Tandoori Cauliflower & Homemade Naan Tacos with Curry Yogurt Sauce & Cilantro-Mint Chutney

Leave a comment

All Photos © Christine Elise McCarthy 2013

To see images of my past posts & get links to the recipes – look on my Pinterest board – HERE.

~

All my posts now have a VERY customizable PRINT & PDF option.  Create a PDF & save the recipe to your computer or print it out.  It offers a “remove images” option & you can delete any part of the post you do not need before printing.  The button is below by the Twitter & Facebook links.

~

Image

OK – these guys are pretty delicious but I found them impossible to photograph in a way that made them look as good as they tasted.  Please forgive the loser imagery & trust that these taste FAR better than these photos might lead you to believe.

I attempted tandoori cauliflower once before & it was a total failure.  It was FAR too heavily spiced & undercooked & just the worst.  This recipe was a great success.  I even found myself eating the leftovers cold, right out of the container.  And avocado might seem an odd addition but I found it added a lovely & mellow creaminess – as did the curry sauce – so I recommend using both.

The naan I made was thicker than I would like but that was because my dough was too tacky (I should have kneaded more flour into it) & kept sticking to the rolling pin.  I used the recipe HERE in this youtube tutorial.

My other issue is that the pan got too hot & burned the naan a bit.  I think I needed to have used a non-stick pan.  That said, it was damned tasty & I used naan as hotdog buns for the next few days.  Still, store-bought naan (like they sell at Trader Joe’s) would be fine if the idea of making it is overwhelming.  And – if making the tandoori sauce sounds like a pain in the ass – use a store-bought brand of that, too!   Some of my photos show a little side of the cilantro-mint chutney and some jarred Trader Joe’s mango chutney.

Image

Image

Image

Image

Homemade Naan

INGREDIENTS

2 cups flour

2 TBS melted butter

2 TBS yogurt

1 TBS minced garlic

1 tsp baking powder

Salt to taste

Water as needed (probably less than a cup)

Chopped cilantro – optional

DIRECTIONS (watch the video if the links are still good)

In a large bowl, blend the dry ingredients.  Add the butter, yogurt & cilantro & mix.  Then slowly add water until a dough forms.  Knead it fr several minutes, adding flour or water as needed until you have a soft dough that is no longer tacky.

Image

Wrap it in plastic wrap & let rest for 30 minutes or more.

Image

Break off golf ball-sized chunks & roll out (on a floured surface) to your desired size & thickness.

Heat a dry pan (a pan with a cover) until very hot.  Dampen a naan & drop damp side onto hot pan & dampen the other side.  Cover the pan & cook a minute or so or until it begins to bubble a bit.  Turn & cook the other side.

ImageImageImage

There you have it!  But – watch her video for a clearer tutorial.

Image

Image

Curry Yogurt Sauce

INGREDIENTS

1/2 cup yogurt

2 tsp curry powder

1 tsp salt

juice 1/2 lime

1 tsp rice wine vinegar

1 TBS mayonnaise

DIRECTIONS

Blend well.

Image

Cilantro-Mint Chutney

INGREDIENTS

1 1/2 cup cilantro

1 cup fresh mint

1 TBS minced ginger

2 scallions – chopped

2 garlic cloves

2 jalapenos (red is prettier but green will do) – seeded

1 TBS olive oil

1/2 tsp honey (or sugar)

Image

DIRECTIONS

Puree in a food processor.  You can adjust the flavors here – if you feel it needs more mint or cilantro or honey or salt – or even more jalapeno.  I added some water to thin it out.

Image

Tandoori Cauliflower

INGREDIENTS

Cauliflower – broken into small florets

1 cup yogurt

1 1/2 tsp ground cumin

1 1.2 tsp garam masala

1/2 tsp ground coriander

1/2 tsp turmeric

1/2 tsp chili powder

4 garlic cloves – minced

2 tsp ginger (fresh or jarred)

juice of 1/2 lemon

Red food coloring (optional) – just a drop or two

AS TACO GARNISH

Avocado – sliced (optional)

Red onion – sliced very thin

Cilantro – chopped

DIRECTIONS

Heat the oven to 400 degrees.

Blend all the ingredients except the cauliflower (and not the avocado or red onion or extra cilantro).  When well blended – add the cauliflower & allow to marinate for an hour.  The red food coloring is totally unnecessary but it does give that distinctive color.  It gets EVERYWHERE – so be careful.

ImageImage

Roast the cauliflower for 20 minutes or until tender.  Little blackened edges are OK!

Now – simply assemble your tacos.  Naan topped with tandoori cauliflower & then red onion, avocado, some curry yogurt sauce & cilantro.  Serve with cilantro-mint chutney and/or mango chutney.

ImageImage

Image

Red Curry Grilled Shrimp with Spicy Thai Fried Cauliflower “Rice” (Low Carb, Gluten Free & Paleo)

Leave a comment

All Photos © Christine Elise McCarthy 2013

To see images of my past posts & get links to the recipes – look on my Pinterest board – HERE.

~

All my posts now have a VERY customizable PRINT & PDF option.  Create a PDF & save the recipe to your computer or print it out.  It offers a “remove images” option & you can delete any part of the post you do not need before printing.  The button is below by the Twitter & Facebook links.

vromans front

vromans back

~

Image

This recipe is easy & guilt-free.  The “rice” is actually just grated cauliflower & the veggies can be customized to suit your tastes or to reflect whatever vegetables you have handy.  I know paleo is all the rage but I am not 100% clear on which vegetables are on the “no” list – but I am pretty sure this is paleo.  If NOT – please write me & tell me why, OK?

The key to this is a pre-made red curry.  I bought this little far at my local Gelson’s.

Image

Asian stores have little cans of them like these that I buy at Bangluck Market.

Image

If you can’t buy it made, I am sure there are recipes out there on Pinterest or Google that will show you how to make a red curry paste from curry powder.  Having to make the paste sort of eliminates the ease I am professing about this recipe, though, so keep that in mind.  Try to buy it already made.

That said, I must insist that you try cauliflower “rice” at least once.  In a stir fry, you can hardly tell it isn’t rice & it is so much better for you!

Image

Red Curry Grilled Shrimp

INGREDIENTS

Skewers (optional)

Shrimp (about a pound)

1/4 cup olive oil

1 tsp sriracha

1/4 cup lemon juice (fresh squeezed, if possible)

3-4 TBS red curry paste

2 TBS rice vinegar

4 garlic cloves – minced

3 scallions – sliced (reserve some for garnish)

Image

DIRECTIONS

Soak skewers (if using) in water for at least 30 minutes to help keep them from burning).

Peel & clean the shrimp.

In a bowl, blend the oil, sriracha, lemon juice, curry paste, vinegar, garlic & scallions.  Reserve some to use as garnish later (maybe 1/3 cup) and then put the rest in a Ziplock bag or other container & add the shrimp & mix it all about.  Marinate the shrimp for at least an hour or as long as overnight.

ImageImage

When ready to grill the shrimp, either on a grill or in a grill pan, skewer the shrimp (two skewers make it easier to flip the shrimp) & grill for about 2-3 minutes each side or until done.  Serve with the spicy Thai fried cauliflower “rice” (below) and drizzle with extra red curry sauce & garnish with scallion slices.

ImageImage

Image

Spicy Thai Fried Cauliflower “Rice”

INGREDIENTS (use or don’t use or substitute according to your taste)

1 medium head cauliflower

Olive oil

10 green beans – trimmed & chopped

4 jalapeno peppers (red or green) – seeded & diced

1 cup brocoli florets

2 carrots – chopped

1 bell pepper – chopped

1/2 red onion – diced

1 cup peas

4 mushrooms – cliced

2+ TBS red curry paste

2 TBS soy sauce

Eggs – to scramble into rice (optional)

Thai (or other) basil – chopped

Chopped peanuts and/or sliced scallions and/or sliced cucumber and/or lime wedges – as garnish

Sambal oelek, sriracha or chili garlic paste to add kick – if you desire.

Image

DIRECTIONS

With a hand grater or with the grating blade of your food processor – grate the cauliflower & set aside.

Image

Whisk the soy sauce & red curry paste together & set aside.

Image

Prepare your veggies.

Image

Heat some olive oil (1-2 TBS) in a wok or very large pan.  I threw all the veggies in at once.

Image

Once they were tender, I added the red curry & soy sauce mix.

Image

Then I added the cauliflower.

ImageImage

After about 5 minutes, I created a well & added two egs & scrambled them in the well.  When nearly done, I mixed them into the rice & vegetables.  I then added chopped basil.

Serve with chopped peanuts or scallions and maybe a lime wedge & some sliced cucumber.  Serve with the red curry grilled shrimp.  I have no photo of them together as my phone battery died.  Sorry!  I can promise – this is one yummy disj – especially with copious amounts of sambal oelek dumped upon it!

Image

Spicy Lemongrass Grilled Shrimp & Vietnamese Egg Roll (Cha Gio) Vermicelli Salad Bowl

1 Comment

All Photos © Christine Elise McCarthy 2013

To see images of my past posts & get links to the recipes – look on my Pinterest board – HERE.

~

All my posts now have a VERY customizable PRINT & PDF option.  Create a PDF & save the recipe to your computer or print it out.  It offers a “remove images” option & you can delete any part of the post you do not need before printing.  The button is below by the Twitter & Facebook links.

~

Image

I’ve loved Vietnamese food since high school when my parents & I would go to the Saigon Inn in the Combat Zone (red light district) in Boston in the late seventies-early eighties.  It was a tiny place on the edge of Chinatown in an old, white, free-standing building that had once been a White Castle or something.  There were 4 or 5 tables and maybe six stools at a counter & everything on the menu was under $4.  It is here that I learned about hoisin sauce & sambal oelek & vermicelli bowls and about eating their little egg rolls (cha gio) wrapped in lettuce leaves & dipped in nuoc cham (sweet chili dipping sauce).  We would go there late nights after seeing bands like Bauhaus or X or Gray Numan somewhere in town – like The Channel or The Rat.  And I walked around looking like this:

dhgn fgh just for laffs 3

My parents long bragged that they loved the Saigon Inn so much that even the discovery of a cockroach in my step-dad’s half-consumed iced coffee did not dull their passion for the place.  In fact, that roach should have come as no surprise as this restaurant was situated in one of the filthiest & most run down areas of downtown (Chinatowns everywhere are seldom famous for their hygiene & fresh scents – and red light districts have their own grotesquerie to offer).  Also, the roaches at Saigon Inn were bold & you were hard pressed to eat there & not spot a few walking nonchalantly up walls or across menus.

As a quick aside, let me share this gorgeous photo I found as I hunted for a shot of the Saigon Inn.

Image

Boston, Combat Zone 1970 – by Jerry Berndt.  Found HERE.  Isn’t that sensational?

This one, too, by the same guy.

Image

And this (though I do not know if it is from the same guy or exhibition in Boston).

Image

So – with that, I present my Spicy Lemongrass Grilled Shrimp & Vietnamese Egg Roll (Cha Gio) Vermicelli Salad Bowl!

Image

A key to this dish is the dipping sauce – the nuoc cham (or spicy chili dipping sauce).  If you cannot find it in an Asian store like this

Image

then there are lots of recipes for variations of it, if you Google the term.  Here is the basic recipe (from www.VietWorldKitchen.com):

Basic Dipping Sauce (Nuoc Cham)

Makes ¾ cup

3 tablespoons lime juice (1 fat, thin skin lime)
2 tablespoons sugar
½ cup water
2 ½ tablespoons fish sauce

Optional additions:
1 small garlic clove, finely minced
1 or 2 Thai chilis, thinly sliced or 1 teaspoon homemade chili garlic sauce or store bought (tuong ot toi)

1. Make limeade. Combine the lime juice, sugar and water, stirring to dissolve the sugar. Taste and as yourself this question: Does this limeade taste good? Adjust the flavors to balance out the sweet and sour.

2. Finish with fish sauce. Add the fish sauce and any of the optional ingredients. Taste again and adjust the flavors to your liking, balancing out the sour, sweet, salty and spicy. Aim for a bold, forward finish — perhaps a little stronger than what you’d normally like. This sauce is likely to be used to add final flavor to foods wrapped in lettuce or herbs, which are not salted and therefore need a little lift to heighten the overall eating experience. My mother looks for color to gauge her dipping sauce. When it’s a light honey or amber, she knows she’s close.

Notes

Advance Preparation – This sauce may be prepared early in the day and left to sit at room temperature.

Variation – Use half lime juice and half Japanese rice vinegar for a less assertive sauce. Some delicately flavored dishes require this.

Image

The Vietnamese egg rolls can be purchased like this

ImageImage

but these might be hard for you to find.  They are nice because they are tiny – about the size of one of my fingers cut in half.  These are also nice because they are vegan.  But, if you cannot find these you could Google a recipe to make them (traditionally, they are filled with ground pork) or you could just use any old frozen egg rolls of your choice.  If they are big egg rolls, just slice them up after frying.

I added shrimp to this dish because I wanted it to be more substantial & I didn’t want to eat a dozen fried egg rolls.  You could go all shrimp or all egg rolls or even add grilled veggies.   These vermicelli bowls were topped with all sorts of things (sliced meats, meatballs etc etc) at the Saigon Inn, maybe even some things we are glad we are unaware of, so feel free to customize this to your taste.

Image

I had this for dinner two nights in a row.  The first time was less successful because I used fresh vermicelli like this

Image

which got gooey & clumped together.  These guys are far better for soups, like my Vegetarian Pho.

Image

As another side note – if you love that pho but do not want the calories those noodles represent, why not try my ZERO CALORIE ZERO CARB Vegetarian Shirataki Pho?

Image

Last night I made the salad bowl with these dry vermicelli noodles.

Image

They worked far better so I recommend this type for the salad bowls.

Image

Spicy Lemongrass Grilled Shrimp & Vietnamese Egg Roll (Cha Gio) Vermicelli Salad Bowl

INGREDIENTS

Vermicelli noodles – cooked as directed, rinsed in cool water & left at room temperature.

Egg rolls – fried as directed (or baked, if you prefer)

Shrimp – peeled & cleaned

Cucumber – cut into matchsticks

Carrot – grated

Sprouts

Red or green leaf lettuce – roughly chopped (leaving some pieces large enough to wrap around bite-sized egg roll slices)

Basil and/or mint (even cilantro works) – to be hand torn & mixed into the bowl after serving

Lime

Peanuts – chopped

nuoc cham (recipe above or bottled)

Sambal oelek or sriracha – as additional condiments, if you want to add a kick

For the shrimp marinade

1 lemongrass stalk

1 shallot

3 jalapenos – seeded

2 hands full basil (I used both Thai basil & Thai hot basil but any basil will do)

1/4 cup fish sauce

1/4 cup sambal oelek (or chili paste or sriracha)

1 TBS sugar

2 TBS olive oil

4 garlic cloves

Juice of 2 limes

Image

DIRECTIONS

Peel & clean the shrimp & put them in a Ziplock bag or a lidded (preferably glass) container.  Hit the lemongrass with a tenderizer or (as I did) with a heavy pepper mill or something & bruise it up.  Slice it into large chunks & add to the shrimp.

ImageImage

Puree the shallot, lime juice, jalapeno, basil, fish sauce, sambal oelek, sugar, garlic & oil.  Add to the shrimp & toss well.  Refrigerate for an hour or as long as overnight.

Then simply cook the vermicelli.  This is a room temp dish with warm toppings so – make the noodles & assemble them in a bowl(s).  Surround them with the lettuce, cucumber, carrots, sprouts, basil, lime wedges & top with peanuts.

Grill the shrimp & cook the egg rolls.  Add them to your bowl.

Serve with the dipping sauce (you can even pour it on top of the whole lot & mix it all up).

Image

ImageImage

BEER! And other lunch items at Spitz, 3 Dog Cantina, Mission Cantina & Golden Road Pub – in & around Hollywood, California

2 Comments

All Photos © Christine Elise McCarthy 2013

To see images of my past posts & get links to the recipes – look on my Pinterest board – HERE.

~

All my posts now have a VERY customizable PRINT & PDF option.  Create a PDF & save the recipe to your computer or print it out.  It offers a “remove images” option & you can delete any part of the post you do not need before printing.  The button is below by the Twitter & Facebook links.

~

Image

The last time my badass boyfriend, Miles, was in town from Little Rock – it was over 100 degrees nearly every day of his week-and-a-half long stay.  Hot like the temperature recorded on my drive to LAX – in that photo above.

That is the heat reading on one of my two trips to get him at LAX (as his first attempt to leave was thwarted by the total incompetence of American Airlines – a fact that also allowed us a few extra days together so – there’s that).  Driving round trip from Hollywood to LAX is usually unpleasant, at best, but when it is 105 in your house & you have no air conditioning, you find yourself quite content on the 110 south in bumper to bumper traffic – because it is your only access to free AC.  Even the typically irritating fact that you cannot access the carpool lane because you are alone in the car is an inconvenience that rolls off you like the sweat on your own back.  Sweat that has dried & even causes a little chill as you blast the AC into your face so hard that your hair looks like a fright wig at the happy reunion with said beau.

The result of the uncivilized & oppressive & unyielding heat was that Miles & I spent far too many daylight hours in air-conditioned public places – usually ones with bars.  Not jail bars – but “belly-up-to-the” bars.  Bars with friendly bartenders.  Bars serving cold beer & the kind of acidic, unpleasant wine that most bars serve by the glass.   MMMMM!  That’s livin’!

The first time I picked him up at the airport, it was literally 105 in Hollywood so we went directly to Mission Cantina because Miles had a taste for Mexican food & because they serve this Pasadena-made beer – Craftsman 1903 – that I really enjoy.  He got a chicken burrito & I got a couple of fish tacos.

ImageImageImageImage

Everything was delicious.  I’ve written about Mission Cantina before – when Miles & I first went there & then to the Museum of Death.  Here is the interior & outside patio.

ImageImageImage

ImageImage

Our only issue on this day was that they had all their doors wide open & it was only a few degrees cooler in there than the oven just outside the doors.  I had sweat rolling down my legs and when a gal is wearing shorts & sweat runs down her legs – well – does the word “incontinence” mean anything to you?  It isn’t a pretty picture.

So – the next time I picked him up at the airport (an hour after dropping him off there) it was still 105 outside.  So – we decided to try a new place we spotted on our drive back home – Spitz.  I had never heard of it & the exterior gave nothing away as to what we might expect inside.  Here is the inside:

ImageImageImageImage

They had Golden Road AND the Craftsman 1903 – both made locally.  I’m a fussy beer drinker so this pleased me a great deal.  So – Miles & I ordered beers & checked out the menu.

ImageImage

ImageImageImage

Nearly everything on the menu had a carnivorous & vegetarian option!  That is a great thing for me (a vegetarian) & my “all meat all the time” boyfriend.  Unfortunately, neither of us were very hungry so we ordered only the Street Cart Fries which we were promised would be amazing.  And they were!

Image

Somehow, despite being loaded with a lot of damp toppings, these fries remained crispy & delicious.  Then we noticed – MY GOD – it was happy hour!  So I ordered a glass of white wine & Miles got another beer.  The wine was far more drinkable than your average happy hour white & served in a real wine glass AND it was a deep pour.  Suffice it to say, I will be returning to Spitz!

Image

On a hot Sunday, Miles & I staggered in from the heat – and I mean it was Africa hot – to 3 Dog Cantina.  I’d considered the place before but a peek inside revealed it to be MASSIVE & with a sports bar vibe.  Neither Miles nor I can tolerate sports so this place has been on the back burner.  Until that boiling hot Sunday.  We entered 3 Dog Cantina!

ImageImageImageImageImageImage

Promptly seated in one of those huge booths by the window, I checked us in on Four Square because, as I’ve said before, I am a huge dork.  And because, sometimes, you get a little reward.  This check-in rewarded Miles with a free beer!  Bravo!  I ordered this cucumber margarita & it was pretty awesome.

ImageImage

If I’m not mistaken, Miles also ordered a lemonade & a Coke with his beer & they were served in huge Mason jars.

Here is the menu.

ImageImageImageImage

Not a fan of mahi-mahi, I ordered shrimp tacos & Miles got fajitas.

ImageImageImage

ImageImage

The food was great, the room was very pleasant (despite sports on every wall) and it wasn’t crowded so we lingered as long as it took Miles to eat ALL of that chicken – which he did.  A miracle.

On the last full day of Miles’ trip, the temperature dropped into the nineties so I decided we could brave an outdoor meal.  We had been planning to try the Golden Road Brewery Pub and so try it we did.  It was even bigger that 3 Dog Cantina & offered indoor seating, outdoor seating & outdoor games.  Empty, it had the vibe of those massive bars in – like – Ensenada – that cater to college kids.  The sheer optimism of the size of it was intimidating.  Being there when it is crowded must be brutal.  But they had parking & it wasn’t crowded so we pressed on.

Image

ImageImageImageImageImageImage

HERE is the menu.  Far more creative than I have come to expect at pubs.  I ordered the avocado fritters & the banh mi (because I have never seen a veggie one before).  Miles, predictably, got ribs.  And we both got their Point the Way IPA.

Image

ImageImageImage

I’ve had fried avocado before & found it mushy, warm & gross.  THESE were crispy & delicious.

ImageImage

I cannot comment on the ribs but Miles seemed to enjoy them a great deal & he ate ALL of that hunk of cornbread.  I guess southerners like the cornbread crumbly while, southerners say, Yankees like it wet.  As a Yankee, that was news to me – though I am definitely in the “moist with fresh corn added to it” camp.  Miles, if you haven’t figured it out, is a light eater despite the fact that (or maybe because) everything he chooses to eat is heavy.  Meat meat meat.  If it is fried – even better.  “Vegetables” for him include (and are almost limited to) mac & cheese & french fries.  How he stays at 135 lbs at 5’6″ – I will never know.  Especially when you factor in the beer.  By I digress.

ImageImageImage

That is the banh mi.  In fairness to Golden Road – I am not a huge tofu fan.  I don’t dislike it – as in – I will not avoid it but I never add it to anything that doesn’t already include it.  I don’t buy into that whole “Vegetarian?  My god!  How do you get your protein?” bullshit.

ImageImage

So – I found the tofu in the sandwich sort of pointless & replaced it with the fried avocado.  Also, in fairness to Golden Road, they offer a sandwich with the fried avocado.  And the bread was ridiculously awesome.  So, next time – I will get that fried A.L.T. they offer.  And there will be a next time because it was distinctly pleasant to sit out on their big porch & drink their beer & nibble the goodies they offer.

So – there you have it!  Four new joynts to try out – whether you are a degenerate carnivore, a persnickety vegetarian or just an inveterate drunk.  Enjoy!

In closing – here are two completely unrelated but cute little animal posts.  You’re welcome.

ImageImage

Reese’s Brownie Cupcakes with Peanut Butter Frosting & Salted Caramel and Brownie Cupcakes with Chocolate Ganache, Raspberries & Cream

2 Comments

All Photos © Christine Elise McCarthy 2013

To see images of my past posts & get links to the recipes – look on my Pinterest board – HERE.

~

All my posts now have a VERY customizable PRINT & PDF option.  Create a PDF & save the recipe to your computer or print it out.  It offers a “remove images” option & you can delete any part of the post you do not need before printing.  The button is below by the Twitter & Facebook links.

vromans front

vromans back

~

Image

OK, kiddies, it was my friend Alyse’s birthday this week & I hosted a little dinner for her.  And I made CUPCAKES!  I seldom eat dessert foods myself – mainly because I prefer to get my sugar from a wine glass – so I have posted precious few dessert recipes.   But a birthday certainly called for a dessert item so I seized the opportunity.  Please know, I am not part of this whole cupcake craze but cupcakes really are a superior choice for birthdays (in my opinion) as they are a reasonable serving size & you can kinda mix up the flavors a bit more than one can with a cake.  And they travel easily.

For these guys, I had a huge, industrial-sized box of brownie mix:

Image

Then I went to store & bought everything I could think of that I might want to use for brownies including eggs & powdered sugar & cream cheese & pudding & jimmies & sprinkles & raspberries & marshmallows & marshmallow fluff & Reese’s Cups & two kinds of frosting etc etc.   Then I realized I was only feeding four people so there was no need to make 4372 cupcakes.  After some consideration, I elected to make the cupcakes from the brownie mix – and chose to top some with peanut butter frosting & drizzle caramel sauce on them & salt them.  Others – I filled with a marshmallow fluff center & a raspberry inside & atop the chocolate ganache frosting.   Unfortunately – the one cupcake I cut into for the photos had an anemic amount of cream – or maybe the cream was inserted off-center so it is hiding in the photo.

Image

But know – I sent the bulk of these cupcakes home with my friend Rose for her teenage sons & I saw a photo she took of one & the center was creamy, indeed.   Here is that photo:

20130920_211303

All I know is, I injected a bunch of cream in them & then they settled – leaving a gap in their volcano openings – so I rammed a raspberry inside each of them.  Indelicate but delicious!

Image

Reese’s Brownie Cupcakes with Peanut Butter Frosting & Salted Caramel

INGREDIENTS

Brownie mix (be sure to have the eggs & oil you need as per the box)

Reese’s Peanut Butter Cups (I used full-sized)

Caramel sauce (from the ice cream aisle)

Course salt

Peanuts – for garnish

For the peanut butter frosting

1/2 cup peanut butter (I used chunky)

1/2 cup butter (or lard or shortening)

2 TBS milk

1 tsp vanilla

2-3 cups powdered sugar

DIRECTIONS

Make the brownie mix as per box.

For the frosting – blend all but the powdered sugar ( I did this in my food processor).  Then I added the sugar.  Start with 2 cups & test for sweetness.  Add more – if you think it should be sweeter.

ImageImage

To assemble, I lined a cupcake pan with liners, put a tiny dollop of brownie batter to just cover the bottoms, put a Reese’s Cup in each & then topped with more brownie batter.  Bake them according to box instructions.  Then, frost them with the peanut butter frosting.  Drizzle the caramel on them, lightly salt them & top with a peanut.  Put them on the ground and roll around on them naked.

Or serve them to your friends.  Your call.

Image

ImageImage

Image

Brownie Cupcakes with Chocolate Ganache, Raspberries & Cream

INGREDIENTS

Brownie mix (be sure to have the eggs & oil you need as per the box)

Raspberries

7 ounce jar of marshmallow fluff

4 TBS butter

1/4 cup powdered sugar

1/2 tsp vanilla

1 tsp water

1/4 tsp salt

For the ganache

1 cup chocolate chips (dark chocolate is nicer but I used semi-sweet milk chocolate)

3/4 cup heavy cream

DIRECTIONS

Make the brownie mix as per box.  Bake them as directed.

To make the cream filling, dissolve the salt in 1 tsp hot water.  Blend the fluff, butter, powdered sugar, salted water, and vanilla.  I did this in my food processor.  I then put this in a Ziplock bag & cut a corner out.  I used this as a make-shift pastry bag.  A real pastry bag would be great, too.

When the brownies are done & cooled a bit, use a paring knife & create little cavities in their centers.

Image

Squeeze some cream filling into each.  Fill to the top & let rest a bit.  If the cream settles – either add more cream or shove a raspberry in there like the killer on Twin Peaks used to shove a tiny letter under the fingernail of his/her victims (remember that?).

ImageImageImage

Over low heat, melt the chocolate chips.  A double boiler is best for this but I was lazy.  I melted them a bit & then just added the heavy cream & whisked it all together.

Dip the cupcakes into the ganache & then top with another raspberry.  Voila!

These are also good to roll around on nude but that can get awkward at a birthday party.  Maybe just stick them all on a tray & serve them the traditional way.

Image

Image

Fig & Gruyere Quesadilla with Balsamic Glaze & Honey or Fig, Spinach & Whipped Goat Cheese Pizza with Honey

Leave a comment

All Photos © Christine Elise McCarthy 2013

To see images of my past posts & get links to the recipes – look on my Pinterest board – HERE.

~

All my posts now have a VERY customizable PRINT & PDF option.  Create a PDF & save the recipe to your computer or print it out.  It offers a “remove images” option & you can delete any part of the post you do not need before printing.  The button is below by the Twitter & Facebook links.

~

Image

I can’t resist figs now when I see them at the store.  They are beautiful to look at and so delicate & versatile – I love them.  But they tend to go bad fast so, when I buy them, I end up eating fig everything.  To extend their shelf life, I put them in a Ziplock baggy & put them in a single layer on a shelf in the fridge.  That seemed to add a day or two to their lifespan.

These are not really recipes.  These are really just suggested ways to use figs.

Image

Fig & Gruyere Quesadilla with Balsamic Glaze & Honey

INGREDIENTS

Flour tortilla

Gruyere cheese – sliced

Figs – sliced

Honey

Balsamic vinegar

DIRECTIONS

Image

Bring some balsamic vinegar to a boil & then reduce to a simmer.  In 20 minutes – my 1/4 cup of balsamic reduced to only one or two teaspoons of glaze – so boil down an appropriate quantity.

Layer the cheese & figs on a tortilla, fold it over & grill it on both sides until the cheese melts & the tortilla browns.

ImageImage

Slice it up & drizzle with honey & the balsamic glaze.  MMMMM!

Image

Fig, Spinach & Whipped Goat Cheese Pizza with Honey

INGREDIENTS

Pizza dough (mine is HERE)

Spinach

Figs – sliced

Mozzarella – grated

Goat Cheese

Cream cheese

Olive oil

Image

DIRECTIONS

To get whipped goat cheese – simple blend goat cheese with some cream cheese at approximately a 2 to 1 ratio, like – 4 ounces goat cheese to 2 ounces cream cheese.  Go heavier with the goat cheese if you want that flavor to be stronger.

Now just roll out your dough, put it on a greased baking sheet and smear some whipped goat cheese on it.  Layer some spinach & drizzle with olive oil.  Add figs & then some grated mozzarella & bake at about 450-500 (be sure the oven is at full temperature before putting pizza in there) for about 12 minutes or until the cheese melts & the crust browns.  Drizzle with honey!

ImageImageImageImage

ImageImage

Creamy Avocado Yogurt Dressing with Lime & Dill

1 Comment


All Photos © Christine Elise McCarthy 2013

To see images of my past posts & get links to the recipes – look on my Pinterest board – HERE.

~

All my posts now have a VERY customizable PRINT & PDF option.  Create a PDF & save the recipe to your computer or print it out.  It offers a “remove images” option & you can delete any part of the post you do not need before printing.  The button is below by the Twitter & Facebook links.

~

Image

This is far lighter than it seems because it is made with yogurt rather than mayo & you can control the amount of olive oil yourself.  The oil is used mainly as a thinner & you could probably even use water instead – if the fat from the oil concerns you.  Beyond that – all you do is stick the ingredients in a food processor or blender & whip them up!   PS – there is no onion in this dressing but the magenta-red looked so pretty – I included that onion in the pictures.

Creamy Avocado Yogurt Dressing with Lime & Dill

INGREDIENTS

1 large avocado -peeled cut into chunks

1/2 cucumber – cut into chunks

6 ounces Greek yogurt

juice of 1-2 limes – depending on how juicy the limes are

1-2 tsp fresh dill

1-2 tsp fresh cilantro (or parsley)

3 garlic cloves

1/3 cup olive oil (more or less – depending on how thin you like your dressings)

S&P to taste

1 jalapeno (optional) – if you like kick

Image

DIRECTIONS

Blend everything except the olive oil in a food processor until smooth.  Drizzle oil in until it reaches the consistency you prefer.  If you want it thinner than 1/3 cup oil makes it – maybe consider adding a bit of water to thin it.  Add S&P to taste.  Adjust lime & dill & cilantro to suit your tastes.

Image

Spicy Orange Cauliflower with Cauliflower Fried Rice (Vegan & Gluten Free)

1 Comment

All Photos © Christine Elise McCarthy 2013

To see images of my past posts & get links to the recipes – look on my Pinterest board – HERE.

~

All my posts now have a VERY customizable PRINT & PDF option.  Create a PDF & save the recipe to your computer or print it out.  It offers a “remove images” option & you can delete any part of the post you do not need before printing.  The button is below by the Twitter & Facebook links.


vromans front

vromans back

~

Image

These recipes are the result of a week-long effort at avoiding carbs.  I am trying to shed a few pounds fast and, since carbs make up most of my regular diet, I thought cutting them out for a bit might get me some quick results.  So far, so good – and I haven’t missed the carbs at all because I have gotten very clever at using cauliflower to masquerade as (among other things) pizza dough

Image

& tortillas (which I also used as mini pizza crusts)

Image

hot dog buns

Image

mashed potatoes

Image

and fried chicken (while chicken is not a carb – it is always off my diet so this recipe pleases me especially).

Image

These faux buffalo wings are pretty great, too!

Image

At any rate – this faux rice made of grated cauliflower topped with spicy orange cauliflower is pretty delicious & nearly guilt-free.  And vegan!  And gluten-free!  And EASY!  So TRY IT and watch your ass lose mass in real time.

Image

Spicy Orange Cauliflower

INGREDIENTS

1 head cauliflower – cut into florets

2 cups orange juice

6 TBS soy sauce

4 tsp ginger

6 garlic cloves – minced

4 TBS Mirin

2 TBS brown sugar

6 TBS sriracha

2 TBS cornstarch

Garnish: sesame seeds and/or scallions and/or chives and/or cilantro

Image

DIRECTIONS

Steam the cauliflower for 5 minutes or roast it (tossed lightly in olive oil) at 425 for about 15-20 minutes.  Test that t is tender but don’t cook it until it gets mushy.  Set aside.

Heat the orange juice, soy sauce, ginger, garlic, mirin, brown sugar, sriracha to a boil.  Whisk in the cornstarch & simmer until it thickens – which should take less than five minutes.  Add the cauliflower & stir to coat.  Set aside on low heat.

Image

Image

Cauliflower Fried Rice

INGREDIENTS

1 head cauliflower

1 small bell pepper (red is prettiest) – diced or slivered

3 carrots – shredded

1 small onion – diced

1 cup peas

1 TBS olive oil

2 TBS soy sauce

1 tsp sesame oil

Image

DIRECTIONS

Grate the cauliflower with a grater or the grater blade of your food processor (a far less messy option).  Set aside.

Heat the olive oil in a large frying pan or wok.  Add the vegetables & saute about 5 minutes.  Add the soy sauce & sesame oil.  Stir to blend.   Once these vegetables are tender – add the grated cauliflower.  Stir to blend.  Test the cauliflower for readiness but it should soften in less than five minutes.

Serve with the warm, orange cauliflower & garnish as you will.  Devour with abandon & laugh at the Gods!

Image

Gluten-Free Spinach Pizza Crust Dough

6 Comments

All Photos © Christine Elise McCarthy 2013

To see images of my past posts & get links to the recipes – look on my Pinterest board – HERE.

~

All my posts now have a VERY customizable PRINT & PDF option.  Create a PDF & save the recipe to your computer or print it out.  It offers a “remove images” option & you can delete any part of the post you do not need before printing.  The button is below by the Twitter & Facebook links.

~

vromans front

vromans back

Hey guys!  I wrote a funny novel!  I hope you will check it out!  www.BathingBook.com

Image

Inspired by the success of my cauliflower tortillas and my earlier cauliflower pizza crust & quinoa pizza crust recipes – I decided to attempt a spinach-based pizza crust.  My issues with this spinach crust are that 1) cooked, it isn’t that vibrant green and, hence, isn’t the prettiest crust I’ve ever seen and 2) that the recipe calls for a full cup of grated mozzarella & and egg which, combined, add about 430 calories or so to the crust itself.  In contrast, the cauliflower tortillas only require 3 eggs which is a total of about 270 calories.  So – if calories are your concern – go cauliflower.  If the issue is gluten & calories don’t matter – then I suggest trying them all because, despite the fact that the spinach crust was a tad higher in calories and was pretty soft as far as crusts go, it was really delicious!  I was surprised at how delicious – because (frankly) it did not look so appetizing.

Image

The recipe is super easy (if you have a food processor) so do not be intimidated.  The spices I added were sort of random so you can either use them or not or go a different way but this version is very tasty!  One thing, though – be sure to use parchment paper because, due to the cheese, this dough can get very sticky.

Image

Gluten-Free Spinach Pizza Crust Dough

INGREDIENTS

2 cups tightly packed fresh spinach (or more)

1 cup packed grated mozzarella cheese (or more)

1 egg

1 tsp each: dry oregano, dry basil, dry parsley, onion powder, garlic powder

S&P to taste

PARCHMENT PAPER (critical)

DIRECTIONS

Puree the spinach in your food processor.

Image

Add the cheese & egg & blend.  Add spices & blend.

ImageImage

Line a pizza pan with parchment paper & press the spinach mix onto it in the shape you want your pizza to be.

Image

Bake it at 425 for about 15 minutes.  Check to be sure it doesn’t overcook.  Mine was thinner in some places & browned a bit too much.

Image

Ideally, only the edges would be browned.

I then lined a second pizza pan with parchment paper & flipped the dough over onto it.

ImageImageImageImage

This step was probably unnecessary as the pizza crust was pretty resilient at the oint and the flipping didn’t result in a crispy result (my aim).  So – feel free to just top the thing without the flipping.  I topped mine with whipped feta (4 oz feta + 1 oz cream cheese plus 1 tsp lemon zest, a tsp water & some pepper – blended in a food processor), sliced tomato, additional fresh spinach, chopped roasted peppers, red onion, grated mozzarella & some fresh mozzarella.  I cooked it at about 350 for 20 minutes or so.  Y.U.M.M.Y!

ImageImageImage

Image

Chicago Veggie Hot Dog Taco on a Gluten-free Cauliflower Tortilla

2 Comments

All Photos © Christine Elise McCarthy 2013

To see images of my past posts & get links to the recipes – look on my Pinterest board – HERE.

~

All my posts now have a VERY customizable PRINT & PDF option.  Create a PDF & save the recipe to your computer or print it out.  It offers a “remove images” option & you can delete any part of the post you do not need before printing.  The button is below by the Twitter & Facebook links.

~

9-13-13 (57)

Another way to avoid carbohydrates!  Cauliflower tortillas!  A traditional Chicago hot-dog would be served on a poppy seed bun & use something called sport peppers.  I didn’t have sport peppers (nor have I ever heard of them) but I did have leftover roasted jalapenos – so I used those.  A real Chicago dog would use white onions – but I had red.  They call for dill pickles – so I used my homemade ones.  Yellow mustard only – no Dijon or other fancy stuff & sweet relish, which I usually hate but I thought it was great on these.  And lastly, it should be sprinkled with celery salt but I discovered that I had none after it was too late.  I loved the result here so much, however, that I am buying celery salt tomorrow & I am going to look for sport peppers.

You could make these using real hot dogs or with a real bun.  But these guys are really satisfying the way I assembled them so, if you eat veggie dogs & wanna go even lighter with them – this is the way to go.

Image

10-13-12-15

24-Hour Easy Refrigerator Dill Pickles

INGREDIENTS

1.5 lbs cucumbers (I used cocktail cucumbers – but you can try any variety you find available) – cut into spears or 1/4″ chips.

8 garlic cloves – 4 quartered, 4 left whole

8-16 sprigs fresh dill

2 TBS coriander SEEDS (not ground)

3 TBS sea (or Kosher) salt

2 TBS sugar

1 1/3 cups white vinegar

water

Jars for containing the pickles

DIRECTIONS

NOTE – these are very garlicky!!!  If you don’t LOVE garlic – cut the garlic back a lot.

In a sauce pan – heat the vinegar & add the salt, sugar & coriander seeds.  Heat, stirring, just until both the sugar & salt dissolve.  Try to get this done before the vinegar gets hot.  If it gets very hot – let it cool before pouring over your cucumbers.

Put your cucumbers in the pickling container (a mason jar, old pickle jar – or other container with a water-tight lid) – with the garlic & the fresh dill.  Pour the vinegar mix over the cucumbers.  Add water to fill the container to the top.  Seal the container & chill in the fridge for at least 24 hours.  Try one.  ENJOY!

These should last in your fridge (in a sealed container) for up to one month.  If they get too vinegary – drain the jar & replace the vinegar with fresh water.

Image

Chicago Veggie Hot Dog Taco on a Gluten-free Cauliflower Tortilla

INGREDIENTS

Hot dogs (heated whichever way you like)

Cauliflower tortilla (or a bun) – toasted or not – as you like

Sport peppers (or roasted jalapenos)

Yellow mustard

Sweet relish

Dill pickle spears

White onions – diced

Tomato – diced

Celery Salt

DIRECTIONS

Layer the cauliflower tortilla (or other tortilla or bun) with the hot dog, mustard, dill pickle spear, onions, sweet relish, tomato & celery salt.  Shove it in your face like a competitive eater.  Smile!

ImageImageImageImageImageImage

Image

9-13-13 (76)

Gluten-Free Cauliflower Tortillas as Goat Cheese, Roasted Pepper & Spinach Pizza or Margherita Pizza

9 Comments


All Photos © Christine Elise McCarthy 2013

To see images of my past posts & get links to the recipes – look on my Pinterest board – HERE.

~

All my posts now have a VERY customizable PRINT & PDF option.  Create a PDF & save the recipe to your computer or print it out.  It offers a “remove images” option & you can delete any part of the post you do not need before printing.  The button is below by the Twitter & Facebook links.

~

9-13-13 (42)

I made these cauliflower tortillas as part of a recent effort to shed a few pounds – quickly.  I am cutting out bread, pasta, white rice, flour tortillas, potatoes – you know – white carbohydrates.  I am on day three of just cutting out those things & have lost four pounds already!  Of course, I lost two of them in just a single, one-hour class at my gym (owned by Billy Blanks siblings – Irene & Michael).  I lost two pounds this morning despite downing a 51 ounce bottle of water during the class.

At any rate, I made these with the plan to make tacos out of them last night but pizza just sounded so much better!  So – little 6″ pizzas it was.

This is really just a simpler variation of my Cauliflower Pizza Crust Dough recipe – but they really are easy & can be used as the basis for pizza or tacos or, as I will show soon, to replace hot dog buns.  One fairly large head of cauliflower produced about six 6″ tortillas.  The toppings I used were sorta random.  I had a bunch of jalapeno, red & orange bell, red jalapeno & poblano peppers that were getting a tad wilty.  I roasted them on the stove top.  You do this right on the burners (or under a broiler in the oven) by just charring the outside completely black.  You then steam them for 5-10 minutes by putting them in a covered container.  Under cool water, rub the skins off & remove the seeds.  Then just store them for later use.

Image

Image

Image

Gluten-Free Cauliflower Tortillas

INGREDIENTS

1 large head of cauliflower

3 eggs

Generous pinches of onion powder, oregano and S&P.

DIRECTIONS

Rice the cauliflower by grating it – either by hand or with a food processor.

Image

Put an inch or two of water in a large stock pot & add the cauliflower.  Bring to a boil & then reduce heat to med-low & simmer, covered, for 10 minutes.  Drain into a colander lined with a kitchen towel & run cold water over it.

ImageImage

Squeeze as much water out of the cauliflower as possible.  The drier you get it, the better!

ImageImage

Mix in a bowl with the eggs & spices.  Line a baking sheet with parchment paper & press the mixture into little tortillas about 1/4′ thick or thinner.

Bake in an oven pre-heated to 375 degrees for 10-12 minutes & then flip & repeat.

ImageImage

Cool on a wire rack so they do not steam themselves & get soggy.

ImageImage

I made two mini-pizzas from these guys by baking them (with toppings) at about 425 for about 10-15 minutes (or until cheese is bubbly & melted).  One was topped with:

Spinach

Goat cheese

Sliced tomato

Chopped roasted peppers

Crushed red pepper

and the other was simply – Margherita using:

Sliced tomato

Mozzarella

Crushed red pepper

Chopped basil as garnish

Image

Zucchini Squash Blossom & Saffron Pesto Pasta with Cauliflower

2 Comments

All Photos © Christine Elise McCarthy 2013

To see images of my past posts & get links to the recipes – look on my Pinterest board – HERE.

~

All my posts now have a VERY customizable PRINT & PDF option.  Create a PDF & save the recipe to your computer or print it out.  It offers a “remove images” option & you can delete any part of the post you do not need before printing.  The button is below by the Twitter & Facebook links.

~

9-11-13 (55)

I love me some squash blossoms.   They are just so pretty & elegant and the fact they are seasonal & so hard to come by makes them all that much more exotic & satisfying to use.  They have only the slightest hint of flavor, though.  Less even than my latest other favorite ingredient – saffron.  Saffron is also rare – in fact – I believe it is the most expensive spice in the world when priced by the pound.  Saffron is also pretty & delicate & elegantly flavored.  So, I thought, why not marry the two in a recipe?  This pesto is as easy as any other, assuming you have some kind of food processor or blender.  I didn’t use garlic as I thought it might overwhelm the other flavors and, as it turned out, I found that the Parmesan I used ended up being the most powerful taste.  Still, this is a pretty & easy & quite yummy.  And it is a great way to use squash blossoms that might no longer be in the peak of their glory (as in – been in the fridge a few days).  Like these:

Image

I added cauliflower to the dish because 1) it, too, has a lovely & delicate flavor and 2) it lightens up a pasta dish with all its bulky, veggie goodness.  Feel free to leave it out or even to use only cauliflower & leave out the pasta.   Also – I used whole wheat spaghetti but any pasta (or risotto) would work.

ImageImage

INGREDIENTS

1/2 pound dry pasta

1/2 head cauliflower – cut into florets

15 (or so) squash blossoms (plus extra chopped up for garnish)

1/4 cup almonds (about 30) or other nut (pine nut, walnut, pecan)

3 TBS saffron liquid (or a generous pinch steeped in 3 TBS warm water)

1/4 cup finely grated Parmesan

1/3 cup olive oil

1/4 tsp crushed red pepper (optional) – (I used more but I feel I overdid it.)

Image

DIRECTIONS

Remove the pistils from the centers of the squash blossoms & then wash them.  Separate a few to chop as garnish.

Image

Toast the nuts in a dry pan for about 2-3 minutes or until they are fragrant.  Be careful not to burn them.  Blend the blossoms, nuts, saffron water, & cheese in a food processor or blender.  Add the crushed red pepper (if using).  Drizzle in the olive oil.  You might need to scrape the sides of the work bowl a few times.

Image

Cook the pasta according to directions – adding the cauliflower florets for the last 5 minutes.  Drain & toss with the pesto.  Garnish with chopped squash blossoms and/or chopped basil or parsley or a tad more crushed red pepper or Parmesan.

9-11-13 (90)

Spicy Extra Crispy Southern Fried Chicken & Fireball Cinnamon Whiskey

5 Comments


All Photos © Christine Elise McCarthy 2013

To see images of my past posts & get links to the recipes – look on my Pinterest board – HERE.

~

All my posts now have a VERY customizable PRINT & PDF option.  Create a PDF & save the recipe to your computer or print it out.  It offers a “remove images” option & you can delete any part of the post you do not need before printing.  The button is below by the Twitter & Facebook links.

~

vromans front

vromans back

Image

Ok, well, I haven’t eaten chicken since the late eighties & I have never made fried chicken.  I did make a cauliflower version – my Spicy Southern Fried Cauliflower and Delta Dipping Sauce with Smashed Baked Potatoes and White Gravy and Buffalo Mac & Cheese.  I loved it!

Image

But my chicken-loving boyfriend, Miles, was in town this week & I had promised him for months that I would make him fried chicken on this trip.  So – we went to the amazing Super King and bought 2.5 pounds of chicken for under $4.  I got two breasts & two drumsticks.  After breading & frying, one of those breasts weighed in at 14 ounces!  That is nearly a pound of fried chicken in just one piece.  The drumsticks weighed about 8 ounces after breading & frying.  That amount of chicken could feed 4-6 people.  Crazy.

Anyway, I was somewhat intimidated to make this dish, primarily because Miles is a very picky eater & because I couldn’t try it myself to test its worthiness but – a promise is a promise – so I did it.  And I think it was a huge success!  It came out golden on the outside, moist on the inside & was very crispy.  I was dying to eat it myself but I had my fried cauliflower & Delta dipping sauce with which to console myself and console myself I did.

I included a bottle of Miles’ new favorite sipping whiskey in some photos because the bottle is pretty & because it really was what Miles washed his chicken down with.  That & a Bud Light.

Miles’ contribution to the meal can be seen in the frame with the whiskey – little bowls of the spiciest, pan-fried red potatoes.  They were little bowls because both of us kept sneaking bits out of the pan every time we went near it & pretty much devoured the lot before the chicken was ready to serve.

The Delta dipping sauce is really a spicy Thousand Island dressing but it is delicious & I strongly suggest you try it – even on a salad.  That way – you can maximize the fat intake of a single meal.  🙂  Fuck it.

Image

Spicy Extra Crispy Southern Fried Chicken

3 lbs chicken

4 eggs

1/3 cup water

1 cup Frank’s Hot Sauce (or other hot sauce)

4 cups flour

2 tsp cayenne pepper

2 tsp each of S&P

2 tsp chipotle chili powder (or smoked or regular paprika)

2 tsp garlic powder

Lots of vegetable oil for frying

1 gallon zip lock baggy (not necessary but it makes life easier)

1 quart buttermilk

1 tsp each – salt, pepper & garlic powder

DIRECTIONS

Put the chicken pieces in a container & cover with buttermilk.  Marinate them like that in the fridge for a few hours.

Blend the eggs, hot sauce & water in a deep bowl.

Blend the flour, cayenne, S&P, chili powder & 2 tsp garlic powder in a Ziplock bag or a deep bowl.

When ready to cook the chicken, remove it from the buttermilk & sprinkle with S&P and garlic powder.

Image

Heat a lot of oil (I used enough that I could completely submerge a breast & drumstick – and cooked the chicken in two shifts) over medium heat.  MEDIUM HEAT.  If you have a kitchen thermometer – the oil should be 350 degrees.  I do not have one.  If you do not have one either – simply put the end of a wooden spoon or chopstick in the oil to test it.  When it reaches 350, little bubbles will creep up the wood.

Put the chicken in the flour mixture & completely coat it.  Then, dunk it in the egg mixture & coat it again & then back into the flour mix.  The crust should be fairy thick.  Then fry those bitches up!

Image

My pieces took 20-25 minutes to cook but that was because they were Flintstone-style gigantic hunks of chicken.  Normal pieces should cook in 14-18 minutes.  If the chicken seems to be browning faster than the inside is cooking – lower the heat.  Drain on paper towels.

Image

ImageImage

For the Delta dipping sauce

1/4 cup mayonnaise

1 tsp lemon juice

1/8 cup vegetable oil

1/8 cup sambal oelek (or other chili sauce)

1/8 cup ketchup

1/4 tsp paprika

1/4 tsp pepper

1/2 tsp onion powder

1/4 tsp mustard

1/2 tsp Worcestershire sauce

2-3 dashes hot pepper sauce (Tabasco or another brand)

1 garlic clove – minced

DIRECTIONS

Blend together & chill.

9-10-13 (6)

Bringing Back the Two Martini Lunch at Traxx & Pizzeria Mozza

4 Comments

All Photos © Christine Elise McCarthy 2013

To see images of my past posts & get links to the recipes – look on my Pinterest board – HERE.

~

All my posts now have a VERY customizable PRINT & PDF option.  Create a PDF & save the recipe to your computer or print it out.  It offers a “remove images” option & you can delete any part of the post you do not need before printing.  The button is below by the Twitter & Facebook links.

~

So – my badass boyfriend & I celebrated an anniversary of sorts this week & decided to celebrate it several times.  Here is my badass boyfriend (photographed by his brother, Josh Miller):

Image

The bad news for us this week, however, was that it was (and remains) over 100 degrees every goddamn day.  And my home is not air conditioned.  So – rather than sweat to death & stew in our own filth waiting for evening to come & cool us down – we opted to eat fancified lunches in fancy places with delightfully cooled environs & get our day drinking on!

Our first celebration happened at what I often refer to as my favorite Los Angeles restaurant – Traxx – located inside Union Station downtown.  In the interest of minimizing our drinking & driving vulnerabilities, we took the train downtown.  That isn’t as easy as it might seem, however.  The fucking automated ticket seller machines are intimidating, confusing & really fucking impatient!  I speak English, read it fairly well & have lived in L.A. since 1984.  Buying a ticket for a ride on the public transit system ought to be easy.  It isn’t.  They are not clear about what the fare actually is or how to just buy all the fares you need for a day all in one go.  And if you take longer than 15 seconds to proceed at each of the several steps – the machine cuts you off & puts you back to one.  Step one – that is.  It warns you that your time is nearly up, which got me super flustered & panicky and then it just cuts you off.  Same thing with payment.  Don’t get that card in there fast enough or deep enough?  Oops!  Too bad.  Back to one.  THANK GOD it was noon on a Tuesday & there was no line of cranky & more savvy commuters behind me or I would have just given up & gone home.  I nearly did that, anyway, as I felt more & more stupid – with Miles watching me prove to be completely incompetent.  Just as I was on the verge of simply collapsing on the station floor & assuming the fetal position in utter humiliated defeat –  the fucking machine spat out a plastic “Tap” card.  Now – the last time I rode the train, the tickets were paper & you swiped them through a slot in the turnstile – like you do in NYC.  Unless they changed it there, too.  Now – you need to literally tap the plastic card on a large button on the turnstile.  See here – another hapless victim – spirit obviously completely broken by the strident & cruel Tap card dispensing machines (image stolen from Google).  Look at the slump of her shoulders – the near-tears expression on her face.

Image

And now she has to face this shit:

ImageImage

It’s not OK.  Really not OK.

Somehow – I managed to tap my way through the gauntlet but when I handed the card back to Miles to tap (as I had paid for four fares – to get each of us round trip) – it wouldn’t work.  I was beginning to feel like we would not only never leave this Hellywood subway station – but that Miles & I would never again be on the same side of the turnstiles.  I felt a flash of regret for my foolish confidence & my reckless failure to pack food & water for our ordeal.   Not even a power bar.  Nothing.

Eventually, some kind Metro employee took pity on we two confused & broken travelers & let Miles through a gate.  But seriously – it shouldn’t be this hard to buy an Uzi or to adopt a child from Malawi – let alone simply commute to a different neighborhood via public transportation.  WTF?

At any rate – here are two shots of the train station.

Image

Image

I have others but – whatever.  Let’s move on.

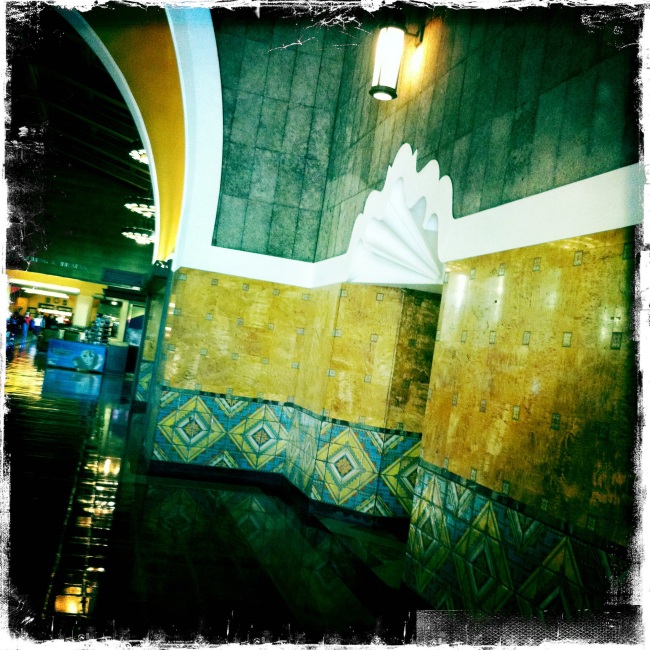
About 20 minutes later, Miles & I stepped into the gorgeous Union Station.  Here are some half-assed pictures of it.

ImageImageImageImageImageImageImageImageImageImage

Very quickly thereafter – we were seated at Traxx & handed menus.  Look at the pretty embroidered leather chairs.

ImageImageImage

And while we did not order martinis – we did order this bottle of wine.

Image

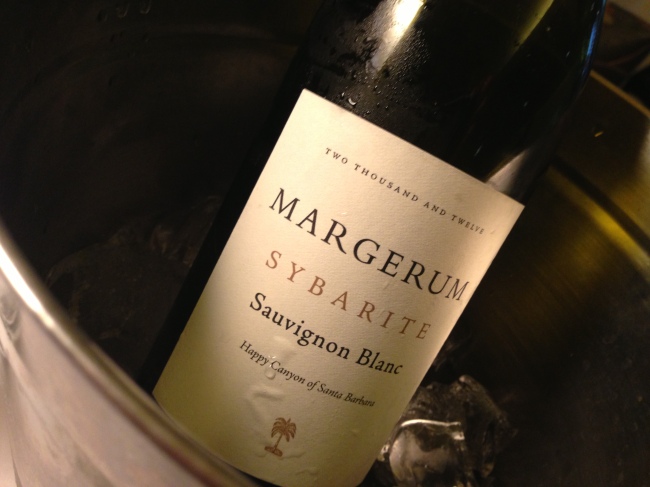
Happy Canyon, indeed.

Happier yet – me & Miles – eating these outrageously delicious saffron mussels!

ImageImage

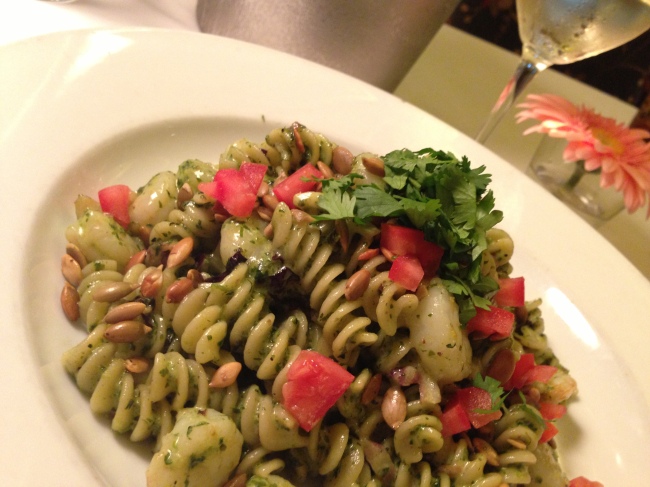
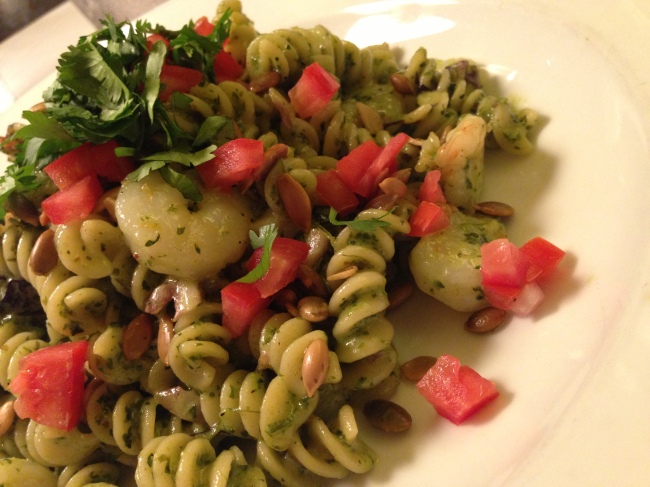
Miles ordered a hanger steak & I got a fusilli with rock shrimp & some sort of pumpkin seed pesto.  YUM!

ImageImageImage

Lunch completed, full & pleasantly plied with wine, we braced ourselves for the horror of trying to get through the turnstiles again.  This time, I let Miles go first & it worked!  He got through without a hitch!  He handed the card back to me and, timidly, I tapped the thing & looked nervously up at Miles.  Nothing.  No green light.  Denied!  I tried again.  And again.  Nada.  Finally, an attendant approached & asked why I was such a retard.  Not really – but he did approach & inquire as to what my problem was & with a noticeable hostility.  I explained that Miles had tapped the card & that there should be one more fare left on it.  After all – I had paid $7 for the card which, I thought, meant 4 fares of $1.50 plus a $1 service fee (which is bullshit, if you ask me).

“You have to have your own card!” he said, looking at me as if I smelled of fecal matter.

“But I bought four fares.  So we could each go round trip…” I said, but even as I stammered the words, I could feel my ire rising.

“You need your own card!” he said again with utter contempt & then threw a suspicious look at Miles.  I was inclined to scream at Miles, “Run!  Save yourself!  There is no longer any hope for me!  But you can still make it back – and tell the others my story!”

But I didn’t.  Instead, I said, “That is bullshit.  I paid for four fares.  Who cares how many cards are involved?”

This got me led to the subway equivalent of the principal’s office – which was a speaker on the wall with an intercom button.  The surly attendant pushed the button & then said “Tell her!”

“Can I help you?” – asked a tinny voice from beyond.  I scanned the perimeter of the ceiling for a camera that might provide this voice with secret prying eyes.

“Yes.  I paid for four fares.  I want to use them…”

“You need your own card,” she said, cutting me off.

I scanned the ceiling & corners again.

“But I already paid for…”

“I can’t help you!” she said with finality – again cutting me off.

I looked at the smug pig fuck of the attendant guy standing there as he stared back at me with “I told you so” satisfaction.

I decided he was beneath contempt & treated him only to a sound of disgust before I stormed over to the evil wall ticket vending machine.  $2.50 later ($1.50 fare plus $1 fee.  Grrrrr!) – I re-approached the turnstiles only to see Miles on the other side getting the shake down from a bitchy female attendant.

“You can’t stand here, sir!  Move along!”

“He is waiting for me!” I said, hoping she could hear the “don’t fucking push me or I will be forced to kick your fat ass” in my tone.  I like to think she did, because she cut her eyes at me sidelong but then thought better of a verbal response.  Instead, she opted to shuffle away, back to her secret cave with its all-powerful intercom & secret camera vision.

After that ordeal and once again safely above ground in Hollywood – we decided another drink was in order & treated ourselves to a cocktail at the W Hotel.  I decided not to order the TWENTY-FOUR DOLLAR drink on the menu and, instead, ordered a Moulin Rouge (Prosecco, gin & something else with cayenne pepper floating on top) for the bargain basement price of $15.  Miles got a concoction for the same price which had about 2 inches of muddled raspberries on the bottom.  He spent a lot of time chewing his drink.  I’m not sure that is really the point of a cocktail but at least we were not at the mercy of the subway any longer.

ImageImage

The next day, we decided to beat the heat & continue the celebration at the much lauded Pizzeria Mozza.  We made a noon reservation.  When we pulled up there at noon, we saw a line already formed outside of folks waiting for the place to open.  Within twenty minutes of the doors opening, every single seat in the house had an ass in it.  Every seat at the bar, at the pizza bar & at every table – filled.  Impressive for 12:30pm on a Wednesday.

ImageImage

The only tables that remained available were the ones in a cutie little side room with a wine cellar in it.

Image

I immediately checked in at Pizzeria Mozza on FourSquare (because I am a giant dork) & was informed that I had unlocked a special!   A free glass of Prosecco.  Yes, please!   I indicated this to our waitress & was promptly served a $14 glass of bubbly.
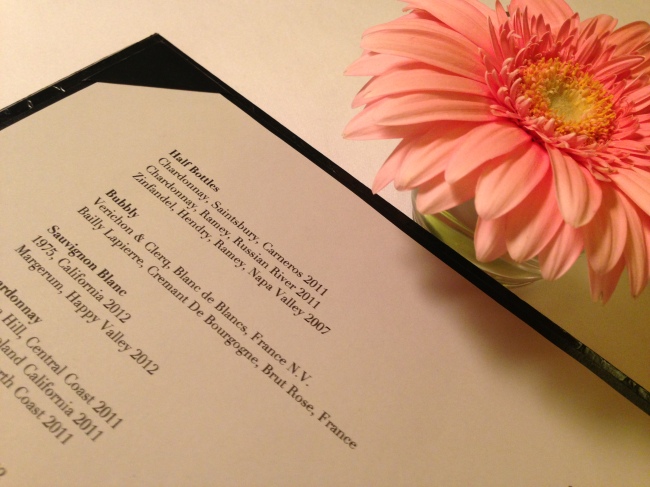
Here is the menu.

ImageImageImage

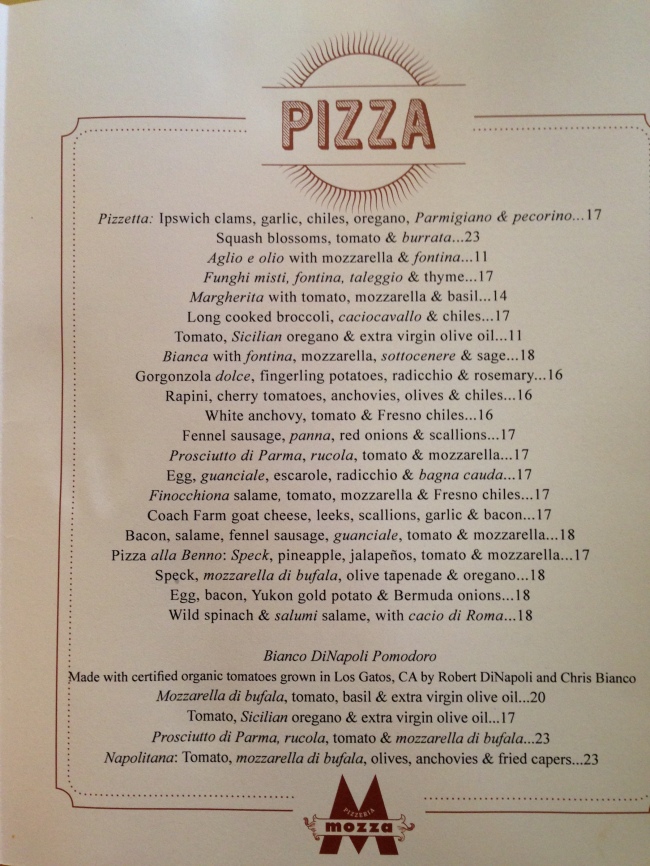
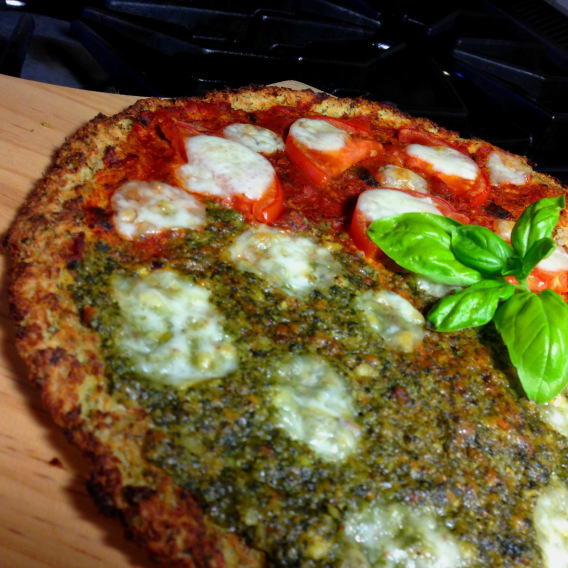
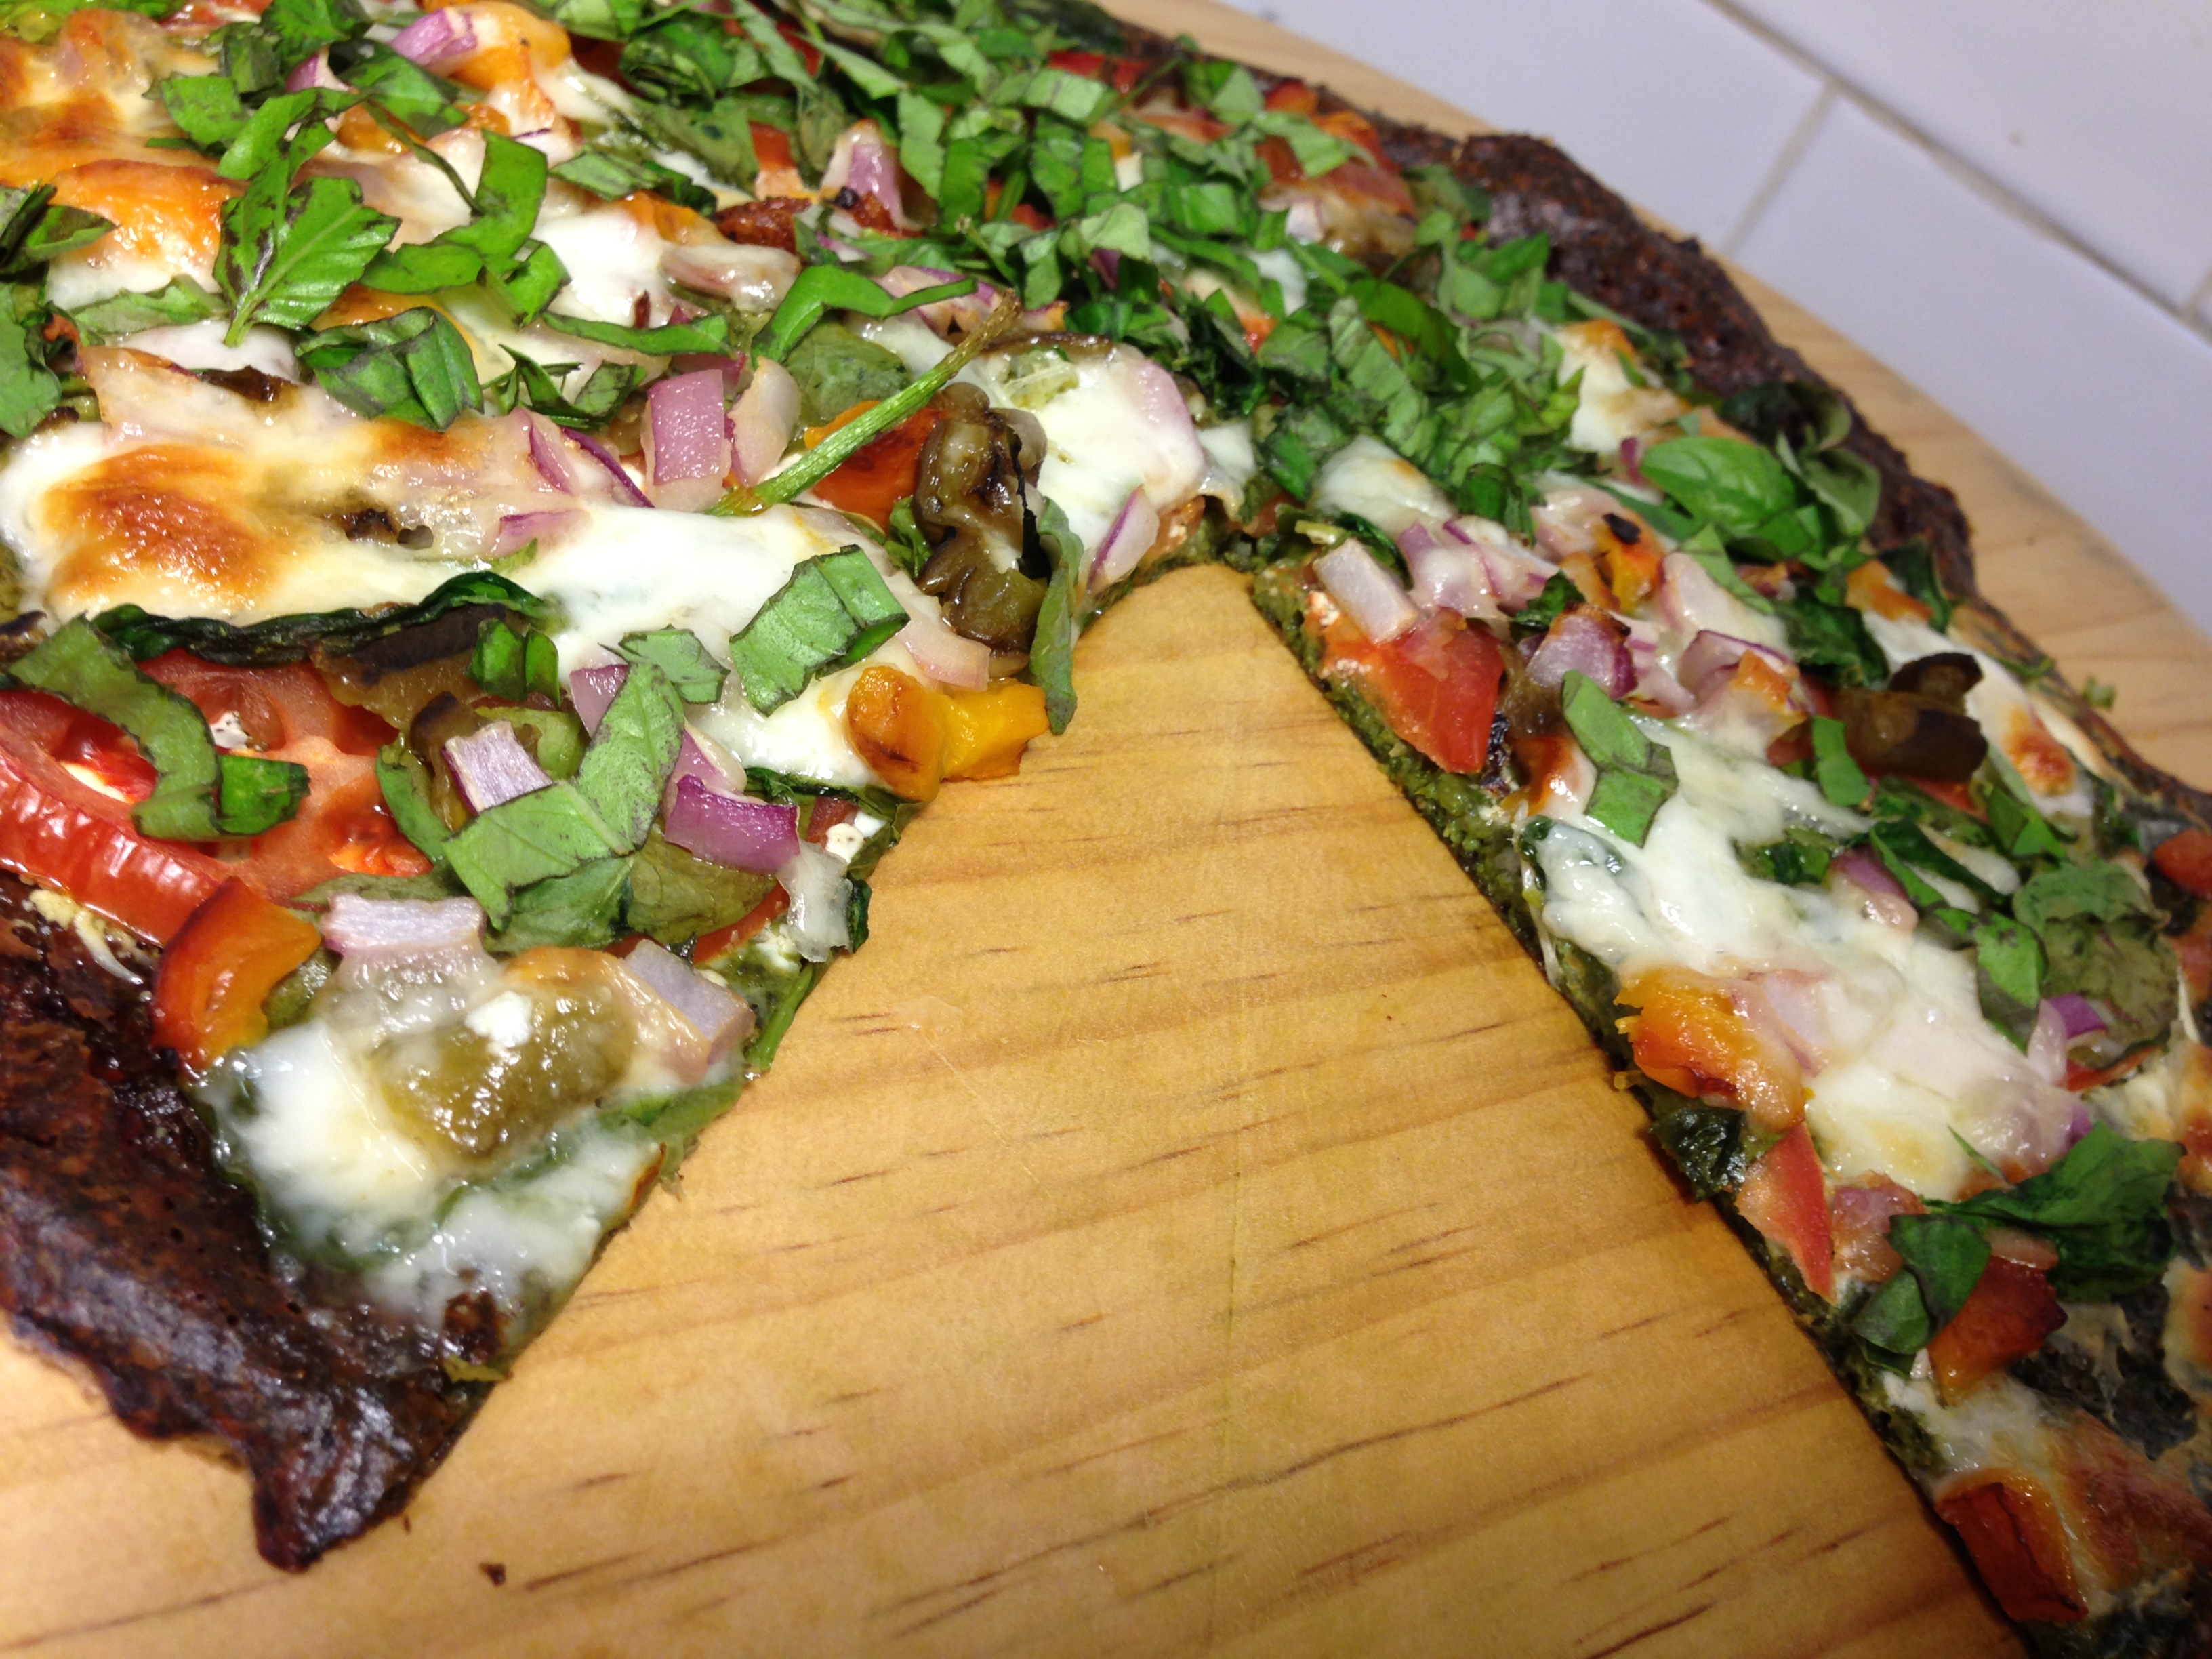
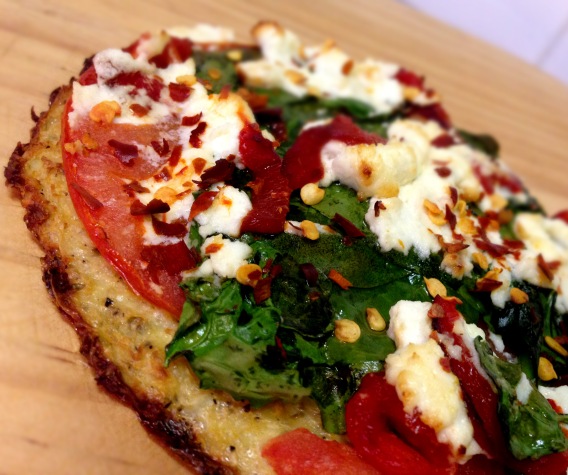
I considered myself fairly close to fluent in restaurant Italian but Pizzeria Mozza proved me woefully wrong.  I had to look up lots of words on that menu before we could order.  But order – we did!  We opted to try mussels because the ones at Traxx had been so great.  Miles ordered the chopped salad (that seemed to appear on every table) and we each got a pizza.  He ordered that bacon & salame one & I got the $$$ squash blossom pizza with burrata.   Here is the pretty food.

ImageImageImageImage

We both enjoyed the spicy mussels but agreed the ones at Traxx had been superior – primarily because the ones at Pizzeria Mozza that day were teensy-weensy – and because that saffron mussel broth at Traxx had been like crack.

The salad was yummy but, like most chopped salads, had meat in it so I had to pick around a bit.

The pizzas, however, were (predictably – given the reputation of the place) awesome!  Miles declared his pizza the best sausage pizza he had ever had (with golf ball-sized hunks of meat on it).  My squash blossom pizza had cool burrata atop it & it was incredible.  Plus – neither of us could eat more than half or our pizzas so we got to take some home.

So – two drinks later & pizza boxes in hand – we departed Pizzeria Mozza delighted by the experience.  And grateful to drive home & avoid the ugly bowels of the Los Angeles subway system.

Image

Spicy Honey Chipotle Homemade BBQ Sauce & Golden Road Beer

3 Comments

All Photos © Christine Elise McCarthy 2013

To see images of my past posts & get links to the recipes – look on my Pinterest board – HERE.

~

All my posts now have a VERY customizable PRINT & PDF option.  Create a PDF & save the recipe to your computer or print it out.  It offers a “remove images” option & you can delete any part of the post you do not need before printing.  The button is below by the Twitter & Facebook links.

~

This is pretty straight forward.  I used this on a bunch of chicken drumsticks that I barbecued over the weekend for my carnivorous boyfriend & some other guests.  They looked like this (the drumsticks – not my guests):

Image

And they smelled so good – it was all I could do not to just quit this pescatarian business & devour a few of those bad boys.  The BBQ sauce is genuinely spicy & could be used any way you might use such a thing – or maybe even mixed into some potato salad or something.

The beer in this photo here

Image

is by a local Los Angeles brewery called Golden Road & it is delicious!  See – the cans are all marked with the date they were canned?  I once had a beer from there that was only a day old.  There is a pub, too, with vegan & other bar food.  I will definitely be going there soon so I can report back.

Image

Spicy Honey Chipotle Homemade BBQ Sauce

INGREDIENTS

1 small onion – diced

olive oil

4 garlic cloves – chopped

3 TBS brown sugar 3/4 cup ketchup

1 TBS molasses

1/4 cup honey

2 TBS apple cider vinegar

1 TBS Worcestershire sauce

2 chipotle peppers in their adobo sauce – minced

2 TBS Dijon mustard

1 TBS sriracha

1 tsp chipotle powder

1 tsp smoked paprika

1/2 tsp cayenne

DIRECTIONS

Heat about 1 TBS olive oil in a stock pan.  Saute the onion until translucent.  Add the other ingredients & bring to a boil.  Lower heat & simmer for 10-20 minutes to let it thicken a bit & to let the flavors meld.  Add water if it is too thick.  When it cools – blend it to break up any onion or chipotle still left in pieces.  Put it in an old pickle jar or something & chill until you are ready to use it.   This should last at least a week in the fridge – maybe more.

ImageImage