To see images of my past posts & get links to the recipes – look on my Pinterest board – HERE.
~
All my posts now have a VERY customizable PRINT & PDF option. Create a PDF & save the recipe to your computer or print it out. It offers a “remove images” option & you can delete any part of the post you do not need before printing. The button is below by the Twitter & Facebook links.
~
So – this weekend, I entered a Chili Cook-off! There were only two vegan entries of the 14 adults competing & it was meat chilis that won the chili titles but I won for best presentation. Check it out!
Click the image below to watch this on my Youtube channel.
It was a lot of fun & it raised money for the Downtown Women’s Shelter. Kids competed, too!
Homemade Chili Powder
2 TBS smoked paprika
2 tsp oregano
2 tsp ground cumin
2 tsp garlic powder
1 tsp onion powder
1/2 tsp cayenne pepper
Mix & store in a jar.
Cirque Du Macabre Vegan Chili
Serves a fuckton!
INGREDIENTS
1 TBS olive oil
2 each – Anaheim, Pasilla & Jalapeno peppers (I used 3 large jalapeno peppers)
2 small sweet potatoes – peeled & cubed
3 ears of unshucked corn or 2 (15 oz) cans of corn kernels
2 celery stalks – chopped
1 large onion (I used 1/2 white & 1/2 sweet onions) – diced
2 red bell peppers
1 TBS chili powder (recipe for homemade is above)
28oz can crushed or diced tomatoes (I used San Marzano)
2 TBS hoisin or BBQ sauce
2 TBS chipotle in adobo – minced
2 TBS vegan bouillon (I used vegan beef bouillon)
1 (4oz) can hot diced jalapenos (optional)
1 (4oz) can mild diced chilis
5 (15oz) cans of beans (I used a mixture of chili beans, light red kidney beans & black beans)
3 lbs vegan ground beef
8-10 large vegan sausages (Beyond Meat are the best)
I charred all the peppers (Anaheim, Pasilla, red bell & jalapeno) on a grill until the skins were black. I did the same with the corn. I put the peppers in a closed container to cool & then peeled & seeded them under cold water. I shucked the corn. You need not roast the peppers & corn but it adds a lovely smokiness. Cool & chop. Cut the grilled corn from the cobs.
I cooked the sausages on an outdoor grill. Cook yours as you please. Cool & chop.
Heat the olive oil in an Instant Pot or on the stove. Saute the onions & celery until soft. Add the chili powder & saute a minute. Add the ground beef & brown it.
If using a slow cooker, transfer the meat from the stove to it.
Now – add everything else or as much as fits in your slow cooker of Instant pot (minding the maximum capacity line). If it all cannot fit – leave out a few cans of beans.
Slow cooker – cook on high for 4 hours. Add remaining beans – if they fit – & heat through.
Instant Pot – pressure cook for 45 minutes. Add any beans you have left & stir to heat them through.
To see images of my past posts & get links to the recipes – look on my Pinterest board – HERE.
~
All my posts now have a VERY customizable PRINT & PDF option. Create a PDF & save the recipe to your computer or print it out. It offers a “remove images” option & you can delete any part of the post you do not need before printing. The button is below by the Twitter & Facebook links.
~
Click the image above to watch the video.
Vegan Chicken & Eggplant Casserole
Feeds 4-6
INGREDIENTS
8 vegan chicken patties (like Boca or Quorn)
1 large eggplant – sliced 1/4-1/2 inch slices & sprayed with cooking spray
12-16 ounces vegan mozzarella (at least half of it grated)
Basil for garnish
DIRECTIONS
Make sauce – if you are using homemade.
Heat the oven to 350 degrees.
Grill the eggplant slices on both sides on a grill or in a grill pan.
Assembly instruction is not really important – as long as you have about 1/2 the sauce & 1/4 of the grated mozzarella left to top the casserole.
Layer 1/4 of the sauce in a casserole pan. Layer 4 chicken patties, all the eggplant & then about 1/2 the cheese. Top with another 1/4 of the sauce & the remaining 4 chicken patties. Top with the rest of the sauce & as much grated mozzarella as you like.
Bake for 30-45 minutes or until it is heated through & the cheese is melted.
To see images of my past posts & get links to the recipes – look on my Pinterest board – HERE.
~
All my posts now have a VERY customizable PRINT & PDF option. Create a PDF & save the recipe to your computer or print it out. It offers a “remove images” option & you can delete any part of the post you do not need before printing. The button is below by the Twitter & Facebook links.
~
Click the image above to watch the video.
I keep throwing softballs like this out there to you kids. Softballs in that the recipe is easy & the result delicious. When, oh when, will you trust me & try one?
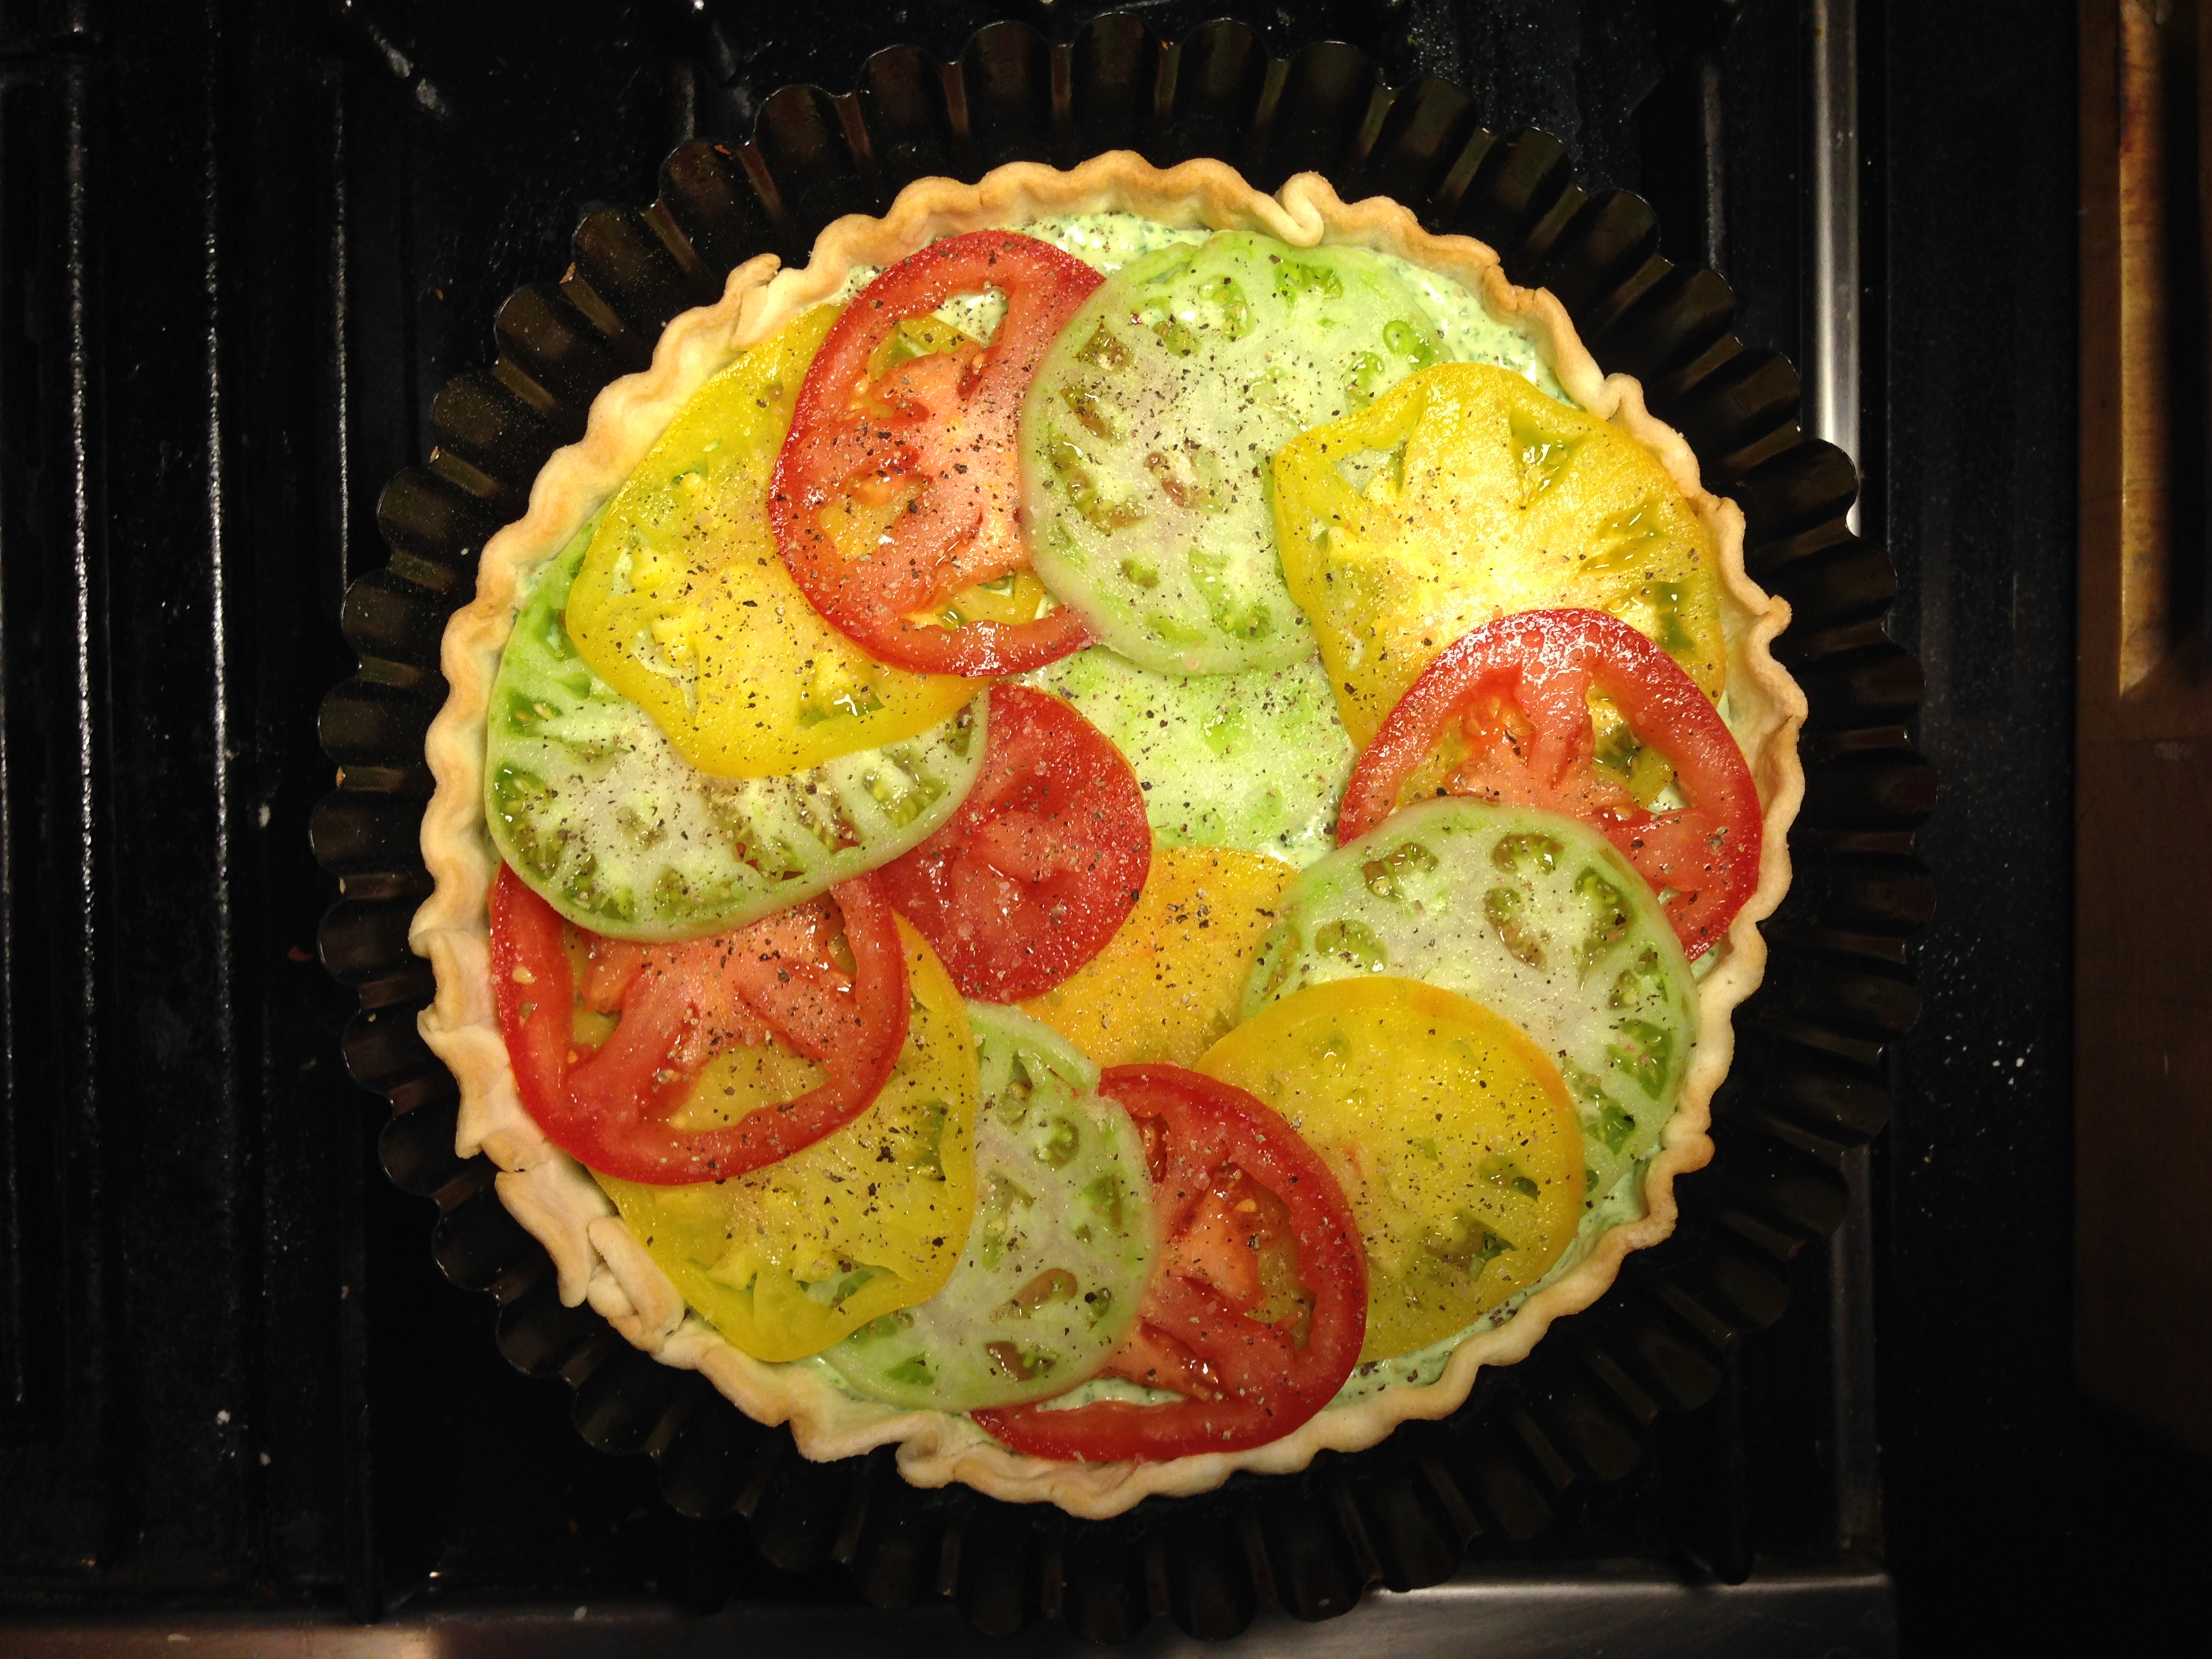
This one is almost like a quiche but uses no eggs or heavy cream – and it is vegan! I used three colors of heirloom tomatoes but any tomatoes would work, even cherry tomatoes, I suspect.
For the pastry crust
makes two tarts
INGREDIENTS
2 1/2 cups flour
1 tsp salt
1 tsp sugar
16 TBS ice cold (even frozen) vegan butter
1/4 cup or more of ice water
Heirloom Tomato Pie with Arugula, Tofu, Cream Cheese & Parmesan
makes two tarts
INGREDIENTS
Pie crust – uncooked
5-6 heirloom (or other) tomatoes – sliced thin
2 cups fresh arugula
2 cloves garlic
1 (14 oz) block firm tofu
4 oz vegan cream cheese
2 slices of your favorite flavor vegan cheese
1/4 cup vegan Parmesan – grated (plus a bit extra for topping – optional)
S&P
Basil – as garnish
DIRECTIONS
For the pastry crust
Put the flour, salt & sugar in a food processor. Pulse to blend. Then, 1 TBS at a time, pulse in the cold butter until it is all incorporated. Add a few TBS water & pulse until little balls of dough begin to form & it falls away from the bowl of the processor.
Remove from the bowl & press into two balls – one a tad larger than the other. Press flat, wrap in plastic wrap & chill for about an hour. Let it sit at room temperature for about 15 minutes before you roll it out.
DIRECTIONS
for the Heirloom Tomato Pie with Arugula, Tofu, Cream Cheese & Parmesan
Heat the oven to 400 degrees.
Press the dough into a greased pie or tart pan. A traditional pie dish is absolutely OK to use – as is a spring form pan. Slit the crust at the bottom and par-bake it for 7 minutes.
Put the sliced tomatoes on paper towels, salt them & press more paper towels on top. If your tomatoes are very wet & seedy, squeeze some of the seeds out to avoid excess moisture in the pie. You can see that I did this with my red tomatoes.
Meanwhile, blend the tofu, cream cheese, cheese slices, vegan Parmesan, arugula & garlic in a blender or food processor. Season with S&P.
When the crust has baked 7 minutes, top with the cup of grated Parmesan, the tofu mix & the drained tomatoes. Add some S&P. Maybe sprinkle some grated vegan Parmesan on top. Drizzle a bit of olive oil on top.
Bake for 45-60 minutes – or until the ricotta is set. You might need to wrap the edges of your pie with foil (or one of these cool silicone things – the red thing below – that I got at Bed Bath & Beyond) to prevent the crust from over-browning.
When the center seems set, allow this to cool for at least 15 minutes before cutting into it. It can be eaten warm or room temperature.
To see images of my past posts & get links to the recipes – look on my Pinterest board – HERE.
~
Click the image above to watch the video.
This is a really easy, 5-minute pasta sauce. It is fairly spicy so cut back on the crushed red pepper if you are sensitive to heat. Canned tomatoes are not desirable – even BAD – (read why you should avoid canned tomatoes & seven other foods HERE) – but they are sometimes the only affordable (and super convenient) option. .
Fresh herbs will also improve this sauce measurably but – in a pinch – they are absolutely not REQUIRED to make this sauce tasty.
Five (5) Minute Arrabiata Sauce
INGREDIENTS
1 27 oz carton tomato sauce
Garlic to taste
1 tsp each of crushed red pepper, oregano, pepper & sugar
1/2 tsp salt
Fresh thyme (optional)
Fresh basil – chopped (optional)
DIRECTIONS
Heat the olive oil. I sautéed maybe 10 tiny garlic cloves whole. If giant chunks of garlic offend you or yours, you might want to crush them a bit with the side of a knife or press them through a garlic press or chop them fine. Just do not burn the garlic and burning is easier – the smaller you chop the cloves. With whole cloves – I sautéed a minute before adding the spices. If you chopped the garlic – add it and the spices at once.After about a minute of both the garlic and all other spices sautéing – add the tomato sauce. Be careful as it will sputter and splatter you when it hits the hot oil.
A few minutes in – I used a slotted spoon to fish out the garlic cloves & put them through a garlic press but this is not totally necessary.Heat over med-low heat until ready to use. Add chopped fresh basil/parsley at the very end – if you are using fresh herbs.
Eggplant is an odd thing. Some of my favorite dishes are made of eggplant – most markedly my nearly guiltless Indian Baingan Bharta & one of the most popular recipes of this blog’s history, my Spicy Vegan Chinese Eggplant – both seen just below.
But if it is cut into slices or cubes that are too large & then under-cooked – it can have an icky texture & an icky flavor. Lots of people categorically reject it because the first time they tried it – it was yucky. But it is so versatile & can take on so many flavors so well. I love it & I feel certain I could convert more than a few haters – if I served them the right dish.
THIS dish might just be that dish – assuming they do not also hate spinach. The eggplant is very subtle & melts in your mouth. This could be customized a zillion ways. There are no rules. Just make a little mash of some flavors you like & roll’em up & bake them – and voila! Yes – there are a few steps but none are difficult & the result is delightful. A tad hard to photograph but really delicious.
Oh! I got this new little garlic press at Bed Bath & Beyond for (I think) under ten dollars & I am kind of in love with it. There are to ways to go with this – sliced or minced (there is a second blade tucked into the base) & all you do is press the garlic through & it creates a little drawer of crushed garlic for you. Se easy & easy to clean & no garlic fingers!
Easy Eggplant Rollatini with Spinach
Should feed 4
INGREDIENTS
2 medium eggplant – tops removed & sliced 1/4 inch thick (thick makes assembly harder)
1 lb fresh spinach (or 8 oz frozen or other spinach – thawed)
3-4 cups (28 0z or so) – marinara (your favorite brand or homemade or the one I post below) or my 5-minute spicy arrabiata
Handful vegan Parmesan
1/2 cup vegan ricotta
1/4 cup parsley – chopped
4 oz vegan mozzarella
S&P
Olive oil
More vegan mozzarella to melt on top – to taste
Parchment paper (if possible but not imperative)
Foil
Garnish: more cheese and/or parsley and/or basil
DIRECTIONS
Heat the oven to 400 degrees.
Cut the tops off the eggplant & try to cut them evenly 1/4 inch thick. I used a mandolin. Lay the slices on paper towels & sprinkle with salt. Flip & salt the other side (lightly – so they won’t be overpowered by salt). Salting the eggplant helps release excess moisture & can temper any bitterness. Let them sit for about ten minutes.
Steam the fresh spinach by simply boiling a tiny bit of water to a very large stock pot & adding the spinach. Cover the pan. It should wilt in less than a minute (this works to thaw frozen spinach, too, though it might take longer). Strain into a colander & run cold water on it. Squeeze out as much water as you can & chop the spinach.
Put the spinach, parsley, & your Parmesan & ricotta & mozzarella cheese in a large bowl & blend. Add some S&P.
Pat the eggplant slices dry & sprinkle with ground pepper. Place them on a cooking sheet covered in parchment paper (or foil treated with cooking spray – because you do not want these guys sticking). Bake about ten minutes.
Layer some sauce on the bottom of a casserole pan. Spread about 2 TBS of the filling on each of the eggplant slices. If you have extra – spread it around. Carefully roll those guys up & place them in the pan, seam side down.
Layer some more sauce on top & then sprinkle with mozzarella. Cover tightly with foil & bake for 1 hour. Remove from the oven & uncover & let rest a good 5-10 minutes before cutting in. Serve with more cheese and/or parsley and/or basil and copious red wine. See? You like eggplant!
To see images of my past posts & get links to the recipes – look on my Pinterest board – HERE.
~
Click the image above to watch the video.
The Ivy Copycat Grilled Vegetable Salad with Lime Vinaigrette
serves 2 as an entree
INGREDIENTS
for the dressing
Juice of 1-2 limes
match the lime juice with an equal part of olive oil so it is 50/50.
Add about 1 TBS each of balsamic vinegar (or other vinegar) and agave
Season to taste with S&P.
Combine & taste. Tweak to suite your palate.
for the salad
Your choice of greens – or a mixture (arugula, romaine, butter lettuce, watercress, field greens – your call)
1 zucchini
1 yellow squash
2 ears fresh corn – in the husks
1 bunch asparagus – tough bottoms trimmed
1 red bell pepper – seeded
1/2 cucumber – diced
1 handful cherry tomatoes – haved
3-4 radishes – chopped
1/4 small red onion – diced
1 avocado – chopped
OPTONAL – chopped herbs (basil or cilantro), protein (chickpeas, black beans, vegan chicken or any other protein you desire)
DIRECTIONS
Make the dressing while the veggies are grilling.
Slice the zucchini & squash in 1/4 inch thick slices & grill until softened & there are grill marks – turning a few times. Do the same with the red pepper & asparagus. Set aside. Grill the corn in the husks until blackened on the outside. Cool & throw the husks away then cut the corn from the cobs.
Now – just assemble the salad the way you would any other. If there are going to be leftover veggies – do not dress them. They will stay fresher in the fridge undressed.
To see images of my past posts & get links to the recipes – look on my Pinterest board – HERE.
~
All my posts now have a VERY customizable PRINT & PDF option. Create a PDF & save the recipe to your computer or print it out. It offers a “remove images” option & you can delete any part of the post you do not need before printing. The button is below by the Twitter & Facebook links.
~
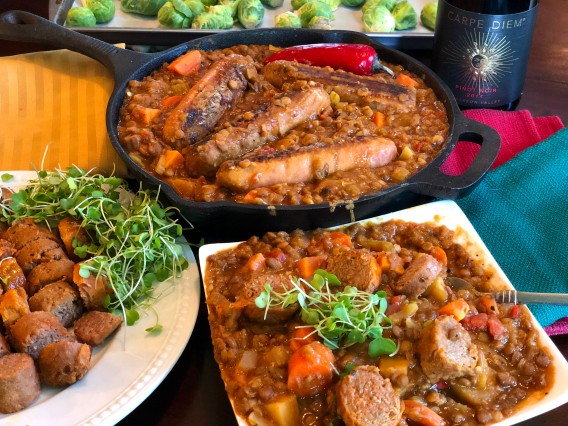
2 images above courtesy of Beyond Meat.
Click the image above to watch the video.
Vegan Beyond Sausage & Lentil stew
Serves 4 very well
INGREDIENTS
6-12 Beyond Sausages or your favorite vegan sausage
1 lb cooked lentils
1 medium onion – diced
1-8 garlic cloves (to taste) – minced
4 carrots – sliced
4 celery stalks – chopped
1 parsnip – chopped
1 sweet potato – cubed
1-2 jalapenos – diced
1 lemon
1 (14 oz) can fire-roasted diced tomatoes
1 cup salsa (optional)
4 cups stock
1 TBS mild harissa (optional)
1-2 TBS olive oil
2 tsp ground cumin
1 TBS sweet paprika
1 TBS cayenne (or less if you are intolerant of spicy foods)
S&P to taste
DIRECTIONS
Cook the lentils & set aside.
Heat the olive oil in a large stock pot & saute the onions & celery until soft.
Add the garlic & saute one minute. Add the can of tomatoes. Combine.
Add the salsa, harissa, cumin, paprika, cayenne & the juice of the lemon & combine.
Add the carrots, parsnip, sweet potato & jalapeno & 4 cups of stock.
Bring to a boil. Lower heat & simmer for about 10 minutes or until all the vegetables are tender. Stir in the cooked lentils & season to taste with S&P.
Cook the sausages & serve either sliced or whole. You can stir the sausage into the stew or serve it on the side to add as garnish to the stew.
To see images of my past posts & get links to the recipes – look on my Pinterest board – HERE.
All my posts now have a VERY customizable PRINT & PDF option. Create a PDF & save the recipe to your computer or print it out. It offers a “remove images” option & you can delete any part of the post you do not need before printing. The button is below by the Twitter & Facebook links.
Click the image of me below to watch the sauce recipe WITHOUT the mushroom. These images here reflect the use of a crazy lobster mushroom I bought when I originally made this recipe. You need not use the mushroom – in fact – I rather suggest against it because it was very expensive and underwhelming but I include it here, anyway, for the curious & the risk takers.
I went to the farmer’s market for the first time in forever. Once there, I was reminded of why I no longer go. IT COSTS A FORTUNE. Everything seems reasonable until you walk out with fingers screaming from the pain of carrying 400 pounds of produce & $200 poorer. But it is always fun & there are usually yummy things to sample. This time there were almond croissants the size of footballs, boxes of mixed mushrooms for $20, some peana & eggphan (I can’t resist misspelled signs).
There were also golden beets that were larger than a softball and the crazy-looking thing above. That, my friends, is a lobster mushroom. It was about the size of a small Russet potato & weighed about 4 ounces. I asked the mushroom monger what it was & she told me it was a lobster mushroom. I asked why they were called that & was told that they not only have a reddish color similar to a cooked lobster but also that they have a slight seafood taste. I had to have one! I let her pick one out and as she weighed it, I began pulling out ones to pay for it. I pulled for a while because that fucker there cost me $17!!! I almost choked at the price but decided it would be a worthy blog post so I paid & walked away – wondering what the fuck I was gonna do with it.
Intimidated by the idea of ruining a $17 mushroom barely larger than my fist, I Googled to see what others had done with them. I found this gorgeous photo & checked out the recipe at THE COFFEE TABLE COOKBOOK.
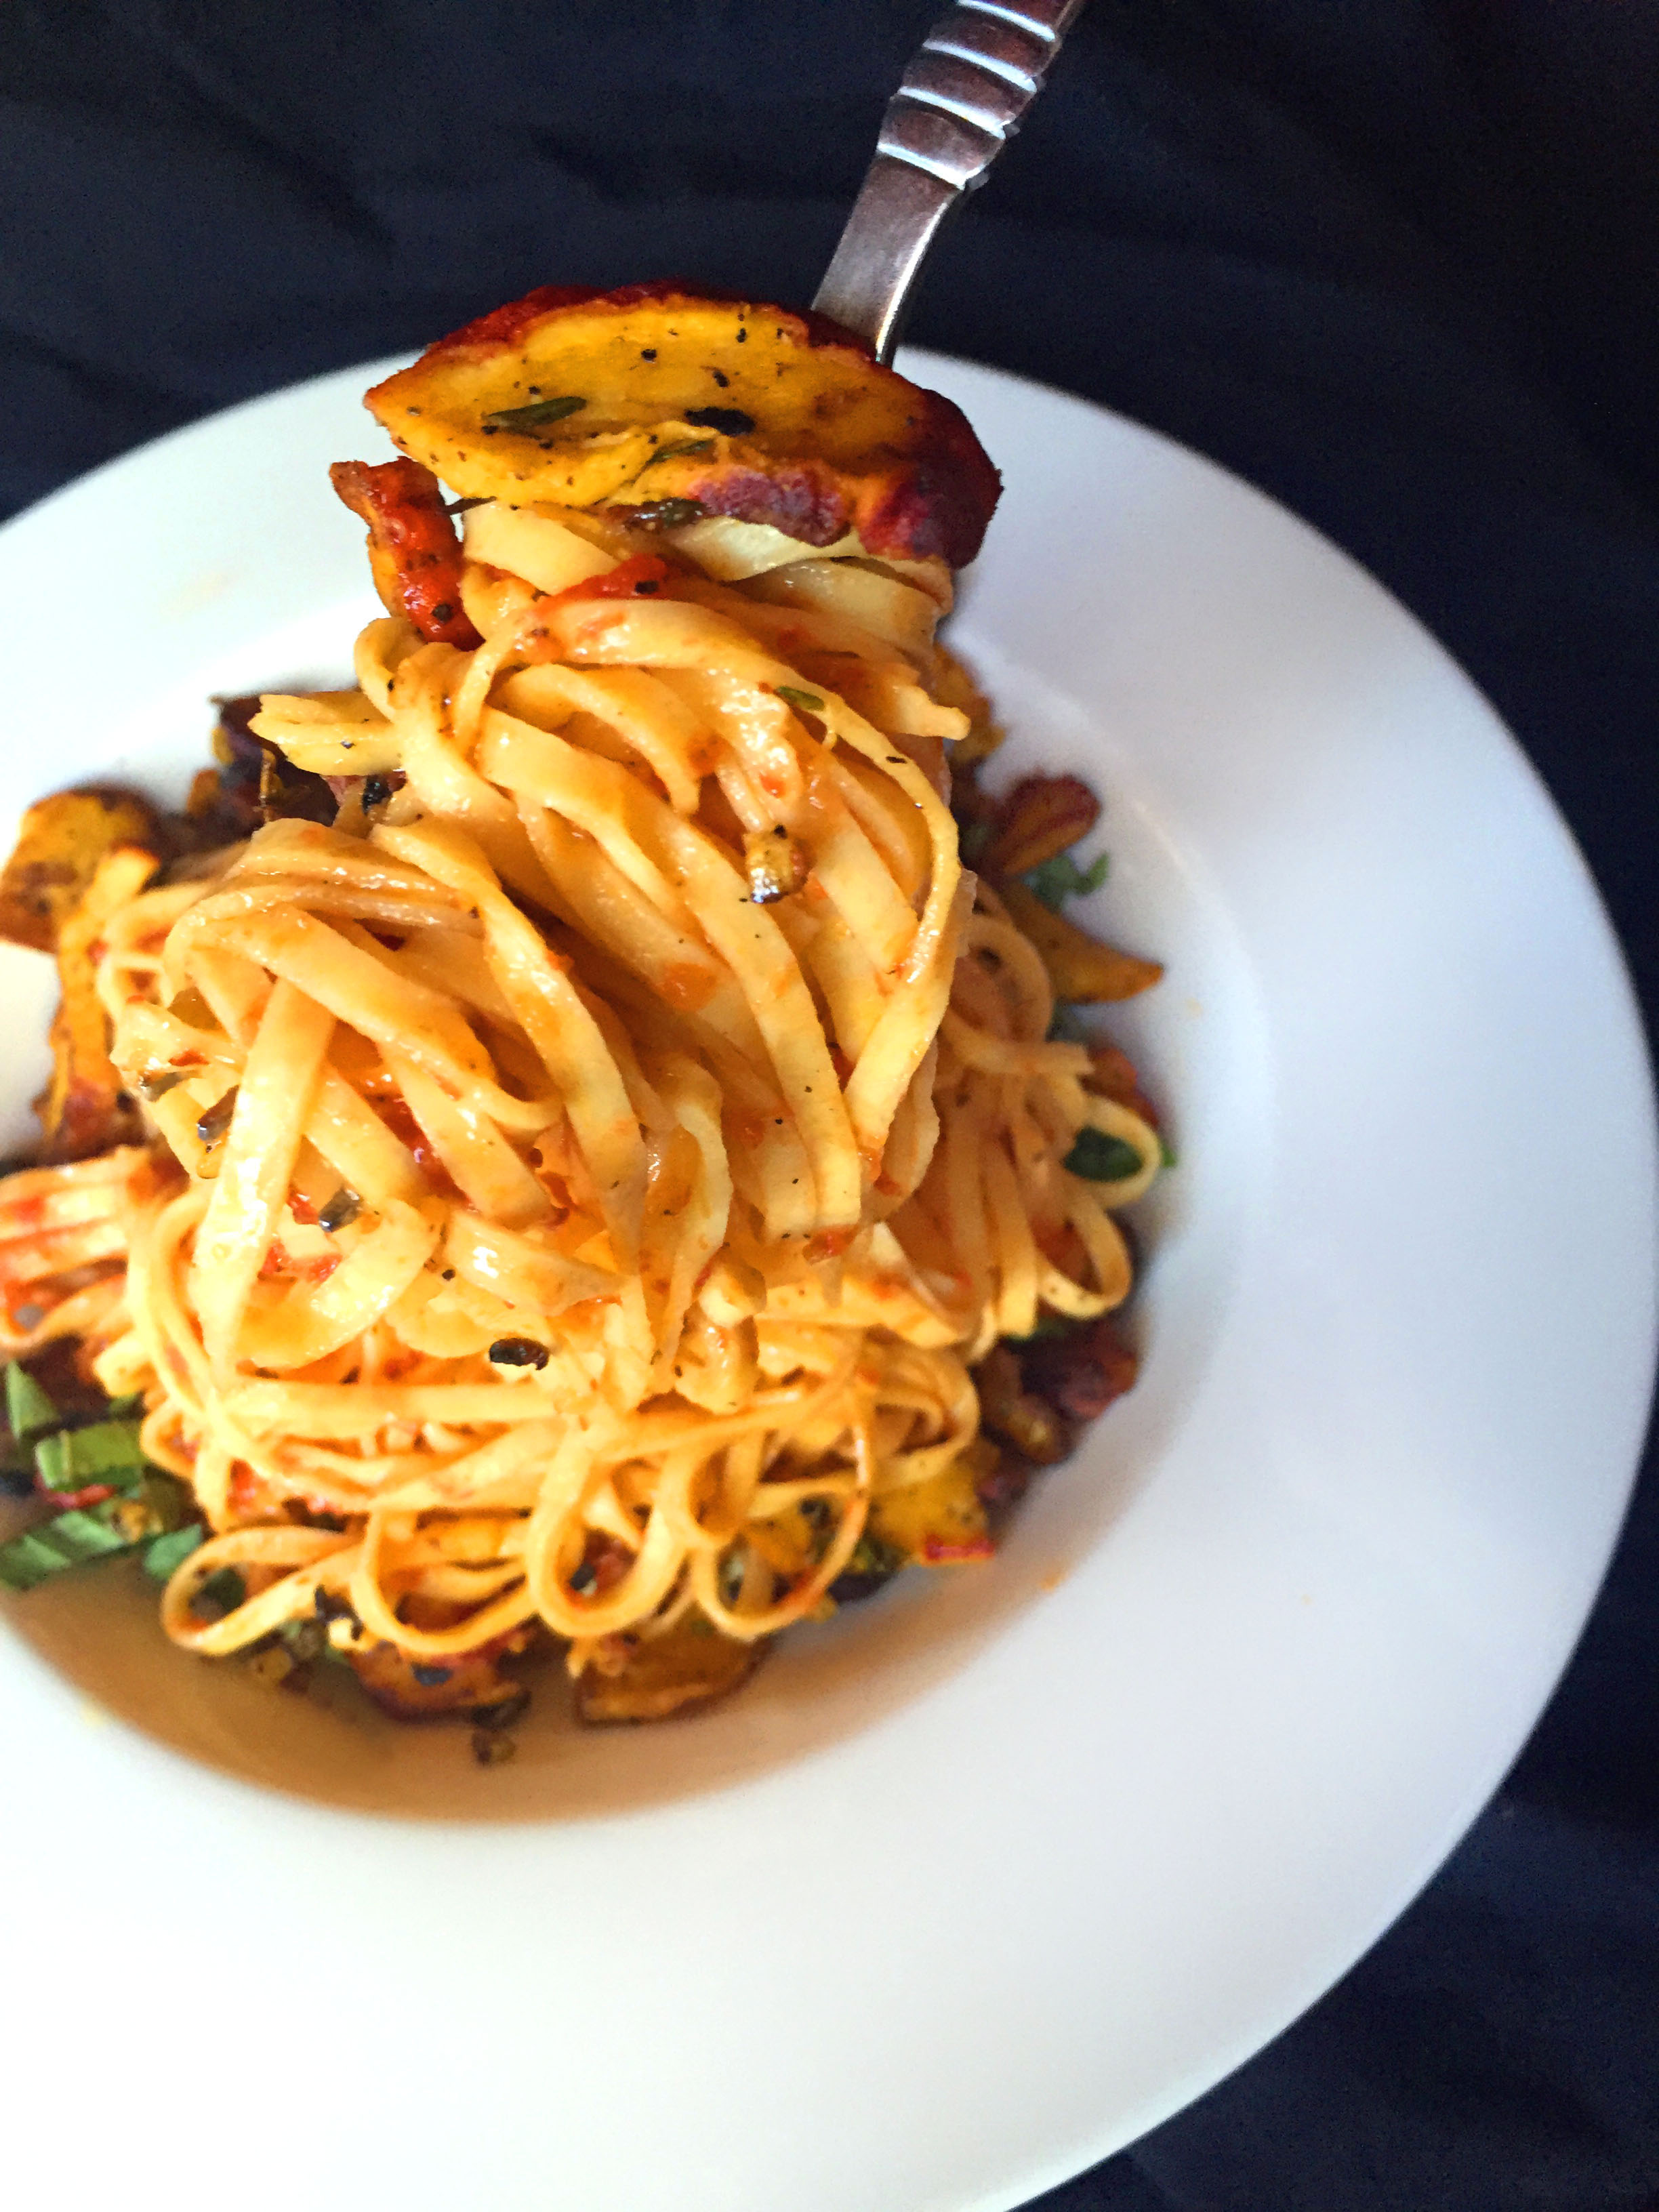
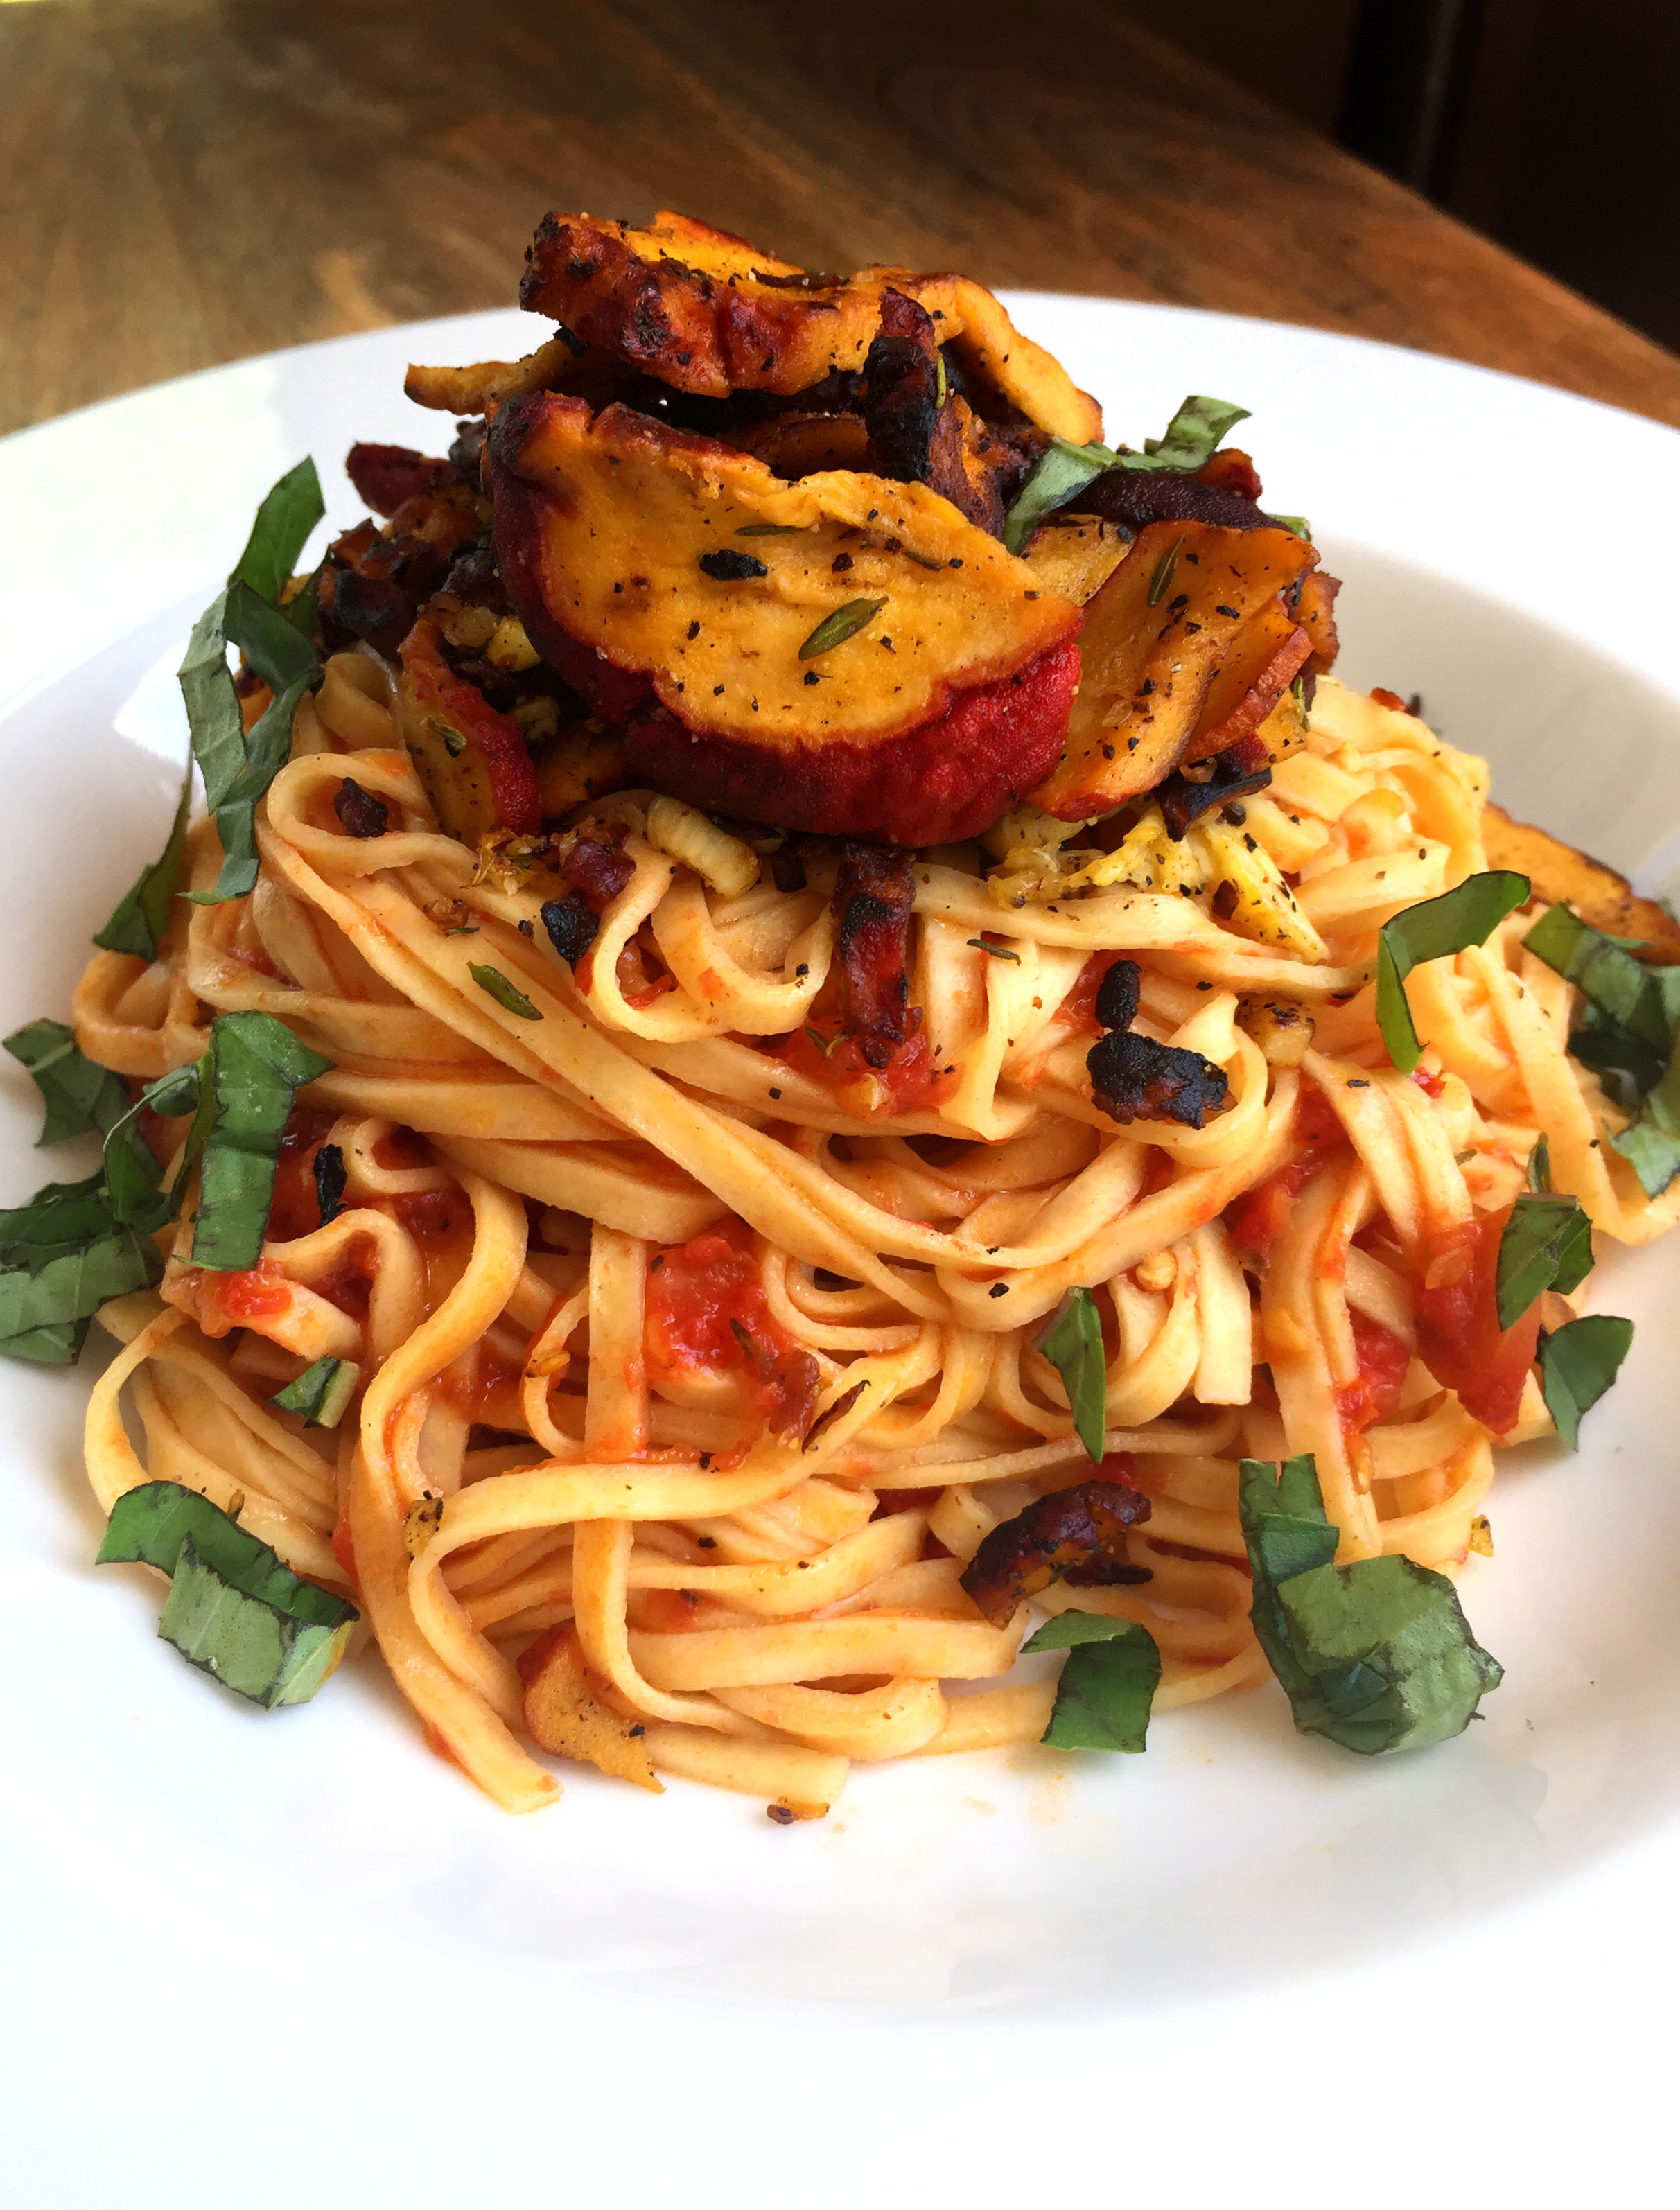
I had the bulk of the ingredients already so I decided to make a vegan version of their FETTUCCINI WITH LOBSTER MUSHROOM AND SCRATCH-MADE HEIRLOOM TOMATO SAUCE. I simplified the sauce recipe quite a bit but the most interesting thing I learned from their post was the concept of grating tomatoes. Click that link & see how it is done & how not to grate your flesh into the sauce. You basically grate the tomatoes on a box grater & it results in a beautiful tomato puree without any skin. See below.
I added a lot of crushed red pepper to my sauce which might have been a mistake because the spicy sauce sort of overwhelmed the very delicately flavored lobster mushroom. The mushroom had only the slightest mushroom flavor & no seafood element at all. Those photos above are the mushroom cut up. Looks like chicken or pork – or bread. It is very light & porous so it reduced to almost nothing in the saute pan. Overall – I would say there is no reason to pay so much for what amounts to so little. Regular mushrooms are just as good and far less costly.
I do recommend trying this sauce, however. I eliminated the dairy from the original recipe & also could not bring myself to add a cup of the precious – a cup of white wine – to the sauce just to cook it off. I felt the wine would be better used poured down my gullet & I don’t think the sauce suffered and I know I didn’t.
Vegan Pasta with Heirloom Tomato Sauce & Lobster Mushroom
4 oz lobster mushroom (or 1/2 lb regular mushrooms)
2 TBS olive oil or vegan butter
3 garlic cloves – chopped
1 tsp thyme leaves
DIRECTIONS
for the sauce
Heat the olive oil & add the garlic. Saute one minutes & then add the other ingredients. Simmer on med-high until it reduces by about half. Season to taste. Remove the thyme sprigs and throw them away.
for the mushrooms
Heat the olive oil or vegan butter and saute the mushrooms until they are nearly done to your liking. Add the garlic & thyme & cook another minute or two. Be sure not to burn the garlic. Season with S&P.
Cook the pasta as directed & toss with the sauce. Serve & top with mushrooms & chopped fresh basil.
To see images of my past posts & get links to the recipes – look on my Pinterest board – HERE.
~
All my posts now have a VERY customizable PRINT & PDF option. Create a PDF & save the recipe to your computer or print it out. It offers a “remove images” option & you can delete any part of the post you do not need before printing. The button is below by the Twitter & Facebook links.
~
Click the image above to watch the video.
This is another very easy dish.
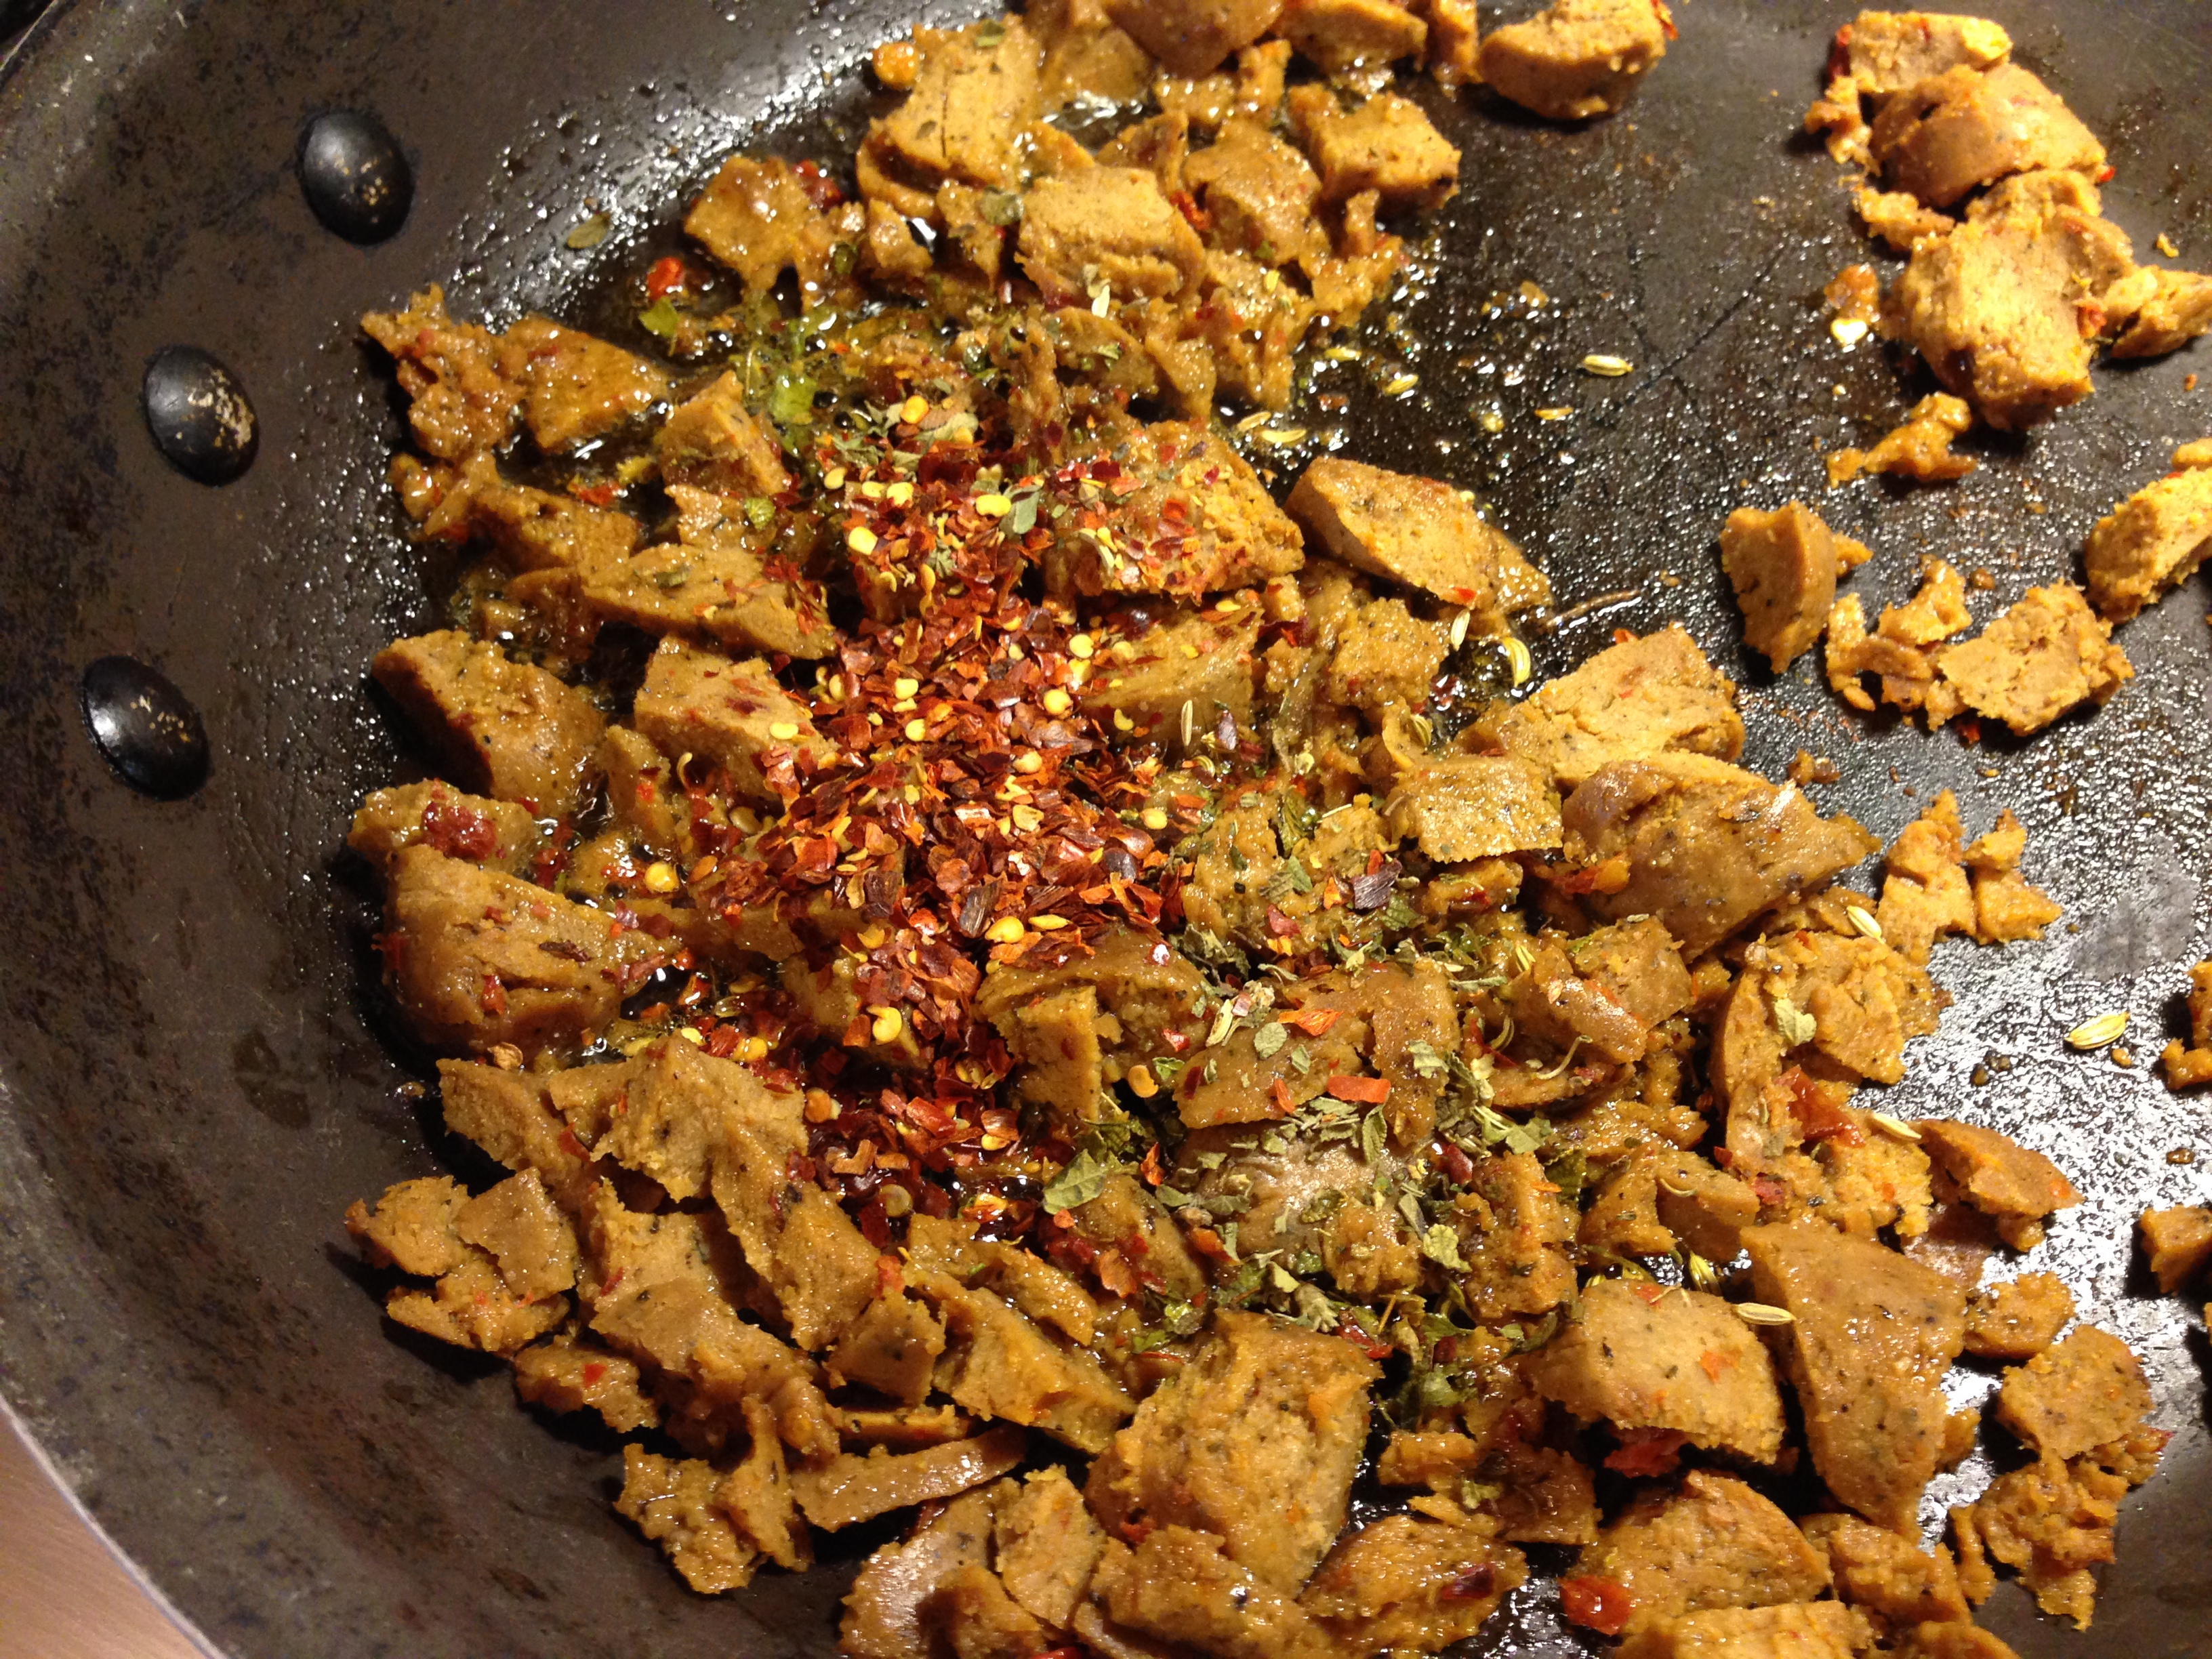
Vegan sausage is usually pretty nasty but I keep hoping I can find a way to doctor it up & make it edible and, finally, with this dish – I SUCCEEDED! The secret was a pinch of fennel & a shit ton of crushed red pepper. The filling in these shells was so delicious – I kept eating it directly out of the pan. A few simple ingredients, a half hour in the oven – and you are neck deep in heaven. Trust!
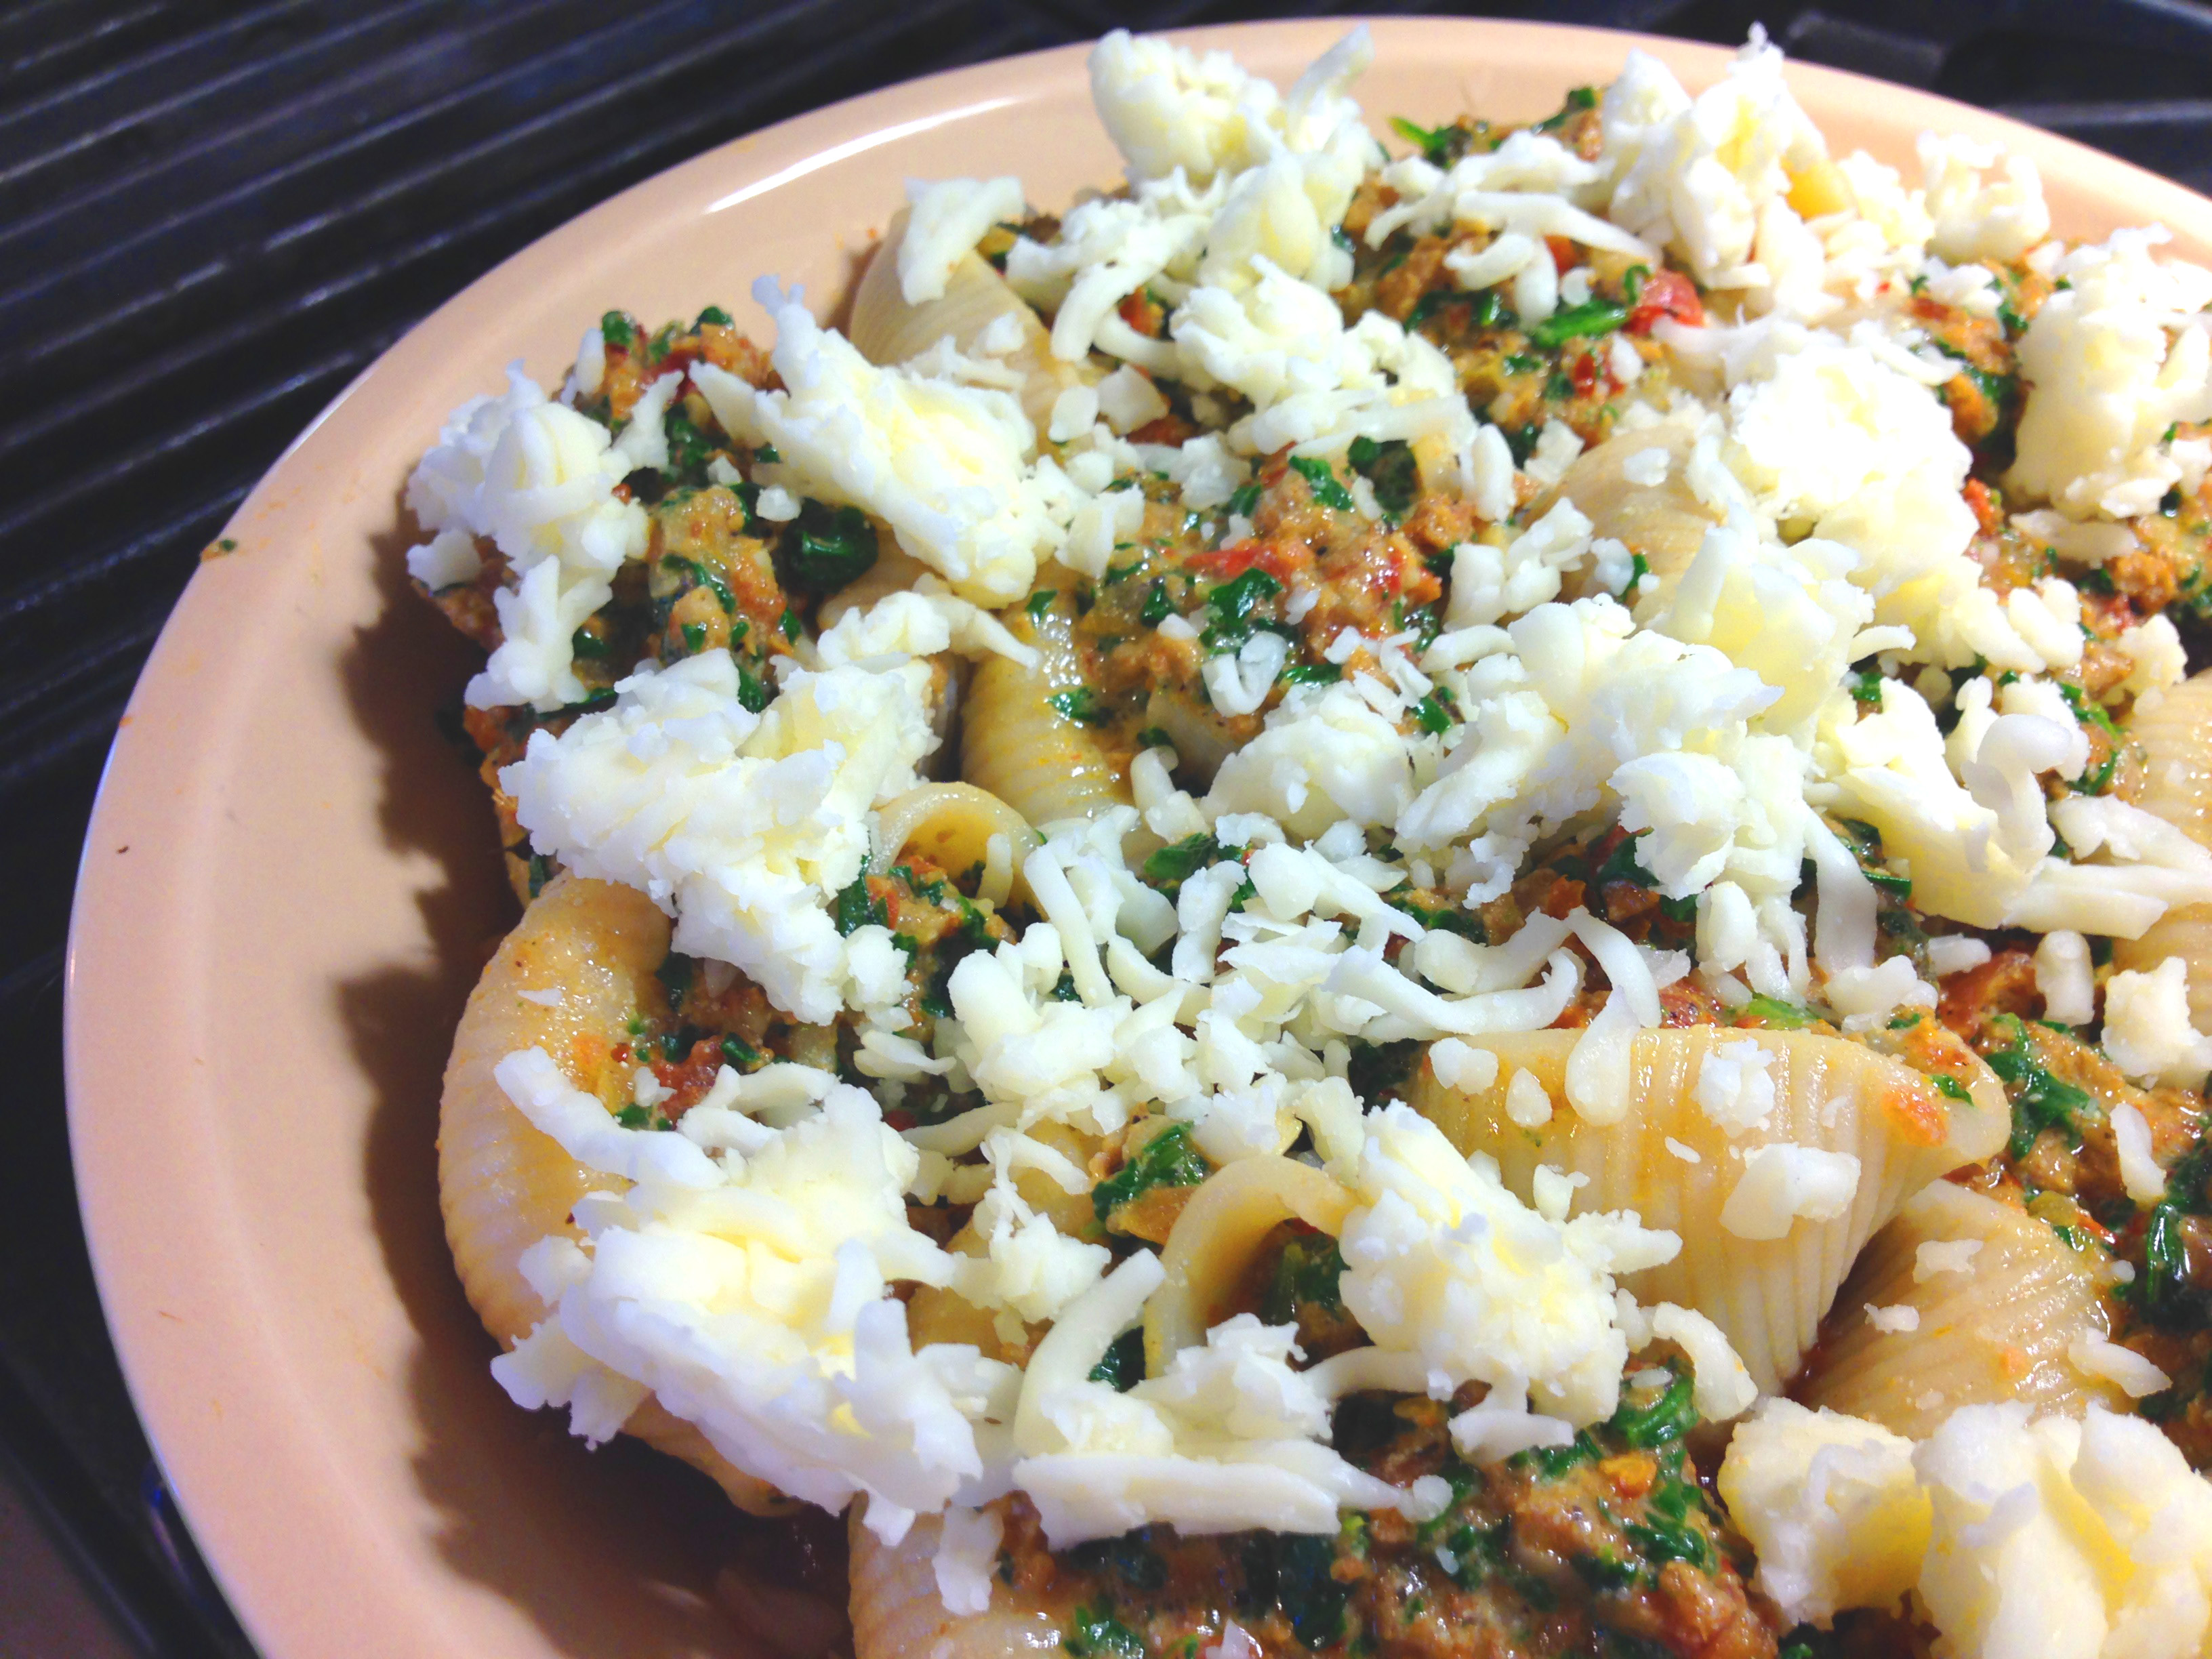
Vegan Sausage and Spinach Stuffed Shells
(This makes enough to fill three pie dishes)
INGREDIENTS
1 lb dry fill-able pasta shells (any variety works)
Olive oil
4 vegan sausages – chopped
1 lb fresh spinach (or kale or arugula or other greens of your choice)
4-10 garlic cloves (depending on the size & your passion for garlic) – coarsely chopped
2 (10 to 15 oz) cans chopped tomatoes (I used Rotel & fire roasted tomatoes)
1 lb vegan ricotta
8 oz or more vegan mozzarella
1/2 cup grated vegan Parmesan
1 tsp dry fennel
1 tsp dry oregano
1 TBS crushed red pepper (I used closer to 3 TBS but I love spice)
1-2 cups red pasta sauce (I used some spicy Rao’s & spicy Guy Fiery sauces but homemade would be even better)
S&P
DIRECTIONS
Heat the oven to 350 degrees.
Cook the pasta until al dente – or maybe a minute less than the package suggests. Drain & run under cool water.
Heat 1-2 TBS of olive oil in a large saute pan.
Saute the sausage with spices (fennel, oregano & crushed red pepper) until it is begins to brown.
Add the garlic & spinach & tomatoes. Cook until the spinach is just wilted. Season with salt & pepper & blend them in.
Put the mix in a food processor & puree it. Add about 1/3 of your mozzarella & the ricotta. The blending is not strictly necessary but it makes filling the pasta easier if the filling is mushy.
Put some of your pasta sauce on the bottom of a casserole or pie dish. Fill the pasta shells & place them on top of the sauce. Sprinkle with whatever amount of mozzarella appeals to you and additional sauce, if you like a wetter dish. Maybe sprinkle some vegan Parmesan on there, too. Put it in the oven & bake for about 30 minutes or until the cheese is melted & bubbly & the pasta is brown in spots. If you want to freeze some – wrap the dish in foil & freeze – UNCOOKED.
To see images of my past posts & get links to the recipes – look on my Pinterest board – HERE.
Click the image above to watch the video.
A long, long time ago, I had a boyfriend. And that boyfriend had – egads! – ex-girlfriends. One of these ex-girlfriends was (and remains) a famous actress. A beautiful, famous actress. She had been reaching out to him to “reconnect.” My boyfriend at the time announced that he would be having dinner with this ex at some point in the future. I informed him that I would be attending this dinner myself. He looked at me like I was crazy. “Nothing’s going on,” he explained. “She just wants to get together. We are friends.” I explained that, as his live-in girlfriend, his friends should be my friends, too, and asked that if everything was so innocent, why couldn’t he just invite her over to our home for dinner.
It took a bit but I won this debate. The invitation was extended & then the pressure was on. ME. On me because I had to cook the damned dinner – a dinner to impress this chick. I wanted to impress her with both my culinary skills & with the level of our domesticity. It was a passive-aggressive counter-attack to what I sensed were not entirely innocent intentions on her part.
This was pre-internet and pre-40 million cooking shows – so I had only my trusty collection of cookbooks to consult for ideas. After hours of deliberating – I ended up making two dishes I had never made before – always very dangerous if making a good impression is your top priority. I made a two-color soup much like this one (this one here is not my creation):
And I made an eggplant timbale as shown here in this blog. As fate would have it, my dinner was a huge success & the ex-girlfriend was smart & funny & charming & the two of us were quickly gabbing like old friends, nearly cutting my boyfriend from the conversation completely.
And – for the record, ladies (and gents) – this ex-girlfriend never “reached out” to “touch base” again – to either me or my boyfriend. So – my instincts had been correct. She had been perhaps interested in rekindling more than just old times. But – to her credit – once she met me, she was forever respectful and was never again a threat to our domestic bliss.
So – if you ever need to impress someone or scare off some interested interloper from meddling with your love life – serve them this whopper of a dish. It is far easier to make than folks guess and it tastes delicious – and it is classier than a slap fight & hair pulling.
Also – as an aside, I bought this fucking gigantic can (I know canned tomatoes are bad but sometimes you gotta bend rules) of tomato sauce for $2.69. That is practically free! It makes 12 cups of whatever the Hell sauce you are making. I made arrabbiata (surprise, surprise) and I froze 8 cups of it & used 4 cups of it to make the vodka sauce in this recipe.
Vodka Sauce – large quantity
INGREDIENTS
2 28-ounce cans tomato sauce
1 small onion – diced
1/2 cup vodka (optional)
1/4 cup olive oil
5 garlic cloves – chopped
1 TBS crushed red pepper (optional)
1 cup chopped basil
1 cup peas – optional
S&P to taste
For a pink sauce (optional) – 1 cup vegan heavy cream or vegan cream cheese
DIRECTIONS
Heat oil & saute the onion until soft. Add garlic for one minute then add the vodka. Cook on high a minute & then add the other ingredients, bring to a boil then reduce heat to low & simmer for 30 minutes or more. For a pink sauce – add 1 cup vegan heavy cream or vegan cream cheese.
Vegan Eggplant Timbale with Rigatoni & Vodka Sauce
INGREDIENTS
FOR THE TIMBALE:
1 pound rigatoni (or other pasta) – cooked & drained
8 oz vegan mozzarella
4 large eggplants
1/4 cup bread crumbs
1/8 cup vegan Parmesan
Chopped tomato or chopped fresh parsley or basil – as garnish
DIRECTIONS
Pre-heat the oven to 350.
Slice the eggplants into 1/4 inch slices. You can go the long way or the other way – creating round disks. (OPTIONAL – Place in colanders or on paper towels & sprinkle with salt on both sides. Let the eggplants drain for about 30 minutes. This not only helps remove moisture from the eggplant but also minimizes bitterness. I skipped this step.)
You can either rub olive oil into your eggplant before grilling or you can dip them in an Italian salad dressing – really just to lubricate them so they do not stick to the grilling surface & tear apart. Grill (a grill pan works, too) the eggplant until they get nice grill marks on one side, turn them & repeat. Remove & set aside.
Cook the rigatoni according to the box directions. Err on the side of under-cooking – as they will cook more in the oven. Drain the rigatoni & mix in a bowl with cheeses & 2 or more cups of vodka sauce. Add more sauce if you like a really wet pasta. You will have extra vodka sauce that you can use to add as a garnish to the finished slices of timbale or to use in another recipe. It might be nice to have extra sauce for the timbale when you are in the leftovers phase.
ASSEMBLY-
Grease a spring form pan & then put some bread crumbs & vegan Parmesan inside. Swirl the pan to coat all the surfaces. Throw any unstuck bread crumbs/cheese away.
Line the inside of the pan with grilled eggplant. You can either do as I did or, if you have circular disks, fan them on the bottom of the pan & then stick some, overlapping, up on the sides. However you do it – try to cover every part of the pan with eggplant. Pour the pasta & vodka sauce & cheese mix in – layering in extra cheese, if you fancy. Top with any remaining eggplant slices.
Cover the timbale in foil & place some heavy dishes on top & put in the fridge to compress for about 15 minutes.
Then – bake at 350 for about 45 minutes. Let rest, unmolested, for at least 15 minutes and then put a serving dish on top of the timbale, flip the whole thing over & then very carefully – remove the spring form pan.
Garnish with either grated Parmesan or extra vodka sauce.
To see images of my past posts & get links to the recipes – look on my Pinterest board – HERE.
Click the image above to watch the video.
I love Indian food. I always have. I also love cooking with dry beans & lentils because they are so inexpensive & yield many servings for pennies per serving. The only issue with Indian recipes is acquiring the exotic spices – which can be expensive if you do not buy them from an Indian market. Ethnic markets are always the best place to buy spices because each will typically carry all you need for recipes from that area of the world and at greatly reduced prices. If you do not live in an area with much diversity – Amazon is wonderful. You can typically omit a few spices from most recipes with little loss of flavor but it is really satisfying to be as authentically true to a regional recipe as possible. With Thai food, for example, getting fresh kaffir lime leaves & Thai basil makes an enormous difference. You just open the packages of these things and are transported to your favorite Thai restaurant. Indian food has a few staples that are hrd to get around – garam masala, for example. But it is stuff like cardamom & fenugreek (methi) that add authenticity. Fenugreek is an herb – pictured below – both fresh & dried. It also comes in seed form & as a powder and it is ubiquitous in Indian recipes in one form or another. It might be a good idea to research a few Indian recipes & stock up on the critical spices sif you want to experiment with this wonderful cuisine. HERE is a list of the most used spices – garam masala being the most commonly used and that list omitted the kasoori (or kasuri) methi (dry fenugreek leaves) and I would add that to your list as well as amchoor (mango powder).
I made a version of mahkani in July – seen above – my Spicy Vegan Dal Makhani (Beluga or Black Lentils) for the Slow Cooker. That dish used beluga lentils & is not as authentic as today’s recipe. In today’s recipe I used whole black lentils (also called urad dal or black gram) and red kidney beans (rajma). I not only soaked these beans overnight but I also cooked them in my slow cooker for 5 hours on high AND left them overnight to let the flavors meld. I recommend this (though it is not necessary) to let the beans really soften & the flavors blend – so – if you are making this dish it takes two days before you are eating it. Again, you definitely could eat it after the 5 hours but like many stew-type dishes – it gets better over time. The good news is – there is no prep cooking for this dish so, except for cutting up an onion & 2 peppers – the slow cooker does all the work (except the smoking process – explained below). The lentils & beans I used are below – dry – and as they looked after soaking them – separately – overnight. As you can see – they changed color considerably. This dish is traditionally very rich using varied amounts of butter & heavy cream. I used only 2 TBS of vegan butter & 1/2 cup vegan sour cream – so this dish is not quite so heavy.
As to smoking your dal makhani – it is VERY easy & I recommend it very highly. It just requires a chunk of a natural charcoal & a small metal bowl. You simply heat the coal over a burner until it is red hot, place it in a metal bowl & drizzle olive oil on it & place it atop your dal & put the lid on the slow cooker. In ten minutes – you will have authentically, smoky goodness! (The photo of the smoking charcoal is from my Smoked & Spicy Indian Eggplant Curry (Vegan – Vegetarian) – seen below.)
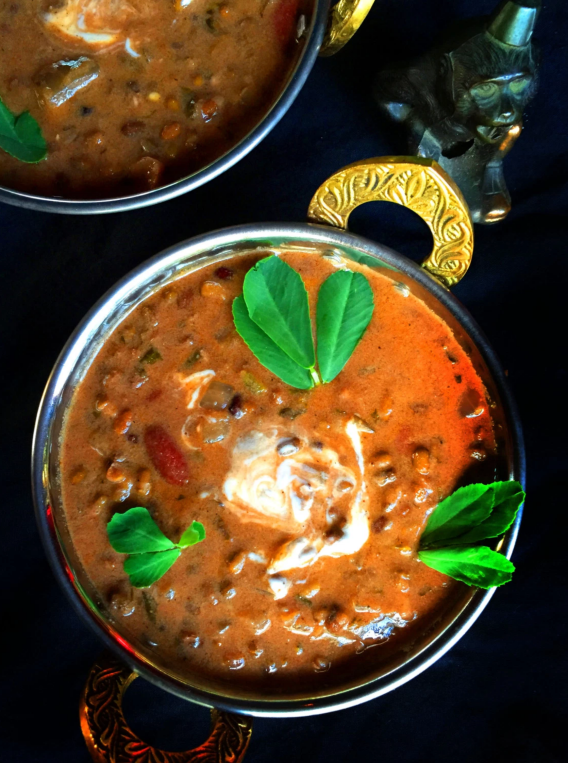
Vegan Smoked Dal Makhani Punjabi-Style (Black Gram/Urad Dal & Rajma) –
Serves 6+ with rice
INGREDIENTS
1 cup dry black urad dal – soaked overnight
1/2 cup dry red kidney beans – soaked overnight
1 onion – diced
2 serrano (or jalapeno) peppers – seeded & diced
2 TBS vegan butter (or coconut or olive oil)
4 cups water (or vegetable stock)
1 cup tomato puree
1/4 tsp nutmeg
1 TBS garam masala
1/2 tsp amchoor
2 TBS dry methi leaves
1 tsp ground cumin
1 tsp ground coriander
1 tsp onion powder
1 tsp chili powder
3 green cardamom pods
1 TBS fresh or jarred ginger (I used jarred)
4 garlic cloves – minced
1/2 cup vegan sour cream
Steamed rice
GARNISH – more sour cream, cilantro or fresh fenugreek leaves
DIRECTIONS
Soak the beans overnight. Drain & rinse.
INSTANT POT
Heat the oil or butter using the saute setting – saute the onion & peppers until soft. Put everything else in & cook, sealed, on manual for 35 minutes.
SLOWCOOKER
Put everything except the sour cream into a slow cooker & cook on high for at least 5 hours – maybe more. If you are going for the overnight uber-cooking (as I did) – leave it covered overnight. I left my cooker off as there was nothing in there that would spoil but – if you are not comfortable with that – add some water & leave it on warm overnight.
STOVE TOP
Heat the oil or butter and saute the onion & peppers in a large stock pot until soft. Put everything else in & bring to a boil. Reduce heat & simmer until the beans are tender – 30 minutes or so.
Either way – the next step is the smoking (which you can skip but I recommend trying it because it is amazing. Heat the coal over a burner until it is red hot, place it in a metal bowl & drizzle olive oil on it & place it atop your dal & put the lid on the slow cooker or Instant Pot or pan. In ten minutes – you will have authentically, smoky goodness!
Now – stir in the sour cream. If it is too thin – add water or vegan milk to thin it. If it is too thin – cook it on high with the lid off until it thickens. Mashing some of the dal with a wooden spoon or pureeing with an immersion blender gives an even creamier result.
Garnish with a dollop of sour cream & serve with rice.
To see images of my past posts & get links to the recipes – look on my Pinterest board – HERE.
~
All my posts now have a VERY customizable PRINT & PDF option. Create a PDF & save the recipe to your computer or print it out. It offers a “remove images” option & you can delete any part of the post you do not need before printing. The button is below by the Twitter & Facebook links.
~
Click the image above to watch the video.
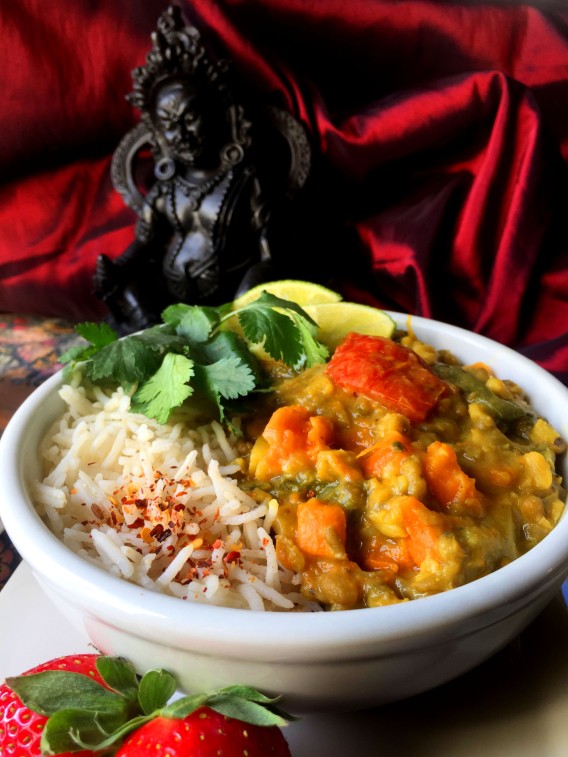
My friend, Katie, turned me on to kitchari. Apparently, you can eat it – JUST IT – for 1-7 days straight & it calms your digestive tract & detoxes you system but with the added benefit of feeling like decadent comfort food. Also – mung beans are dirt cheap. (Articles on the subject are linked at the bottom of this post). This recipe makes about 7 quarts which is a fuckton so – unless you are feeding a lot of people or want to freeze some – consider reducing the recipe.
I used an Instant Pot to make mine but this can be done in a slow cooker or stove top. I really recommend Instant Pots, though, because they steam, pressure cook, slow cook, cook rice, cook cakes, saute, cook eggs & clean windows. I got my huge one HERE for just over $100 & I am VERY happy with it. I can now get rid of several other appliances.
***NOTE – I soaked my beans on the counter overnight & in the fridge a second night but this is not necessary. If you want to move more quickly – boil some water, add your beans & let them soak for an hour.
Ayurveda Kitchari – Vegan Mung Bean Stew
Caters a party so be ready for a lot
INGREDIENTS
3 cups mung beans (I used half whole green & half split green – as seen above) – soaked (see ***NOTE above)
1-2 TBS coconut oil or olive oil
1 onion – chopped
6 garlic cloves – chopped
1 TBS turmeric
1 TBS ground cumin
1 TBS (or more – to taste) salt (I used pink Himalayan)
1 TBS ground mustard
1 TBS ground coriander
1 TBS ground pepper
1 TBS ground fenugreek (optional)
1/4 tsp asafoetida
1 (15 oz) can coconut milk (I used lite)
6 TBS minced ginger
1 cup cilantro
Vegetables are optional. Use any you prefer but I added:
5 small turnips – diced
5 small golden beets – diced
1 large sweet potato – diced
5 oz baby kale
1 tomato – diced
6 cups water
2 cups basmati (or other long grain white rice)
(If you are making your rice separate from the stew, as I did, it is nice to add a tsp cumin SEEDS & 6 green cardamom pods to it as it cooks but that is not necessary.)
GARNISH – coconut butter, cilantro, crushed red pepper
DIRECTIONS
Quick soak your beans (see note above) if you did not soak them overnight or for 2 days, as I did.)
Traditionally, the rice is cooked in the same pot with everything else. My Instant Pot was not large enough so I cooked it separately. This is your call – or maybe your pot size will determine your choice but it does not matter much either way.
Rinse the rice. Set aside.
Heat the oil in a very large pot (or your Instant Pot – my pot is 8 Quarts) and soften. Add the garlic & spices & stir to combine.
If you are using a slow cooker, transfer the onions & spices to it. Everything else is the same no matter whether you are slow cooking, Instant Pot cooking or going stove top. Only the cooking time will vary.
Now, add everything else to the pot. If your pot is easily deep enough to hold the rice, too, add that. If you are cooking the rice in the same pot – add 4 additional cups of water to the 6 cups used if you are cooking the rice separately (assuming your rice directions ask for 2 cups water per 1 cup rice. Adjust accordingly if your rice has different directions). Or – just cook the rice separately as the package directs. If you are making your rice separate from the stew, as I did, it is nice to add 1 tsp cumin SEEDS & 6 green cardamom pods to it as it cooks but that is not necessary.
Slow cooker – cook on low for 8 hours or high for 4 hours.
Stove top – bring to a boil uncovered for 5 minutes. Reduced heat, cover, and simmer for 30 minutes or more or until everything is tender.
Instant Pot – seal & cook manually for 10 minutes.
If it is to thick, thin it with extra water. If it is too thin, let is simmer, uncovered, for a while longer.
Serve with rice (if you cooked it separately) and garnish with coconut butter (burns fat & lowers cholesterol) and lots of cilantro & maybe some crushed red pepper.
Here are some articles for more info on kitchari & using it to detox:
To see images of my past posts & get links to the recipes – look on my Pinterest board – HERE.
~
All my posts now have a VERY customizable PRINT & PDF option. Create a PDF & save the recipe to your computer or print it out. It offers a “remove images” option & you can delete any part of the post you do not need before printing. The button is below by the Twitter & Facebook links.
~
Click the image above to watch the video.
This dish makes an incredible centerpiece for your vegan holiday table but is good as a side, too. I ate the entire thing alone in two days. So yummy! I overcooked my cauliflower in the boiling water just a bit so it did not hold its shape perfectly. So – be sure to only cook your cauliflower the 8 minutes & then drain it under cold running water.
Even if this guy falls apart when you cut into it, the flavor is not impacted. It is really delicious.
Gobi Musallam or Whole Roasted Cauliflower in Curry Sauce
INGREDIENTS
1 Head cauliflower (leaves and tough stem removed)
Water to blanch
2teaspoonssalt
1teaspoonturmeric
1teaspoonchili powderoptional
curry sauce
1 TBS olive oil
1/2medium red onion – chopped
1 TBS minced ginger
1 TBS minced garlic
1 TBS crushed red pepper chili flakes (or to taste)
Garnish – cilantro, pomegranate seeds, cooked rice or naan
INSTRUCTIONS
Preheat the oven to 400 degrees.
Bring a large pot of water to boil. Use enough water so all of the cauliflower can be immersed in it. Add salt, turmeric and chili and cook the whole cauliflower by immersing it in the water – bottom side down. Cover and cook for 8 minutes. Drain & rinse under cold running water to stop its cooking.
In a pan, add oil and heat over medium heat. Add chopped onion and saute until golden, 6-7 minutes. Add ginger, garlic chili and saute for another 2 minutes. Add the spices and mix. Add tomatoes, salt, sugar, fenugreek (if using), mix and cook covered until tender. Add coconut milk & yogurt. Heat a bit. Puree in a blender. Taste and adjust salt, spice.
Oil a baking dish – either a cast iron pan or casserole dish that can accommodate the head of cauliflower. Place the blanched cauliflower in a baking dish. Reserve about 1/3 of the sauce & set it aside. Slowly pour the remaining sauce the puree on top to cover the entire head of the cauliflower. Some sauce will fall pool around the bottom of the cauliflower.
Bake for 40-45 minutes till the cauliflower is dry to touch and sauce thickens a bit. Turn the dish around after 30 minutes.
Heat the remaining sauce to just about a boil so it thickens and serve on the side.
Garnish with warmed reserved sauce & fresh cilantro and maybe even some pomegranate seeds – if you are feeling festive. Serve as a side or with rice or naan.
To see images of my past posts & get links to the recipes – look on my Pinterest board – HERE.
All my posts now have a VERY customizable PRINT & PDF option. Create a PDF & save the recipe to your computer or just print it out. It offers a “remove images” option & you can delete any part of the post you do not need before printing. The button is below by the Twitter & Facebook links.
Click the image below to watch the video.
OK – in order to make this recipe – you really will need two important ingredients – seen above – preserved lemons & ras el hanout. The preserved lemons will give the dish its distinctive Moroccan flair and the ras el hanout will keep this stew from tasting like a curry. You can make the ras el hanout – as it is just a blend of other spices – but buying it will be so much cheaper & easier. See the package below – list the spices involved in that particular brand.
I used saffron – because I had it – but saffron can be very expensive so – if you don’t have any & don’t want to shell out the funds – blow the saffron off. Same with the harissa (a hot sauce). The two things I really suggest you not blow off are the preserved lemons & the ras el hanout – both of which can be purchased on Amazon.
Preserved lemons come in a jar (see above) & are simply lemons pickled in brine. They maintain all their sharp lemon flavor but are quite salty & very soft. The flavor they give this dish is critical – so – be patient – and get some before making this.
Other than that – this is a straight-forward slow cooker dish (which could be made by simmering on the stove, too) with ingredients that are easy to come by. I served mine with this Trader Joe’s blend of grains but couscous is more traditional. I like this stuff from Trader Joe’s because it is pretty & offers lots of textures. You can serve yours with whatever grain you prefer.
I used Beyond Meat chicken because I think it is the best on the market. I thawed & shredded it because it breaks down in stews better that way & because – visually – it really looks like shredded chicken. I am convinced you could slip this by meat-eaters with no complaints.
Vegan Moroccan Chicken, Chickpeas & Butternut Squash with Preserved Lemons for the Slow Cooker (or Not)
Serves 4-6 with couscous or rice
INGREDIENTS
9-12 oz vegan chicken
1 onion – diced
2-4 garlic cloves – chopped
2 (15 oz) cans of chickpeas – drained
4 cups vegetable stock
1 TBS ras el hanout
1/4 – 1 preserved lemon (depending on hpw large it is) – diced small (start with less & add more as you go – just so that this flavor doesn’t get to overpowering for you) – I used the entire 1/2 lemon using all parts
Saffron (a large pinch or more) – optional
Green and/or black olives – I used half Kalamata & half large martini olives – in a quantity to suit your taste for olives – optional
1 TBS harissa (or other hot sauce) – optional
1 (14 oz) can diced tomatoes
3 carrots – chopped
1 butternut squash – peeled, seeded & cubed
1/2 – 1 red bell pepper – diced
1 lemon – peeled & sliced
1 handful cilantro
GARNISH – chopped cilantro or parsley, lemon wedges/slices
Cooked couscous or other grain
DIRECTIONS
Instant Pot – Put all the ingredients in & use soup setting for 20 minutes.
Slow cooker – Put everything into a slow cooker & cook on high for 4 hours or on low for 8. If you started light with the preserved lemon – taste occasionally & add more – if you like the flavor. Overall – it should have a strong lemon flavor. It should not need salt – because the preserved lemons, olives & stock should have that covered.
Stove top – just bring to a boil & simmer everything until the vegetables are soft – likely less than an hour. If you started light with the preserved lemon – taste occasionally & add more – if you like the flavor. Overall – it should have a strong lemon flavor. It should not need salt – because the preserved lemons, olives & stock should have that covered.
In all cases – add water if it gets too thick. Drain in a colander if it is too wet.
Serve with whatever grain you chose & garnish with cilantro or parsley & lemon wedges.
To see images of my past posts & get links to the recipes – look on my Pinterest board – HERE.
To watch the video, click the image above.
I had cabbage & I had a desire for some old school comfort food. I was Googling around looking for inspiration & saw this thing of beauty by Proud Italian Cook:
Both my friend, Rose, and I were blown away & both swore to make it immediately. And we both did. I think she stuck with the original recipe but I had to make it vegan & make it before work – including going to the store to buy a different kind of cabbage – Savoy cabbage – so I could get that pretty lace effect – so I had quite a task ahead. My cabbage, ultimately, was not quite as vascular as the one Proud Italian Cook used & my oven heats unevenly – so I did not get quite the forest effect they did & I browned one side. No matter! This was easy to make & is really delicious & quite the show stopper!
I would have just used two bags of the Beyond Meat rather than add tofu but I only had one bag. I used frozen tofu that I thawed & then squeezed the water out. It gives the tofu a spongy-texture that resembles ground beef more than raw tofu does. It also has the added benefit of removing lots of the moisture.
I also added maitake mushrooms (seen above) and 2 grilled zucchini – simply because I had them. You could fill your cake with whatever traditional filling you would use for cabbage rolls or use this recipe or tweak this recipe. I used Rao’s sauce for ease & because it is the best jarred sauce on the market. You can use your own favorite – homemade or from a jar. Whatever you decide – I promise you will be delighted with this unexpected & regal reinvention of the humble stuffed cabbage roll.
Vegan “Tree of Life” Cabbage Cake (Stuffed Cabbage Tower)
Serves 4-6 (depending on appetites)
INGREDIENTS
1 large head of Savoy (or other green) cabbage
2+ TBS olive oil
9 oz vegan beef crumbles (or 18 oz or more and skip the tofu below)
1 lb tofu – frozen, thawed, water squeezed out & crumbled
1 onion – diced
4 garlic cloves – minced
1 celery stalk – chopped
1/2 to 1 lb mushrooms – chopped (optional)
1/4 cup parsley – chopped
1-3 tsp fresh thyme (or oregano) – less if you use dried
1 1/2 cups cooked rice (I used brown basmati)
S&P to taste
24 oz of your favorite red sauce
1 cup or so of Grated vegan Parmesan – optional
DIRECTIONS
Heat the oven to 350 degrees.
Core the bottom of the cabbage (leaving it in tact) & place in a deep pot cored-side down. Add 2-3 inches of water & bring to a boil – covered – for 5 minutes. Plunge into cold water & when it is cool enough to handle – carefully peel the leaves away & place on paper towels to dry.
Heat the olive oil in a large saute pan & then cook the onions, celery and mushrooms (if using) until soft (my photos do not reflect the proper order & it doesn’t really matter). Add the beef, tofu, and garlic, thyme, parsley rice & 1 cup marinara. Blend well. Season with S&P.
Grease a deep, round casserole or souffle-type dish & then arrange the prettiest and largest leaf on the bottom. Place another leaf on top of that and up the sides of the dish all around. Layer in some beef mixture (maybe 1/2 inch) & top with another layer of cabbage. Repeat until you reach the top or run out of filling. Finish with cabbage on top making sure to tuck it in the dish all around. Drizzle the top with olive oil and a sprinkling of about half your cheese (if you are using vegan or real cheese) all over. The cheese can be eliminated completely with little impact on this recipe.
Bake for about 40 minutes. Let it rest then invert a serving plate over the casserole dish, then carefully flip it over. Top with more warmed marinara & some of your cheese. Cut into slices and serve with additional warmed marinara and more grated cheese.
To see images of my past posts & get links to the recipes – look on my Pinterest board – HERE.
~
All my posts now have a VERY customizable PRINT & PDF option. Create a PDF & save the recipe to your computer or print it out. It offers a “remove images” option & you can delete any part of the post you do not need before printing. The button is below by the Twitter & Facebook links.
~
Click the image below to watch a video for this recipe.
OK – this dish is really easy to make & wildly delicious! And – you get to smoke it yourself in just five minutes! This is a really cool new trick I learned & I cannot wait to find new ways to use it.
All you need is a piece of natural charcoal (without lighter fluid or chemicals) – like this:
You heat it up on the stove – like this:
There is one more step but I will get back to that later. There are a few steps involved in the overall recipe but all are very easy! And the only “exotic” ingredient is the garam masala. If you cannot find it or don’t feel like looking for it – you can make it from stuff you likely already have. Look for recipes HERE.
This recipe really makes quite a lot of this stuff – enough for four – more if you serve it with rice or naan or roti. If you don’t have lots of folks to feed & don’t want yummy leftovers – cut the recipe in half – at least. I like my Indian food very flavorful & I tend to double or triple the amount of spices that traditional recipes typically suggest. I will post this recipe with a suggested amount of each thing & then tell you what I used. This dish is spicy but not crazy spicy – but I do like heat. If you have a more tender palate – be conservative.
Oh – and check out this tip on how to cut an onion without crying!
Smoked & Spicy Indian Eggplant Curry
Feeds 4 generously – served with rice
INGREDIENTS
2 small onions – diced
1 red bell pepper – seeded & diced
6 medium tomatoes
30 raw almonds (or raw cashews)
3+ TBS vegan butter
2 lb eggplant (any variety) – cubed
1-2 TBS ginger – minced (I used 2 but mine was jarred. Maybe go lighter if you are using freshly grated ginger)
4-10 garlic cloves – minced (I used 10)
1-2 TBS garam masala (I used 1)
1-3 tsp chili powder (I used 1)
Cilantro – as garnish
(serve with steamed rice or naan or roti or tortillas)
for smoking the eggplant curry
1 lump of coal about the size of a lemon or larger
2 TBS olive or vegetable oil
1 small METAL bowl to safely hold the hot charcoal
You also need a large saute pan & some sort of cover. I used my wok cover.
DIRECTIONS
Soak the nuts in some water for 5 minutes. I used this metal dog food dish & used it again later in the smoking process.
(In the video version – I did not peel the tomatoes so feel free to skip this step.) Meanwhile – poke some holes in your tomatoes with the tip of a knife & drop them into boiling water. After a few minutes – you will see the skins curling off. Drain & run under cool water until you can handle them without burning yourself. Then core them.
Drain the nuts & then puree them in a blender with the tomatoes. Set aside.
Heat 3 TBS of vegan butter or olive oil in a large saute pan – large enough to hold ALL the ingredients. Over high heat – saute the onions & red bell pepper & eggplant. Saute until the eggplant begins to brown. Add more vegan butter or olive oil if needed. This should take about 10 minutes.
Add the garam masala & chili powder & the ginger – stir to incorporate. Add the garlic & stir for one minute – then add the tomato puree. Boil this for about 5-7 minutes until it thickens. If it gets too thick – add a bit of water.
When it looks about like this:
TURN OFF THE HEAT & put your metal bowl in the center of the pan.
Now – heat up the charcoal – like this:
When it is red hot or graying on the outside – USE METAL TONGS & put it in the bowl in the center of your curry. Then pour some olive or vegetable oil on it It will immediately begin smoking so – if you have a hood with vents – turn them on. Quickly – cover it up with a pot cover of some sort. I used my old & very beaten up wok cover.
Let this sit for 5-10 minutes & let the smoke work its magic. I went 6 minutes because I was afraid it would be too smoky. It wasn’t. In the future – I will go for ten minutes. CAREFULLY remove the metal bowl – with two pairs of tongs. DO NOT BURN YOURSELF!
DEFINITELY season this with salt. Do not be shy – but add it in increments. Salt is under-rated as a spice.
Then – just serve this over some rice or with naan or a tortilla or roti – garnished with some cilantro.
To see images of my past posts & get links to the recipes – look on my Pinterest board – HERE.
~
All my posts now have a VERY customizable PRINT & PDF option. Create a PDF & save the recipe to your computer or print it out. It offers a “remove images” option & you can delete any part of the post you do not need before printing. The button is below by the Twitter & Facebook links.
~
Click the image below to watch the video.
This is hardly a recipe because all you do is mix everything up but it is so light & yummy & pretty – I am posting. Traditionally, this is made with bulgar but I had quinoa (keen-wah) around & used that. The ration of ingredients is no science and pretty open to tweaking. It is great to eat with chunks of pita bread or as a sandwich spread. It is a light & salady thing & you don’t eat it in huge portions. It is kind of like a palate cleanser when eating other foods of the region like shawarma, gyros & hummus.
Tabbouleh with Quinoa
Makes about 2 cups
3/4 cup dry quinoa – cooked according to packaging (for me – that was 2 parts water to 1 part quinoa – boiled & left off heat, covered, for 12 minutes. OR – 1 1/2 cups or so of cooked & cooled quinoa.