DDD #67 – Vegan Glazed Ham with Garlic Roasted Persimmons

Leave a comment


All Photos © Christine Elise McCarthy 2017

To see images of my past posts & get links to the recipes – look on my Pinterest board – HERE.

images (1)download (1)

BathingandthesinglegirlCover

vromans back


Click the image above to watch the video.

Click this link to see the Instant Pot on Amazon – http://amzn.to/2BVRae2

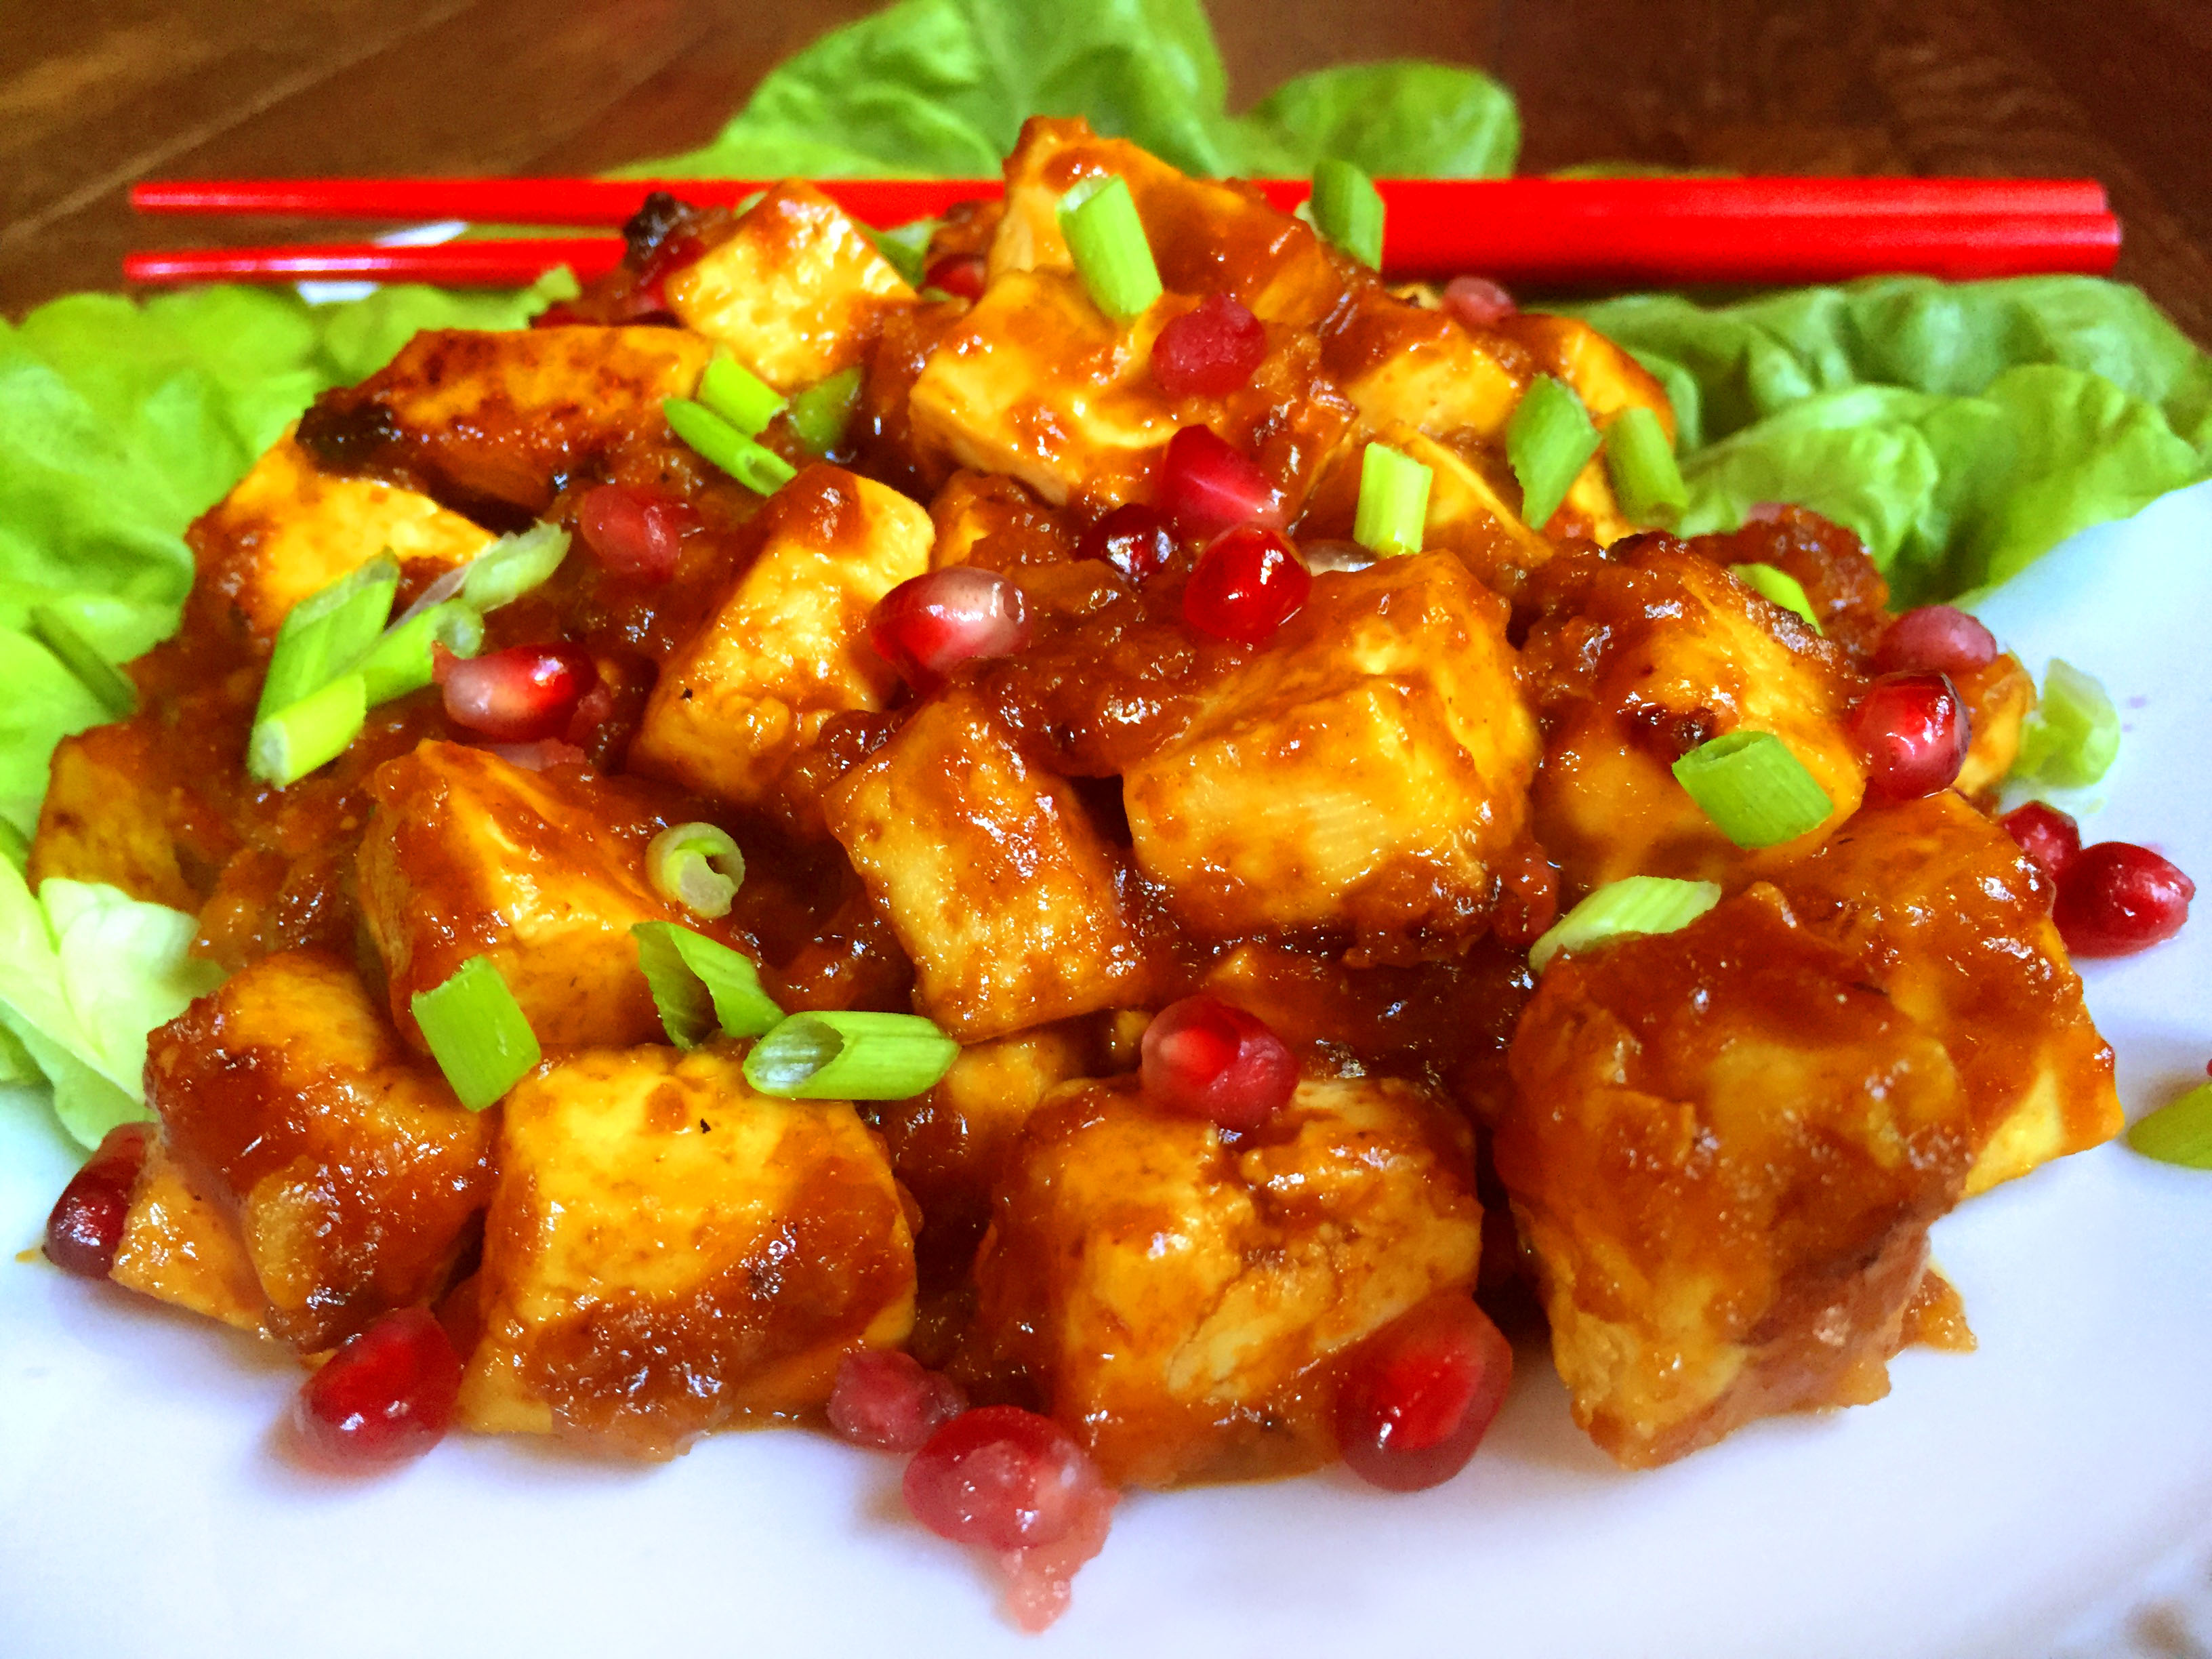
I cooked the ham exactly as was outlined on the box.  It was simply to wrap it in foil & bake in at 325 degrees for 70 minutes.  I boiled & then cooled the glaze.  After 70 minutes, I removed the foil & glazed the ham.  I baked it in 5 minute increments, adding glaze each time, for another 20 minutes.  The only other directions I have to offer here is that the addition of the garlic roasted persimmons was inspired & I recommend you try it.  I just peeled them & cut them into wedges, tossed them in a bit of olive oil with some minced garlic & added salt & pepper.   I put them on the pan with the ham for the final 20 minutes the ham cooked.  If yours are not tender in that time, just continue roasting until they are.

The image above is from the ham box.

The turkey by this same company is also very good – especially cold.  They make the best wraps!

Here are the nutritional facts:

Vegan Ham Roll

Imitation ham with vegan apricot plum glaze. Made with Non-GMO Soy protein.

Ingredients:

Vegan Ham: Textured Soybean Protein (soybean protein, wheat protein, wheat starch, soybean oil), Water, Soybean Oil, Soybean Protein Isolate, Vegetable Extract (carrot extract, pea extract, phosphate, vegetable gum), Raw Cane Sugar, Modified Tapioca Starch, Sea Salt, Yeast Extracts, Maltodextrin, Enzyme, White Pepper Powder, Red Fermented Rice, Black Pepper Powder, Spices.

Vegan Glaze: Plum, Apricot, Water, Agave Syrup.

ALLERGY INFORMATION: This product contains soy and wheat, and is manufactured in a facility that also processes other items containing milk or egg.

Nutrition Facts:

Vegan Ham: Serving Size: 2.5 oz. Calories 150, Calories from Fat 80, Total Fat 9g (14% DV), Saturated Fat 1.5g (8% DV), Trans Fat 0g, Cholesterol 0mg (0% DV), Sodium 360mg (15% DV), Total Carbohydrate 7g (2% DV), Dietary Fiber 1g (6% DV), Sugars less than 1g, Protein 10g. Vitamin A 0%, Vitamin C 0%, Calcium 4%, Iron 8%.

Vegan Glaze: Serving Size: 2.1 oz. Calories 70, Calories from Fat 0, Total Fat 0g (0% DV), Saturated Fat 0g (0% DV), Trans Fat 0g, Cholesterol 0mg (0% DV), Sodium 0mg (0% DV), Total Carbohydrate 17g (6% DV), Dietary Fiber 1g (3% DV), Sugars 16g, Protein 0g. Vitamin A 6%, Vitamin C 6%, Calcium 0%, Iron 0%.


Vegan Lentil Meatballs in a Spicy Asian Glaze (Appetizer)

2 Comments


All Photos © Christine Elise McCarthy 2017

To see images of my past posts & get links to the recipes – look on my Pinterest board – HERE.

images (1)download (1)

All my posts now have a VERY customizable PRINT & PDF option.  Create a PDF & save the recipe to your computer or print it out.  It offers a “remove images” option & you can delete any part of the post you do not need before printing.  The button is below by the Twitter & Facebook links.

3-3-17-75

3-3-17-107

bathingandthesinglegirlcover

vromans-back

2-28-17-6

3-2-17-8

It has been a lentil-crazy week here, lemme tell you.  The other day, I made about 10 cups of my Easy Vegan Thai Sweet Basil & Coconut Lentils.  Then, I used some of the bountiful leftovers to make my Leftover Lentils Red Coconut Curry Beef and Bean Meatloaf (Vegan).  Both are seen just above.  Well, I still had FIVE CUPS of prepared lentils leftover.  What to do?  How many times can one person eat lentils in one week?  And, while they would freeze well, my freezer is busting at the seams with leftovers.  So – I decided to make party appetizers.  And these are GOOD!  Very easy & great for a crowd & healthy & yummy & vegan!  Just mix up the ingredients, bake them for 10-15 minutes – drizzle the glaze & serve!  Mmmmmm!

3-3-17-63

3-3-17-84

3-3-17-93

Vegan Lentil Meatballs in a Spicy Asian Glaze

Makes about 50 meatballs

INGREDIENTS

5 cups prepared lentils in their thick sauce (or about 1/2 of this recipe – Easy Vegan Thai Sweet Basil & Coconut Lentils)

1 TBS olive oil

1 small onion – diced

10 mushrooms – chopped

3 scallions – chopped

5 TBS liquid aminos (or soy sauce or tamari)

2 eggs (whatever vegan replacer you use – I used Neategg)

1 cup panko crumbs (more or less – depending on how wet your lentils are)

2 TBD sesame oil

3 TBS vegan hoisin sauce

for the spicy Asian glaze

2/3 cup hoisin sauce

1/4 cup rice vinegar

2 garlic cloves – minced

2 TBS liquid aminos (or soy sauce or tamari)

1 tsp sesame oil

1 tsp ground ginger

GARNISH – sesame seeds and/or sliced scallions

3-3-17-8

3-3-17-9

3-3-17-10

3-3-17-99

3-3-17-73

DIRECTIONS

for the glaze

Combine ingredients in a shaker or whisk in a bowl.  Set aside.

for the meatballs

Heat the oven to 400 degrees.

Prepare the lentils according to my recipe or your own favorite recipe.

In a saute pan, add the olive oil & saute the onion, mushrooms & scallions until soft.

Add the onion mix to the prepared lentils. Add the remaining ingredients for the meatballs.  Make balls that are 1 to 1.5 inches in diameter & place them on a greased cooking sheet.  Bake for 10-15 minutes -depending on how large & we they are.  When they are getting crusty on the outside – taste one & be sure they are done to your liking.  When they are ready, put them on a plate.  Drizzle with sauce & garnish with sesame seeds & scallion slices.

3-3-17-95

3-3-17-97

Vegan Roasted Butternut, Kabucha & Delicata Squash with Pomegranate, Mint, Balsamic Glaze & Roasted Pepitas

Leave a comment


All Photos © Christine Elise McCarthy 2015

To see images of my past posts & get links to the recipes – look on my Pinterest board – HERE.

images (1)download (1)

12-30-15 (129)

12-30-15 (104)

BathingandthesinglegirlCover

vromans back

12-30-15 (118)

I had managed to collect a variety of squash with no real plans for them.  Today – as I often do – I looked around for inspiration & came up with this.  It is gorgeous & light & delicious and can be served warm or room temperature.    I have leftover roasted squash & pepitas & if you end up with leftovers, too – consider cutting the skins off the squash & make a salad!  Toss with arugula & pomegranate seeds & pepitas & a balsamic vinaigrette (adding goat or feta – if you are a cheese eater) – OR – make a pizza with slices of squash atop a crust with some mozzarella (vegan or not – up to you) and then top the cooked pizza with arugula & pomegranate seeds & pepitas.  Lots of ways to use all these pretty colors & flavors.

This is not a difficult recipe.  The most painstaking parts are seeding the pomegranate (or you could buy pomegranate seeds) and roasting the pepitas (you could buy roasted pepitas).  It is far more satisfying to do it all from scratch.

I used three kinds of squash.  You can use all one kind or choose different kinds – but use ones that all have thick skins so the cook at the same rate.

Speaking of which – I tossed the seeds from all 3 squash into the same bowl to clean & roasted them together.  In the future – I will keep the kabucha seeds separate – as they are far larger than the others.  I will put the smaller seeds on one cooking sheet & the larger on another – so I can take each out of the oven at the rate they are ready.

The ratio of ingredients here is kind of up to you.  You might like more or less glaze, more or less pomegranate or pepitas or mint – so – assemble yours to taste.

 12-30-15 (96)

12-30-15 (132)

12-30-15 (66)

Roasted Pepitas

Seeds from the squash

Fine salt

Olive oil or cooking spray (I used olive oil spray)

11-3-14-166

11-3-14-167

11-3-14-168

12-30-15 (68)

DIRECTIONS

Heat the oven to about 325.

Get a large bowl of water & put the messy seed mix in there.  Separate the seeds from the flesh & the seeds all float to the top.  Use a slotted spoon & get those suckers outta there.

Boil some water & add a tsp of salt.  Lower the heat, add the seeds &  simmer the seeds, uncovered, for about 10 minutes & then drain them.

I let them set out to dry a bit & then tossed them with just a hint of olive oil or some cooking spray.  If you have two wildly different sized seeds – cook them on separate sheets so you can take the smaller ones out sooner than the larger.

Spread them on a cooking sheet in as thin a layer as you can – trying to minimize overlap so all the seeds get heat equally.  Sprinkle with a little salt & bake for about 10 minutes.

Take them out & stir them around.

Now continue roasting in 5 minute increments because you DO NOT want to burn these.  They are done when they are just starting to look golden but the real test is how they chew.  So – cool a few off each time you test them & eat them.  They are done when they chew easily & are nice & crunchy!

Save extras in a jar.

12-30-15 (85)

11-3-14-1881

12-30-15 (103)

12-30-15 (144)


Vegan Roasted Butternut, Kabucha & Delicata Squash with Pomegranate, Mint, Balsamic Glaze & Roasted Pepitas

6-10 as a side – depending on the size of your squash & appetites

INGREDIENTS

3 squash of your choice (I used butternut, kabucha & delicata)

Roasted seeds from your squash (recipe to roast them above)

Balsamic glaze (store bought or homemade – recipe:  Simply boil a balsamic until it reduces by about 50-75% and has a thick syrupy texture.  It really does reduce a LOT so – if it reduces to too little for your squash – just reduce some more.  If it gets too thick – add a few drops of water.)

Pomegranate seeds

Fresh mint – chopped

Olive oil or cooking spray (I used olive oil spray)

S&P

Parchment paper optional but it makes clean-up so easy!

12-30-15 (62)

12-30-15 (64)

12-30-15 (67)

Heat the oven to 425.

Seed the squash & put the seeds in a bowl of water.  If there is a large disparity of size – separate them in different bowls by size.  I did mine altogether but I risked burning the smallest seeds waiting for the large kabocha seeds to cook.  It worked out – but I would still separate them next time.

Cut the squash into 1″ to 1.5″ inch slices.  Arrange on a cooking sheet.  Toss with olive oil (or spray with cooking spray on both sides) – and add some S&P.

Roast about 30 minutes – flipping once – or until they are soft & beginning to caramelize or brown a bit.

12-30-15 (89)

12-30-15 (90)

12-30-15 (94)

If you are using homemade glaze – make that while the squash cook.  Simply boil a balsamic until it reduces by about 50-75% and has a thick syrupy texture.  It really does reduce a LOT so – if it reduces to too little for your squash – just reduce some more.  If it gets too thick – add a few drops of water.  If you like a lot of glaze – start with at least a cup or more before you reduce it.

Seed your pomegranate.

When the squash is done, arrange it on a platter.  Drizzle glaze & then sprinkle the pomegranate, pepitas & mint on top.

Gorgeous & healthy.  Wow the villagers with this shit!

12-30-15 (107)

12-30-15 (146)

12-30-15 (122)

Vegan Creamy Polenta Bowl with Roasted Beets, Toasted Walnuts, Thyme & Balsamic Glaze

2 Comments


All Photos © Christine Elise McCarthy 2015

To see images of my past posts & get links to the recipes – look on my Pinterest board – HERE.

images (1)download (1)

12-23-15 (24)

12-23-15 (23)

BathingandthesinglegirlCover

vromans back

12-23-15 (33)

Once again, I created a dish out of an effort to use what I had on hand and, I must admit, I am quite delighted.  I had a bag of polenta from the bulk section at Lassen’s (a store that is a wonderland of healthy foods but 1) mixes meat & vegan items in the same cases & it can get confusing and 2) is SO FUCKING claustrophobic that I am in a mild panic the whole time I am there).  I also had some roasted beets I needed to use.  Voila!

I am a huge fan of both polenta & grits (grits being the same thing, really, but just not as finely ground).  I especially like them creamy & soft – like a porridge.  Most polenta & grits recipes have cheese in them & you can certainly add cheese but this didn’t need it.  AND – I cooked the polenta in my slow cooker while I went spinning this morning!  I came home, exhausted, to a vat of steaming, creamy polenta.  Win win!

If you are not vegan, some crumbled goat cheese on this would be divine!  Actually – they make lots of vegan cheeses that are like goat cheese or Boursin & a little bit of one of those might be a nice addition to this dish.   If you don’t like or don’t have walnuts – I think pistachios would be better, anyway – I just didn’t have any.  Oh – and polenta is naturally gluten-free.  This is a very low fat recipe but is warm & hearty & great for winter weather.  If you really want to get all cold-weather crazy – stir a small can of pumpkin puree into the polenta.   Yuuuum!

I used this balsamic glaze (below) but a balsamic reduction is VERY easy to make.

BALSAMIC REDUCTION

Simply boil a nice balsamic until it reduces by about 50-75% and has a thick syrupy texture.  It really does reduce a LOT so – if it reduces to too little for your pizza – just boil down some more.  Be careful not to burn it! I used about a tablespoon of the reduction on this polenta.

12-23-15 (6)

12-23-15 (11)

12-23-15 (15)

Vegan Creamy Polenta Bowl with Roasted Beets, Toasted Walnuts, Thyme & Balsamic Glaze

This makes enough polenta to feed 4 easily.  The quantity of the toppings is up to you.

INGREDIENTS

2 cups dry polenta

8 cups vegetable stock

Beets

Walnuts (or pistachios)

Fresh thyme removed from stems

Balsamic glaze (see recipe above if you want to make it yourself)

(Adding vegan goat cheese – or any other very soft cheese) at the end with the beets & nuts would take this to the next level.  Fried sage – in place of the thyme – might also be nice.)

12-23-15 (27)

DIRECTIONS

Heat the oven to 425 degrees.

I cooked my polenta in a slow cooker by simply putting the polenta & stock in there, setting it on high (cover on) and two hours later – I had a lot of creamy goodness.  If it gets too thick, add more water or stock.  If it is too thin – cook a bit longer (taking the top off accelerates this process).

OR – cook your polenta according to the package (using stock rather than water).  Stove top – this should take 30-40 minutes.

Wrap beets well in foil. You might want to drizzle a bit of olive oil in there but that is not necessary.  Place on a baking sheet and bake until beets are slightly soft to the touch, 45 minutes to 1 hour depending on their size. Cool beets and then rub off skins (use a paring knife for tough spots).

Toast the nuts in a dry pan for 2-3 minutes – stirring frequently so they do not burn.  Set aside.

Now – assemble your bowls.  Spoon in the polenta, top with beets & nuts & a drizzle of balsamic glaze & some thyme leaves.  Add cheese – if you are using some.  I did not.

Eat’m up!

12-23-15 (18)

12-23-15 (30)

Vegan Spicy Orange & Sriracha Glazed Tofu with Pomegranate Seeds

Leave a comment

All Photos © Christine Elise McCarthy 2015

To see images of my past posts & get links to the recipes – look on my Pinterest board – HERE.

images (1)download (1)

10-3-15 (69)

10-3-15 (73)

BathingandthesinglegirlCover

vromans back

10-3-15 (99)

9-18-15 (30)

9-18-15 (130)

9-18-15 (159)

christine elise low res_2

10-1-15 (488)

10-3-15 (27)

10-3-15 (29)

I have done a zillion 90210 interviews recently – building up to the 25th anniversary of when the pilot aired.  Above are a few recent photos from a 90210-inspired shoot.

And here are two of the interviews – HERE at TEN MINUTE INTERVIEWS –

christine-elise2-940x521

and HERE  at COMPLEX.

christine-elise-2final_wmfqyp

Tonight is the Lifetime movie about the show at after it – there will be an interview special – in which I took part.

That said – let’s get into this dish.  The glaze is the shit & would work on most things from shrimp to vegan or real chicken or, as here, on tofu.  I could not figure out what to do with the tofu first.  Should I bread & fry it?  I tried that & it just seemed like a bad thing to add all those calories.  So – after half-frying half the tofu – I baked it all at about 400 for thirty minutes – after coating it in some glaze – like you see below.

10-3-15 (35)

10-3-15 (36)

10-3-15 (41)

Ultimately – you could just throw the uncooked tofu into the glaze & warm it that way.  I feared the tofu would be too mushy & break apart and – since I didn’t try that version – I cannot tell you what happened.  So – it is up to you.   You could BAKE IT first, or FRY IT – or just use it plain.  Or – do what I did, coat it with glaze & just bake it a bit to add some texture.  Your call.  Whatever you decide – the glaze is easy & comes together fast.  If I were to make it again – I would cut the sugar in half.  If you like spicy-sweet, go with the full 1/4 cup of brown sugar.  It is pretty spicy – so if you are sensitive to heat – lessen the sriracha.

I added pomegranate seeds because I have a shitload left over from my AMAZING Burnt Eggplant with Pomegranate Seeds & Cucumber – or Really Fancy Baba Ganoush – seen below – which was INSANELY addictive.  The seeds are pretty but don’t add much to the tofu dish so blow them off – if you feel inclined.  They are critical & amazing in the baba ganoush, though!

9-28-15 (109) 9-28-15 (157)

10-3-15 (102)

Vegan Spicy Orange & Sriracha Glazed Tofu with Pomegranate Seeds

Serves 2 – with rice or in lettuce wraps

INGREDIENTS

1 lb extra firm tofu – cubed

Panko (only if you are frying – in which case you need oil, too.)

1 cup orange juice

zest & juice of one orange

1/4 cup (or less) brown sugar

1/4 cup (more or less according to taste) sriracha

1/4 cup rice vinegar

1/4 cup soy sauce or tamari

4 garlic cloves – chopped

1 TBS ginger – grated or minced

2 TBS cornstarch whisked into 2 TBS water

GARNISH – sliced scallions, pomegranate seeds and then cooked rice or lettuce leaves for serving

10-3-15 (39)

10-3-15 (93)

DIRECTIONS

OK – here you need to decide what you are doing with the tofu.  Are you just going right outta the package or fry it or – as I did – toss it with some panko & some (only a little) glaze & bake at 400 degrees for 30 minutes?  I don’t think it makes a massive difference – except fr the effort and, in the instance of frying, the calories.  You could brown it in a frying pan with a little olive oil – to add texture.  Blow off the panko – really – unless you are frying it.  These are your decisions to make and that decision is the hardest part of this recipe.  If you are in a hurry or are lazy – just use the naked tofu.

Prep your tofu.  I tossed mine in a bit of glaze & baked at 400 degrees for 30 minutes.

Make some rice or prep some lettuce leaves for wraps.

To make the glaze – heat the orange juice, zest & juice of one orange, brown sugar, sriracha, rice vinegar, soy sauce or tamari, garlic cloves and ginger and bring to a boil.  Add the cornstarch/water mix & the glaze should thicken up in less than a minute.  Add the tofu & heat through.

Serve either on rice or wrapped in lettuce with a sprinkle of scallions & pomegranate seeds.

10-3-15 (45)

10-3-15 (75)

Peach & Tomato Caprese Pizza with Mozarella, Basil & Balsamic Reduction

Leave a comment

All Photos © Christine Elise McCarthy 2015

To see images of my past posts & get links to the recipes – look on my Pinterest board – HERE.

images (1)download (1)

7-29-15 (41)

7-29-15 (37)

BathingandthesinglegirlCover

vromans back

7-29-15 (3)

That photo above has nothing to do with this recipe.  But – I bought figs at the farmer’s market the other day & they photograph so gorgeously – I could not resist snapping this pic of them & that lush hunk of Saint Andre.  Dairy is something I am increasingly cutting out of my diet but – holy mother of God – that that cheese on some crusty bread & topped with a fig?  Criminy! I am desperate for vegan cheese to do what vegan meats (especially Beyond Meat) have done – namely – evolve into a really great vegan alternative to cruelty-based foods.

7-29-15 (40)

7-29-15 (44)

So – my boss gave me a perfectly ripe peach the other day.  I let it sit, in all its aromatic glory, on my desk all day as I pondered what to do with it.  I then remembered that I had homemade pizza dough in the fridge & from that fact alone – this pizza was born.  At the end of the work day, I sauntered out, proudly declaring that a peach pizza was about to happen – and happen it did.

I wasn’t sure if I would like hot peach pizza so I decided to hedge my bet a bit & made this a twofer.  I did not have Gorgonzola or goat cheese – cheeses that might cut the sweet of the peach so I decided to drizzle it with a balsamic reduction.  I am happy to announce that the peach side was even more delicious than the traditional side.  I did not cook the peach at all first but you could grill yours first if you want to maybe give the pizza that extra layer of flavor. It is completely unnecessary, though.

BALSAMIC REDUCTION

Simply boil a nice balsamic until it reduces by about 30-75% and has a thick syrupy texture.  It really does reduce a LOT so – if it reduces to too little for your pizza – just boil down some more.  Be careful not to burn it! I used about a tablespoon of the reduction on this pizza.

7-29-15 (29)

7-29-15 (45)

7-29-15 (58)

7-29-15 (33)

Peach & Tomato Caprese Pizza with Mozarella, Basil & Balsamic Reduction

Serves as many as you like – depending on how much dough & ingredients you have

INGREDIENTS

(the amount of each is up to your personal taste)

Pizza dough (I used this one)

Peaches – pitted & sliced 1/4 inch thick

Tomato sauce (I used Rao’s Arrabbiata)

Fresh mozzarella (or vegan alternative) – sliced

Fresh Basil

Cherry or grape tomatoes – quartered (optional)

Balsamic reduction (recipe above in bold)

Parchment paper (optional)

7-29-15 (26)

7-29-15 (28)

7-29-15 (54)

DIRECTIONS

Heat the oven to 500 degrees & be sure it reaches temperature before putting your pizza in there.

Make the balsamic reduction.  Set aside.

Cover a cooking sheet with parchment paper.  And old metal pan.  Pizza stones suck.  PARCHMENT PAPER is magic.  Or – grease a cooking sheet with cooking spray or olive oil.

Roll the dough out & put it on the pan.  Spread sauce on one half of the pizza & arrange the peach slices on the other.  Top with cheese.  Cook until it is the way you like it – typically 10-15 minutes.  Top with basil & cherry tomatoes & drizzle the peach side (or both sides) with the balsamic.

Voila!

7-29-15 (59)

7-29-15 (31)

Roasted Rainbow Carrots with Thyme & Balsamic Glaze

Leave a comment

All Photos © Christine Elise McCarthy 2015

To see images of my past posts & get links to the recipes – look on my Pinterest board – HERE.

images (1)download (1)

6-30-15 (53)

6-30-15 (49)

BathingandthesinglegirlCover

vromans back

I belong to a produce delivery service called Farm Fresh to You.  I get a box of custom-selected veggies every two weeks & the standout items so far have been their carrots!  Whew knew?  SO sweet and the texture is wonderful – unlike the almost bitter & very hard store-bought carrots I have been experiencing recently.  These carrots are DELICIOUS & it is nearly impossible to bite into one & not eat the whole thing.  Good news, though!  You CAN eat the whole thing.  Eat the whole bunch.  They are just carrots, for fuck’s sake.  Go friggin’ crazy!

Anyway – my last box had this little bunch of rainbow carrots it it.

6-30-15 (12)

6-30-15 (13)

They get even prettier when you peel them.  The color combination looked so autumnal – roasting them with some earthy thyme & sweet balsamic glaze just seemed like the way to go – so I did just that!  Takes about 20 minutes or so – depending on the size of your carrots.  Easy & delicious!

6-30-15 (30)

6-30-15 (55)

6-30-15 (59)

Roasted Rainbow Carrots with Thyme & Balsamic Glaze

Serves 2 as a side

INGREDIENTS

1 small bunch of rainbow or other carrots

1 tsp olive oil

S&P

Fresh thyme

1/2 cup or more of Balsamic vinegar

Parchment paper (optional)

6-30-15 (17)

6-30-15 (24)

6-30-15 (35)

6-30-15 (58)

DIRECTIONS

Heat the oven to 425.

Peel the carrots & cut any thick ones in half.  Leave thin ones whole.  Toss with olive oil and S&P until they are evenly coated.  Put on a roasting pan (topped with parchment paper – if you have it).   Sprinkle with fresh thyme leaves – maybe a tablespoon or two.  Roast 10 minutes.

Meanwhile – basically boil the balsamic until it thickens.  It thickens quickly & reduces very fast so be careful not to burn it.  If it gets too thick – just add more balsamic.  The thickness of the glaze is up to you.

6-30-15 (19)

When it is thick even – drop a few thyme leaves into it.

After 10 minutes, flip the carrots & then drizzles most of the balsamic glaze onto them – reserving a little (or make more for later).  Roast another ten minutes (more or less – depending on how well you want the carrots cooked).    Drizzle with remaining balsamic glaze, maybe sprinkle more fresh thyme leaves on them & serve.

6-30-15 (39)

6-30-15 (50)

Spicy Vegan Miso Sesame Chicken

Leave a comment


All Photos © Christine Elise McCarthy 2014

To see images of my past posts & get links to the recipes – look on my Pinterest board – HERE.

images (1)download (1)

~

All my posts now have a VERY customizable PRINT & PDF option.  Create a PDF & save the recipe to your computer or print it out.  It offers a “remove images” option & you can delete any part of the post you do not need before printing.  The button is below by the Twitter & Facebook links.

~

9-1-14 (411) 9-1-14 (402)

Untitled

Labor Day!  September 1st – and I haven’t posted since July 31st.   I have never dropped the ball for so long and I apologize.  But – I was out of town for a few weeks – in Mississippi shooting

10277149_856350947724070_8827475139384719925_n

10612739_943005879058576_110022261220454596_n

and then celebrating the third anniversary of meeting the badass, Miles Miller, at Sidewalk Film Festival in Birmingham.

9-1-14 (362)

9-1-14 (366)

The film promises to be fantastic & Sidewalk is always a perfect experience.

That said – back to food.

This recipe can be tweaked to accommodate a carnivore or a vegan.  Easy, quick & spicy – it is just another great way to use Beyond Meat’s amazing vegan chicken.

9-1-14 (406)

9-1-14 (419)

Spicy Vegan Miso Sesame Chicken

Feeds 2 with rice & a steamed vegetable

INGREDIENTS

9 oz vegan (or real) chicken

1/4 cup rice vinegar

2 TBS agave nectar (or honey – if you are not vegan)

3 TBS miso paste

2 TBS sambal oelek (or other hot sauce)

4 garlic cloves – minced

2 TBS toasted (or other) sesame oil

Cooking spray or olive oil

cilantro or scallions or micro greens for garnish

cooked rice

9-1-14 (394)

9-1-14 (395)9-1-14 (396)

9-1-14 (397)

9-1-14 (400)

9-1-14 (403)

9-1-14 (426)

DIRECTIONS

Steam some rice.  I used brown Basmati.  I also added some broccoli to the cooking rice in the last 5 minutes.

Mix the rice vinegar, agave or honey, miso paste, hot sauce, garlic & sesame oil in a bowl & pour over the chicken.  I did this right in the bag the chicken came in.  Marinate for an hour or more, if you can – but that isn’t totally necessary.

Remove the chicken from the marinade & put the marinade in a pan & heat over high heat until it thickens – maybe 5 minutes.

Meanwhile, treat a pan with cooking spray or olive oil & cook the chicken until it browns.  If using real chicken – be sure to cook it through.

Now – simply serve the chicken over some rice & drizzle with the glaze or add the chicken to the pan with the glaze & then put some on the rice.  Your call.

Garnish with scallions or cilantro or some greens.  Eat it up!

HAPPY LABOR DAY!!!!!!!

9-1-14 (407) 9-1-14 (409)

Vegan Garlic and Lime Glazed Chicken (with Cilantro Lime Farro)

Leave a comment


All Photos © Christine Elise McCarthy 2014

To see images of my past posts & get links to the recipes – look on my Pinterest board – HERE.

images (1)download (1)

~

All my posts now have a VERY customizable PRINT & PDF option.  Create a PDF & save the recipe to your computer or print it out.  It offers a “remove images” option & you can delete any part of the post you do not need before printing.  The button is below by the Twitter & Facebook links.

~

7-7-14 (93)


7-7-14 (84)

BathingandthesinglegirlCover

vromans back


7-7-14 (42)


This is another really easy one & another one using the awesome vegan chicken from Beyond Meat.   If you are not vegan, you can use honey rather than agave & maple syrup.  And if you eat meat – you could use real chicken – just be sure to cook it thoroughly.

I served this with my Cilantro Lime Farro & I recommend the combo enthusiastically!

7-7-14 (117)

Vegan Garlic and Lime Glazed Chicken

Serve 2 well

INGREDIENTS

9 oz vegan chicken – thawed & cubed

1-2 TBS olive or coconut oil

1 TBS soy sauce

juice & zest of 2 limes

1 TBS agave (or honey – if you are not vegan)

1/2 TBS maple syrup (or honey – if you are not vegan)

1/2 tsp chili powder

1/2 tsp ground cumin

1 TBS brown sugar

2 garlic cloves – minced

Cilantro – as garnish

Lime wedges – as garnish

(Double the quantities of the soy sauce through to the garlic – if you like more sauce than you see in these images)

7-7-14 (99)

DIRECTIONS

You can pan sear the chicken if you want but it isn’t necessary.  To do that – just heat some oil in a pan over med-high heat & brown the chicken.   Put the chicken in a bowl.  Whisk together the soy sauce, agave & maple syrup (or honey), lime juice & zest, garlic & spices.

7-7-14 (74) 7-7-14 (75)

Add a little more oil to the pan if you need to & heat the sauce over med-high heat until the spices dissolve & it thickens just a bit.  Stir the chicken in – whether or not you pre-browned it.  Heat through.

Just that easy!

Serve with rice or ramen noodles or Cilantro Lime Farro!   Be sure to squeeze lots of fresh lime juice over it as a garnish.

7-7-14 (97)

7-7-14 (113)

Vegan Ponzu Glazed Chicken with Spicy Soba Noodles and Vegetables

3 Comments


All Photos © Christine Elise McCarthy 2014

To see images of my past posts & get links to the recipes – look on my Pinterest board – HERE.

images (1)download (1)

~

All my posts now have a VERY customizable PRINT & PDF option.  Create a PDF & save the recipe to your computer or print it out.  It offers a “remove images” option & you can delete any part of the post you do not need before printing.  The button is below by the Twitter & Facebook links.

~

Image

Image

Image

Image

Image

Like most of my recipes, this one is pretty easy & very customizable.  I used the vegetables I had handy.  You can use these or any others you might have or prefer.  I used Korean Gochujang but sriracha or chili paste will do.

Image

Image

I used soba noodles but ramen or even a thin spaghetti would be great, too.

I use this amazing & easy ginger from a jar but fresh ginger is even better.  And I used my favorite faux chicken from Beyond Meat but any vegan option (or even real chicken – if you eat that stuff) will do.  Tastes great cold, too!

Image

Image


10429671_10154276156540574_1173311463_o

I also used bottled ponzu sauce but you can make your own if you cannot find it bottled.

This really is delicious & so colorful & reasonably healthy, I recommend it very highly!

Image

Image

Image

Vegan Ponzu Glazed Chicken with Spicy Soba Noodles and Vegetables

serves 4 very well

INGREDIENTS

9 oz vegan chicken

12 oz soba noodles

for the marinade

1/4 cup ponzu sauce

1 tsp ginger – minced

1 TBS brown sugar

3 garlic cloves – minced

1 tsp sesame oil

for the sauce

1/4 cup water

1/4 cup low sodium soy sauce

1/4 cup ponzu sauce

2 TBS brown sugar

1 TBS gochujang or sriracha or chili paste

for the vegetables

1-3 tsp sesame oil

1 cup edamame

1 cup carrots – grated

1 cup red bell pepper – cut into strips

1 cup broccoli – cut into small florets

1/2 cup purple cabbage – chopped

as garnish

toasted or regular sesame seeds

cilantro – chopped

lime wedges

Image

Image

Image

Image

Image

DIRECTIONS

Mix the marinade ingredients together & marinate the vegan chicken for 20 minutes –  or – up to overnight.

Cook the noodles as per directions, drain, rinse will cool water & set aside.

Heat a little sesame oil in a large saute pan & cook the chicken & extra marinade over high heat until the chicken begins to brown & glaze up.  Put it in a plate & set aside.

Image

Image

In the same pan, heat some sesame oil (use as little as you can to saute the vegetables – adding more as needed) over medium heat & saute the veggies until tender.  Set the vegetables aside.

In the same pan, heat the water, soy sauce, ponzu sauce, brown sugar & gochujang (or sriracha or chili paste) over heat & boil it until it thickens somewhat.

Image

Stir in the noodles & stir well to combine.  Toss in the vegetables & chicken.  Heat through.

Image

Image

Image

Garnish with sesame seeds & cilantro & lime wedges & devour!

Image

Image

Image

Image

Image

Image

Image

Vegan Sriracha Chipotle Cauliflower “Wings”

6 Comments

All Photos © Christine Elise McCarthy 2013

To see images of my past posts & get links to the recipes – look on my Pinterest board – HERE.

images (1)download (1)

~

All my posts now have a VERY customizable PRINT & PDF option.  Create a PDF & save the recipe to your computer or print it out.  It offers a “remove images” option & you can delete any part of the post you do not need before printing.  The button is below by the Twitter & Facebook links.

~

vromans front

vromans back

YEAH!  I wrote a funny & dirty novel that is getting great reviews on Amazon!  Check it out – at – www.BathingBook.com!

~

Image

OK – my book has been out for a week & a half.  Have you read it yet?  It is only the funniest, fucking book ever written!!!  What the Hell are you waiting for?

Check it out!!!  www.BathingBook.com

Image

Image

OK, now for the matter of these faux wings.  I love spicy food & chicken wings are something I always find myself envious of when I see others eat them.  I also love sriracha – but ONLY this brand:

Image

(Image stolen from Google)

This company produces a sauce that is the very definition of sriracha.  But, alas, they have been victims of Irwindale residents near their plant complaining of the spices in the air & it has resulted in lots of problems for the company.  Recently, I have been finding it VERY HARD to find this sriracha – anywhere.  I was extremely distressed because this is not only a frequent ingredient in my recipes but it is an absolute MUST in my Bloody Marys!

Image

Well, at my local Bangluck Market – I found a whole selection of other brands of sriracha.  Of course, I bought the one in the prettiest bottle.  See there – behind the holy basil?
Image

I used it in a Bloody Mary & had to throw the cocktail away.  This sriracha isn’t spicy & has a sickly sweet flavor.  Do not fall for these low rent srirachas!  You have been warned!

Image

Image

These guys are pretty easy to make and delicious.  I ate them two ways – right off the plate as an appetizer or over rice as a meal.  Ymmmmm!

Sriracha Cauliflower “Wings”

INGREDIENTS

1 small head of cauliflower cut into “drumettes”

2 TBS butter (or vegan butter) – melted

1 TBS olive oil

1 tsp onion powder

1 tsp garlic powder

S&P

For the glaze

1 chipotle pepper & 2 TBS of its adobo sauce – minced

1/4 cup sriracha sauce

2 garlic cloves – minced

2 TBS butter (or vegan butter)

1/4 cup (or less – to taste) honey – or agave nectar

1-2 TBS soy sauce

juice of 1 lime

Garnish: chopped cilantro and/or sesame seeds

Image

Image

Image

Image

DIRECTIONS

Heat the oven to 400.

Whisk the melted butter with the olive oil, onion powder & garlic powder.  Add a little S&P.

Toss the cauliflower drumettes in this & roast for about 15-20 minutes (check mid-way to be sure your florets are not getting to mushy) – or until just beginning to brown at the edges.  Parchment paper makes this a far neater process.  If you don’t have any, treat your cooking sheet with cooking spray or olive oil.

Image

Image

Image

While the cauliflower cooks, melt the butter for the glaze in a sauce pan & then whisk in the other glaze ingredients.  Bring it to a boil & then simmer it over medium heat until it thickens a bit.  Set aside.

Image

Image

When the cauliflower is ready – toss it with some glaze & roast another 5 minutes.  I then turned the broiler on and WATCHED THEM VERY CAREFULLY (and turned the pan a few times) to get a bit of a blackening effect.  This is totally an optional step.

Image

Image

Drizzle a bit more glaze on the wings & garnish with cilantro and/or sesame seeds.  Eat as they are or on top of some steamed rice!

Image

Image

Image

Honey, Maple, Mustard & Sriracha Glazed Baked Ham

Leave a comment

All Photos © Christine Elise McCarthy 2013

To see images of my past posts & get links to the recipes – look on my Pinterest board – HERE.

images (1)download (1)

~

All my posts now have a VERY customizable PRINT & PDF option.  Create a PDF & save the recipe to your computer or print it out.  It offers a “remove images” option & you can delete any part of the post you do not need before printing.  The button is below by the Twitter & Facebook links.

~

Image

I don’t eat meat.  I probably have not tasted ham in 25+ years.  But – my badass boyfriend lives almost exclusively on animal protein (something I want to work on) and, occasionally, I make a meat item for him.  During his most recent trip to LA, I hosted a small shindig.

Image


010

Image

I served Vegan Hoppin’ John & vegan collard greens & corn bread.  Others contributed deviled eggs & an antipasto salad (among other things).  At the very last minute, as I shopped for a few forgotten groceries, I spotted hams at the store.  $20 for a ten pound ham seemed like such a cost effective way to feed a crowd that I stood there for a few minutes pondering my willingness to make it for Miles.  Then I saw the 50% off sticker.  $10 for a ten pound ham?  That cinched it for me.  I mean – at that price – it was a cheaper source of food for my dogs than their limited ingredient dog chow so – I could not possibly lose.

So I bought the gruesome thing & brought it home.

This isn’t really a recipe beyond the fact that I customized the glaze that came with the meat.  I cooked it as instructed with the exception of covering it in foil for the first part of the heating.  I neglected to do that.  This resulted in quite a charred exterior but, once this was glazed, the charred bits became a crust that I saw Miles seeking out as he stole bits of ham as he walked by it.  That sentence is clumsy but I have a terrible cold & my brain is foggy.  Please forgive me.  My point is – the burned bits were quite popular so do not be afraid to burn your ham a bit.  Oh!  And…

HAPPY NEW YEAR!!!!!

Image

Honey, Maple, Mustard & Sriracha Glazed Baked Ham

INGREDIENTS

Ham (I used a cooked, spiral-cut ham)

The glaze packet that comes with it

1/2 cup honey

3 TBS grain mustard

1 TBS maple syrup

1 TBS sriracha

Image

Image

Image

Image

DIRECTIONS

Over medium heat – whisk the glaze packet with the other ingredients & cook until the sugar dissolves.  Let cool.

Cover a baking sheet with a few layers of foil.  It makes cleaning so much easier.  Put the ham cut side DOWN on the foil-lined cooking sheet & either cover it with foil (or not – if you want a bit of char on the outside like mine) and cook it at 350 for 45-60 minutes.

Remove the ham from the oven & increase the temperature to 425.  Remove the foil covering if you used one.

Use about 1/4 of the glaze to coat the ham.  Cook it for 15 minutes & repeat the process – glazing every 15 minutes until the glaze is gone.

Let the ham cool for AT LEAST 30 minutes.  Then, simply serve it – cut side facing out (not down) – and watch your carnivorous friends lose their shit.

Image

Image

Image

Image

Fig & Gruyere Quesadilla with Balsamic Glaze & Honey or Fig, Spinach & Whipped Goat Cheese Pizza with Honey

Leave a comment

All Photos © Christine Elise McCarthy 2013

To see images of my past posts & get links to the recipes – look on my Pinterest board – HERE.

~

All my posts now have a VERY customizable PRINT & PDF option.  Create a PDF & save the recipe to your computer or print it out.  It offers a “remove images” option & you can delete any part of the post you do not need before printing.  The button is below by the Twitter & Facebook links.

~

Image

I can’t resist figs now when I see them at the store.  They are beautiful to look at and so delicate & versatile – I love them.  But they tend to go bad fast so, when I buy them, I end up eating fig everything.  To extend their shelf life, I put them in a Ziplock baggy & put them in a single layer on a shelf in the fridge.  That seemed to add a day or two to their lifespan.

These are not really recipes.  These are really just suggested ways to use figs.

Image

Fig & Gruyere Quesadilla with Balsamic Glaze & Honey

INGREDIENTS

Flour tortilla

Gruyere cheese – sliced

Figs – sliced

Honey

Balsamic vinegar

DIRECTIONS

Image

Bring some balsamic vinegar to a boil & then reduce to a simmer.  In 20 minutes – my 1/4 cup of balsamic reduced to only one or two teaspoons of glaze – so boil down an appropriate quantity.

Layer the cheese & figs on a tortilla, fold it over & grill it on both sides until the cheese melts & the tortilla browns.

ImageImage

Slice it up & drizzle with honey & the balsamic glaze.  MMMMM!

Image

Fig, Spinach & Whipped Goat Cheese Pizza with Honey

INGREDIENTS

Pizza dough (mine is HERE)

Spinach

Figs – sliced

Mozzarella – grated

Goat Cheese

Cream cheese

Olive oil

Image

DIRECTIONS

To get whipped goat cheese – simple blend goat cheese with some cream cheese at approximately a 2 to 1 ratio, like – 4 ounces goat cheese to 2 ounces cream cheese.  Go heavier with the goat cheese if you want that flavor to be stronger.

Now just roll out your dough, put it on a greased baking sheet and smear some whipped goat cheese on it.  Layer some spinach & drizzle with olive oil.  Add figs & then some grated mozzarella & bake at about 450-500 (be sure the oven is at full temperature before putting pizza in there) for about 12 minutes or until the cheese melts & the crust browns.  Drizzle with honey!

ImageImageImageImage

ImageImage

Grilled Fig & Watercress Salad with Goat Cheese, Toasted Walnuts & Balsamic Glaze

1 Comment

All Photos © Christine Elise McCarthy 2013

To see images of my past posts & get links to the recipes – look on my Pinterest board – HERE.

~

All my posts now have a VERY customizable PRINT & PDF option.  Create a PDF & save the recipe to your computer or print it out.  It offers a “remove images” option & you can delete any part of the post you do not need before printing.  The button is below by the Twitter & Facebook links.

~~~~~~

First of all – an update on the gorgeous Piglet.  Here she is about three weeks ago – fresh out of the shelter with epic mange.  (First two images stolen from her rescuer – Fairy Dogfather.)

Image

Here she is about a week later after some meds & one mange dip.  All pink & ALL bald.

Image

And here she is – yesterday.

Image

All we have been doing is steeping supermarket jarred garlic in warm water & giving her a sponge bath in it two times a day (plus a little antibiotic medication) and her fur is coming in so fast you can almost watch it grow!  She is the most incredible little girl!  I am so honored to know her.

In other news – by boyfriend (Miles) lives in Little Rock.  Sometimes, he shares some Arkansas flavor with me.  Lots of bars with great names.  Lots of bars that look like you could find trouble if you wanted it.  Maybe even a mullet or two.  Certainly a few gun racks in the parking lot.  Definitely some misplaced anti-Obamacare sentiment from a lotta folks who probably need it the most.  God bless America!  (Photos by Miles Miller.)

ImageImageImage

And even cooler – authentic southern BBQ joynts like Bubba’s here.

ImageImage

It reminds me a LOT of True Blood’s Merlotte’s!!!

Image

And looky what they serve up at Bubba’s!

Image

ImageImage

Looks like cold beer, fries & the charred forearm of an adult human.  Yum!

Speaking of yum – this salad is outrageous!  Easy & bursting with different flavors & lots of different textures.  Pretty, too – no?

Image

I have a grill on my stove & I love it enough to consider marrying it.  If you do not have one – but you like grilling things – maybe invest in a grill pan.  You don’t have to marry it.  I use my grill pan a lot, too, even though I have the real grill.   I won’t let anyone grill MEAT on my stove because it just gets disgusting fat everywhere & I don’t want that.  I have enough disgusting fat on ME – I don’t need it in the catch pan of my Viking, too.  So – if folks want to grill meat on my stove – they use a grill pan.  It also makes for pretty quesadillas – see!

Image

That’s my Squash Blossom Quesadilla.  As enjoyable to eat as it was to look at.

Anyway – the figs don’t HAVE to be grilled but it adds a nice look & a subtle flavor.

ImageImageImage

These are green figs.  The ones that are purply-red inside are prettier but the green ones were all that were available so I grabbed them.  You can eat the outer skin of figs, too, so these guys can be eaten like giant grapes.

The toasting of the walnuts is a bizarrely important step in this recipe.  It changes their flavor significantly – so do not skip it.  Quantity here is really up to you so I am only going to list the ingredients I used.  You can use more or less of each to suit your taste.  Also – I used watercress but arugula or baby mixed greens would do very well, too.

Image

Grilled Fig & Watercress Salad with Goat Cheese, Toasted Walnuts & Balsamic Glaze

INGREDIENTS

Lots of balsamic vinegar

Watercress (or arugula or other mixed greens)

Walnuts – chopped

Figs

Goat Cheese

Olive oil

Fresh ground pepper

Image

DIRECTIONS

To make the balsamic glaze, boil some balsamic & then reduce it to a simmer.  Cook it down until it thickens.  It reduces quickly & 1/4 cup of balsamic produces about 2 tsps of glaze – so – keep that in mind when deciding how much balsamic to add to the pan.  If it gets too thick – add more balsamic or some water.  Set aside.  Here it is on my Grilled Watermelon & Feta Salad with Mint, Arugula & Balsamic Glaze.

Image

Halve the figs & brush with olive oil.  Grill for about 1 minute or until grill marks appear.

Image

Wash the watercress & remove any large stems.

Toast the chopped walnuts in a dry pan for 2-3 minutes (or until they become fragrant & just begin to brown a bit) being very careful not to burn them.  Set aside.

Now, simply assemble the salad with the watercress, figs, goat cheese & walnuts.  Drizzle a little olive oil over it & drizzle some balsamic glaze.  Grind fresh pepper over it liberally. Taste it & then lose all semblance of control and eat it with your hands whilst standing up. Grunting might happen.  Pleasure definitely will.

Image

Brie Quesadilla with Smashed Balsamic Blueberries

2 Comments

All Photos © Christine Elise McCarthy 2013

To see images of my past posts & get links to the recipes – look on my Pinterest board – HERE.

~

All my posts now have a VERY customizable PRINT & PDF option.  Create a PDF & save the recipe to your computer or print it out.  It offers a “remove images” option & you can delete any part of the post you do not need before printing.  The button is below by the Twitter & Facebook links.

~

This beauty is a three ingredient gem.  Of course, one of the ingredients is my Smashed Balsamic Blueberry Sauce but that is easy to make!  See?

Smashed Balsamic Blueberry Sauce

INGREDIENTS

6 oz fresh blueberries

1 shallot – minced

1/2 TBS olive oil

2 oz balsamic vinegar

1/2 tsp fresh rosemary – minced

Image

DIRECTIONS

Heat the olive oil in a small stock pot & saute the shallot until it softens.

Add the other ingredients & bring to a boil.

Lower heat & simmer about 5 minutes.  I used a potato masher & smashed about half the blueberries.  The edge of a wooden spoon would work, too.  Just be careful because this is a sticky, molten lava.

Image

See?  And the only other things you need are tortillas & brie.

I heated a tortilla in a dry pan, slathered it with blueberry sauce & some brie.  I folded it & compressed it with a pot lid, waited two minutes & repeated that on the other side.

Image

It was sweet & savory melty goodness.  I ate it standing up.  There are no calories that way.

Image

Image

Smashed Balsamic Blueberry Sauce

3 Comments

All Photos © Christine Elise McCarthy 2013

To see images of my past posts & get links to the recipes – look on my Pinterest board – HERE.

~

All my posts now have a VERY customizable PRINT & PDF option.  Create a PDF & save the recipe to your computer or print it out.  It offers a “remove images” option & you can delete any part of the post you do not need before printing.  The button is below by the Twitter & Facebook links.

~

This is really easy & REALLY delicious & would go well on sweets (ice cream) or on chicken or fish or even grilled cheese sandwiches.  Try it!  Yummy!

Smashed Balsamic Blueberry Sauce

INGREDIENTS

6 oz fresh blueberries

1 shallot – minced

1/2 TBS olive oil

2 oz balsamic vinegar

1/2 tsp fresh rosemary – minced

Image

DIRECTIONS

Heat the olive oil in a small stock pot & saute the shallot until it softens.

Image

Add the other ingredients & bring to a boil.

Image

Lower heat & simmer about 5 minutes.  I used a potato masher & smashed about half the blueberries.  The edge of a wooden spoon would work, too.  Just be careful because this is a sticky, molten lava.

Now – get creative with how you use it!

Image