DDD #89 – Vegan Spicy Szechuan Lo Mein Noodles with Vegetables

Leave a comment

All Photos © Christine Elise McCarthy 2018

To see images of my past posts & get links to the recipes – look on my Pinterest board – HERE.

images (1)download (1)

All my posts now have a VERY customizable PRINT & PDF option.  Create a PDF & save the recipe to your computer or just print it out.  It offers a “remove images” option & you can delete any part of the post you do not need before printing.  The button is below by the Twitter & Facebook links.

BathingandthesinglegirlCover

vromans back

This is a really easy recipe but truly makes a fuckton.  So, unless you are feeding a large group or intend to eat this for days, consider cutting the recipe down.  The veggies you choose to use are up to you.  This can be made with no veggies at all or with regular pasta.  It is a very forgiving dish.

Click the image above to watch the video.

Vegan Vegetable Spicy Szechuan Lo Mein Noodles

Feeds 10 or more

INGREDIENTS

2 1/2 lbs of SOFT (or cooked) lo mein or chow mein noodles or even cooked spaghetti

1/2 lb vegan meat of choice (I used leftover Tofurky ham) – diced (very optional)

for the veggies

2 tsp hot chili oil (or other oil)

2 tsp sesame oil

1 small onion – diced

6 long beans (or other green beans) chopped

1 bell pepper (I used 1/2 red & 1/2 yellow) – diced

1 zucchini – diced

2 dozen snow peas – trimmed & sliced

6 mushrooms – sliced

2 small heads of broccoli – cut into florets

5 or 6 carrots – chopped

1 cup purple (or other) cabbage – chopped

8 oz can sliced water chesnuts – drained

6 bird’s eye chilis – split (optional)

1/2 cup water

for the sauce

2 TBS minced ginger

4 garlic cloves – minced

1 tsp Chinese 5 Spice

2 TBS Shaoxing cooking wine or rice vinegar

4 TBS light soy sauce

2 TBS dark soy sauce

1 tsp agave

1 large handful Thai basil (or other basil)

GARNISH – more shredded basil or cilantro, sesame seeds, sliced scallions, lime wedges

DIRECTIONS

In a very large wok, heat the two oils.  Add all the ingredients in the “for the veggies” list.  Heat over high heat for about 5 minutes or until the veggies are tender.

Add the noodles, faux meat (if using) & everything in the “for the sauce” list.  Combine & heat through.

Serve with your garnishes of choice.

DDD #74 – Ayurveda Kitchari – Vegan Mung Bean Stew to Detox & Cleanse (Instant Pot, Slow Cooker or Stove Top)

3 Comments

All Photos © Christine Elise McCarthy 2018

To see images of my past posts & get links to the recipes – look on my Pinterest board – HERE.

images (1)download (1)

~

All my posts now have a VERY customizable PRINT & PDF option.  Create a PDF & save the recipe to your computer or print it out.  It offers a “remove images” option & you can delete any part of the post you do not need before printing.  The button is below by the Twitter & Facebook links.

~

vromans back


Click the image above to watch the video.

My friend, Katie, turned me on to kitchari.  Apparently, you can eat it – JUST IT – for 1-7 days straight & it calms your digestive tract & detoxes you system but with the added benefit of feeling like decadent comfort food.  Also – mung beans are dirt cheap. (Articles on the subject are linked at the bottom of this post).  This recipe makes about 7 quarts which is a fuckton so – unless you are feeding a lot of people or want to freeze some – consider reducing the recipe.

I used an Instant Pot to make mine but this can be done in a slow cooker or stove top.  I really recommend Instant Pots, though, because they steam, pressure cook, slow cook, cook rice, cook cakes, saute, cook eggs & clean windows.  I got my huge one HERE for just over $100 & I am VERY happy with it.  I can now get rid of several other appliances.

***NOTE – I soaked my beans on the counter overnight & in the fridge a second night but this is not necessary.  If you want to move more quickly – boil some water, add your beans & let them soak for an hour.

Ayurveda Kitchari – Vegan Mung Bean Stew

Caters a party so be ready for a lot

INGREDIENTS

3 cups mung beans (I used half whole green & half split green – as seen above) – soaked (see ***NOTE above)

1-2 TBS coconut oil or olive oil

1 onion – chopped

6 garlic cloves – chopped

1 TBS turmeric

1 TBS ground cumin

1 TBS (or more – to taste) salt (I used pink Himalayan)

1 TBS ground mustard

1 TBS ground coriander

1 TBS ground pepper

1 TBS ground fenugreek (optional)

1/4 tsp asafoetida

1 (15 oz) can coconut milk (I used lite)

6 TBS minced ginger

1 cup cilantro

Vegetables are optional.  Use any you prefer but I added:

5 small turnips – diced

5 small golden beets – diced

1 large sweet potato – diced

5 oz baby kale

1 tomato – diced

6 cups water

2 cups basmati (or other long grain white rice)

(If you are making your rice separate from the stew, as I did, it is nice to add a tsp cumin SEEDS & 6 green cardamom pods to it as it cooks but that is not necessary.)

GARNISH – coconut butter, cilantro, crushed red pepper

DIRECTIONS

Quick soak your beans (see note above) if you did not soak them overnight or for 2 days, as I did.)

Traditionally, the rice is cooked in the same pot with everything else.  My Instant Pot was not large enough so I cooked it separately.  This is your call – or maybe your pot size will determine your choice but it does not matter much either way.

Rinse the rice.  Set aside.

Heat the oil in a very large pot (or your Instant Pot – my pot is 8 Quarts) and soften.  Add the garlic & spices & stir to combine.

If you are using a slow cooker, transfer the onions & spices to it.  Everything else is the same no matter whether you are slow cooking, Instant Pot cooking or going stove top.  Only the cooking time will vary.

Now, add everything else to the pot.  If your pot is easily deep enough to hold the rice, too, add that.  If you are cooking the rice in the same pot – add 4 additional cups of water to the 6 cups used if you are cooking the rice separately (assuming your rice directions ask for 2 cups water per 1 cup rice.  Adjust accordingly if your rice has different directions).  Or – just cook the rice separately as the package directs.  If you are making your rice separate from the stew, as I did, it is nice to add 1 tsp cumin SEEDS & 6 green cardamom pods to it as it cooks but that is not necessary.

Slow cooker – cook on low for 8 hours or high for 4 hours.

Stove top – bring to a boil uncovered for 5 minutes.  Reduced heat, cover, and simmer for 30 minutes or more or until everything is tender.

Instant Pot – seal & cook manually for 10 minutes.

If it is to thick, thin it with extra water.  If it is too thin, let is simmer, uncovered, for a while longer.

Serve with rice (if you cooked it separately) and garnish with coconut butter (burns fat & lowers cholesterol) and lots of cilantro & maybe some crushed red pepper.

Here are some articles for more info on kitchari & using it to detox:

What is kitchari? – https://www.banyanbotanicals.com/info/blog-the-banyan-insight/details/what-is-kitchari-why-we-eat-it-for-cleansing

3-Day Cleanse – https://www.banyanbotanicals.com/info/ayurvedic-living/living-ayurveda/cleansing/a-very-simple-three-day-cleanse/

How to do a kitchari cleanse – http://www.krissyruddy.com/how-to-do-a-kitchari-cleanse/

Vegan Vegetable Pasta Salad with Spicy Asian Sesame Peanut Dressing

Leave a comment


All Photos © Christine Elise McCarthy 2016

To see images of my past posts & get links to the recipes – look on my Pinterest board – HERE.

images (1)download (1)

6-6-16 (217)

6-6-16 (223)

BathingandthesinglegirlCover

vromans back

6-6-16 (240)

6-6-16 (247)

Pasta salads.  Who doesn’t like them?  I guess – people who don’t like pasta but do such people exist?  Pasta is a universal thing – like bread.  Is there anyone that doesn’t like bread?  Anyway – lots of pasta salads are drenched in mayo-based sauces & there is no shortage of those that object to mayo.   Even those of us that love mayo are hesitant to eat a pasta salad with mayo that has been sitting out in the backyard BBQ too long.  So – why not eliminate two major objections & make a vegan pasta salad?  Nothing in it quick to spoil & nothing white & creamy to freak out the mayo-haters.

I used ingredients I happened to have so – this is a very flexible salad.  I wanted to use edamame but only had Lima beans – so fuck it.  I used Lima beans.   I had those gorgeous watermelon radishes but they were used primarily for their looks.  You could eliminate any ingredient – or add some – with no negative impact.   This is a light & clean alternative to accompany the entrees at BBQ’s which – let’s face it – tend to be meaty & heavy.

6-6-16 (195)

6-6-16 (197)

Vegan Vegetable Pasta Salad with Spicy Asian Sesame Peanut Dressing

INGREDIENTS

1 lb of pasta

6 oz edamame (or Lima beans)

1 small head of broccoli – cut into small florets

4 carrots – grated

2 bell peppers (red, yellow or orange are prettiest) – grated or diced

1 (15 oz) can chickpeas – drained & rinsed

1-4 jalapenos – seeded & either grated or minced

4 radishes – grated or chopped

3 scallions – sliced

1/4 cup cilantro – chopped

1/2 cup slivered almonds

3/4 cup roasted peanuts

GARNISH – extra radish slices. cilantro, extra peanuts

for the dressing

1/2 cup peanut butter (I used chunky)

4 TBS hoisin sauce

4 TBS liquid amino acids (or low sodium soy sauce or tamari)

4 TBS rice vinegar

4 TBS agave nectar

4 TBS sriracha

1 tsp chili oil

2 TBS sesame oil

1-4 garlic cloves – minced

S&P to taste

6-6-16 (188)

6-6-16 (189)

6-6-16 (190)

6-6-16 (237)

DIRECTIONS

Whisk together the dressing & set aside.

Cook the pasta & add the broccoli for the last minute or two that it cooks.  Drain & rinse pasta & broccoli under cold water.

6-6-16 (191)

Toss the salad ingredients together.

6-6-16 (192)

6-6-16 (193)

6-6-16 (194)

Add some dressing & toss.  Add as much as you like – which might be less than you made.  Overdressed salads get icky so add dressing incrementally until it is where you like it.

Garnish & serve.

6-6-16 (212)

6-6-16 (229)

6-6-16 (207)


Vegan Mixed Vegetable Burrito Bowl with Cauliflower “Rice”

1 Comment


All Photos © Christine Elise McCarthy 2016

To see images of my past posts & get links to the recipes – look on my Pinterest board – HERE.

images (1)download (1)

All my posts now have a VERY customizable PRINT & PDF option.  Create a PDF & save the recipe to your computer or just print it out.  It offers a “remove images” option & you can delete any part of the post you do not need before printing.  The button is below by the Twitter & Facebook links.

1-25-16 (149) - Copy

1-25-16 (145)

BathingandthesinglegirlCover

vromans back

1-25-16 (155)

1-20-16-129

Burrito bowls – easy & endlessly customizable.  I used leftover Coconut, Ginger & Jalapeno Cauliflower “Rice” – seen just above – and that made this bowl virtually guiltless – because cauliflower rice is just grated cauliflower.  The only ingredients left in the bowl that were not vegetable were the vegan cheese & the black beans.

So – there is no real recipe here – but rather a list of ingredients I used & a few suggested alternate or additional ingredients.

I used a teensy bit of bottled vinaigrette on my bowl.  You can toss yours with dressing or a squeeze of lime & some olive oil – or just lime – or whip up a:

Lime & Cumin Vinaigrette

1/3 cup olive oil

3 TBS lime juice

1/2 tsp Dijon mustard

1/2 tsp ground cumin

1/2 tsp chili powder

S&P to taste

Whisked together.

1-25-16 (150)

1-25-16 (153)

Vegan Mixed Vegetable Burrito Bowl with Cauliflower “Rice”

MY ingredients were:

Cauliflower rice (you can use regular cooked rice or try one of my cauliflower rices)

Sliced avocado

Black beans – drained & rinsed

Cherry tomatoes – halved

Arugula (you can use any lettuce or leafy greens you prefer)

Purple cabbage – sliced

Red onion – diced

Jalapeno slices

Vegan cheesed – chopped

Cilantro

Lime juice & wedges

Dressing of choice

OTHER POTENTIAL INGREDIENTS – corn, pico de gallo, sliced radishes, vegan chicken or beef crumbles, vegan sour cream or a vegan Mexican-style cheese, bell pepper, shredded carrots, guacamole, salsa, scallions, corn tortilla strips, quinoa or lentils or other grain – rather than rice.

1-25-16 (143)

1-25-16 (164)

DIRECTIONS

Assemble the bowls as you like or let individuals assemble their own.  Add whatever dressing you like & mix it all up.  Easy peasy!

1-25-16 (148) - Copy

1-25-16 (159)

Easy Roasted Sunchokes (Jerusalem Artichokes) with Herbs

Leave a comment


All Photos © Christine Elise McCarthy 2016

To see images of my past posts & get links to the recipes – look on my Pinterest board – HERE.

images (1)download (1)

All my posts now have a VERY customizable PRINT & PDF option.  Create a PDF & save the recipe to your computer or just print it out.  It offers a “remove images” option & you can delete any part of the post you do not need before printing.  The button is below by the Twitter & Facebook links.

1-25-16 (110)

1-25-16 (125)

BathingandthesinglegirlCover

vromans back

1-25-16 (119)

I had never seen or heard of sunchokes until my Farm Fresh to You veggie delivery offered them.   Intrigued – I ordered some.  They look like ginger but – when you cut them – the texture inside is more like a water chestnut or a radish.  Online – a bit of research revealed that people spoke of how wonderful these things are roasted because they get crispy on the outside but really soft & creamy on the inside.  So – I commenced to roasting them.

While they cooked, I did some more research and happened upon a blog post where the blogger claimed that – after eating roasted sunchokes – she was struck with a 24-hour bout of explosive diarrhea.  Her husband was ill for 12 hours.  So – I added a few key words to my sunchoke searches & it because clear that LOTS of people get horrible digestive & tummy issues after eating these things.  Apparently – they are unaffectionately nicknamed “fartichokes.”  Someone went so far as to say it was “irresponsible” for restaurants to serve them.  Jeez.  I looked at my oven warily as I toyed with the idea of just throwing the sunchokes I had directly into the trash.  But – 45 or so minutes later – they came out of the oven looking all golden & delicious – I could not resist trying one.  It was definitely softer & creamier inside than a potato would have been – and the subtle flavor it had definitely resembled the taste of an artichoke heart – but with a hint of sweetness.  I read somewhere someone saying these taste a lot like Terra chips – but I just got artichoke with sugar.   Of course, I immediately imagined my stomach rumbling in objection – but that was just paranoia.  I ate two or three more bites before I decided the sweetness was unpleasant & determined I had ample reason to throw the rest away – which I did.

So – between the flavor being off & the risk of an explosive shit storm – I don’t think I am endorsing these guys.  Attempt at your own risk!

1-25-16 (120)

Easy Roasted Sunchokes (Jerusalem Artichokes) with Herbs

INGREDIENTS

Sunchokes – washed & cut into bite-sized pieces

Olive oil

Fresh thyme

Dry rosemary

S&P

1-25-16 (87)

1-25-16 (88)

DIRECTIONS

Heat the oven to 400 degrees.

Toss the sunchokes in a bit of olive oil & stir in a few tablespoons of fresh herbs.  Season with S&P.

Roast for 40-60 minutes or until they are soft & golden.

Eat at your own risk!  🙂

1-25-16 (114)

DDD #88 – Garlic Roasted “Simon & Garfunkel” Mushrooms with Mixed Herbs – Parsley, Sage, Rosemary & Thyme

Leave a comment


All Photos © Christine Elise McCarthy 2016

To see images of my past posts & get links to the recipes – look on my Pinterest board – HERE.

images (1)download (1)

All my posts now have a VERY customizable PRINT & PDF option.  Create a PDF & save the recipe to your computer or just print it out.  It offers a “remove images” option & you can delete any part of the post you do not need before printing.  The button is below by the Twitter & Facebook links.

1-25-16 (27)

1-25-16 (7)

BathingandthesinglegirlCover

vromans back

1-25-16 (24)

I love mushrooms.  This dish is very simple and could be tossed with pasta or dropped onto a pizza or even served on top of a piece of meat.  I used all button mushrooms but any variety or combination of various mushrooms would be lovely.  Mushrooms shrink a lot when they are cooked so you should probably make more than you think you need.

Garlic Roasted “Simon & Garfunkel” Mushrooms with Mixed Herbs – Parsley, Sage, Rosemary & Thyme

INGREDIENTS

2 lbs mushrooms – sliced

Olive oil

2+ garlic cloves – sliced

1-2 TBS each: thyme, sage, rosemary

Fresh chopped parsley as garnish

(If you are feeling fancy, drizzle some nice balsamic on them – or a bit of truffle oil)

1-22-16 (64)

1-22-16 (65)

1-22-16 (66)

1-25-16 (2)

DIRECTIONS

Heat the oven to 350 degrees.

Toss the mushrooms with a drizzle of olive oil, the garlic, sage, rosemary & thyme.

Cook for about 45 minutes – stirring once.  Season with S&P & garnish with parsley.  If using balsamic or truffle oil – get on that & then eat this yummy guys!

1-25-16 (19)

Vegan Beef & Vegetable Bibimbap Bowls

3 Comments

All Photos © Christine Elise McCarthy 2015

To see images of my past posts & get links to the recipes – look on my Pinterest board – HERE.

images (1)download (1)

10-8-15 (20)

10-8-15 (72)

10-8-15 (53)

10-8-15 (106)

10-8-15 (82)

10-8-15 (88)

10-8-15 (117)

BathingandthesinglegirlCover

vromans back

Bibimbap!  A signature Korean dish.  Bibimbap translates literally to “mixed rice.”  Typically made with sauteed vegetables, beef, gochujang sauce & topped with a fried egg – diners mix it all up before eating it – so that the yolk & the gochujang sauce get completely incorporated.  It photographs very well – especially when using that egg.   Look HERE at how gorgeous it can be!   I think some people even serve it with a raw egg & let the heat of the other ingredients cook the egg.  I did not do this.  I used no egg at all and Beyond Meat Beefy Crumbles rather than real beef.  Depending on your diet & tastes, you could add egg or eliminate the vegan meat – or use different vegetables.

The most critical ingredient is the gochujang sauce.  Gochujang is a spicy, red paste – thicker than ketchup – that adds the distinct flavor to this dish.  If you cannot find it locally – HERE are a ton of options available on Amazon.  It is not expensive & should last in your fridge as long as any other condiment – which, let’s face it, for most of us means – years.  Korean markets sell it in gigantic tubs – so that should tell you how critical it is to Korean dishes.

10-8-15 (7)

I used this Chinese BBQ sauce – which I later discovered has honey in it.  Oops!  Well – I am not strictly vegan but, if you are, be sure to buy a vegan Asian BBQ sauce (maybe a Korean BBQ sauce) – or any smokey/mesquite BBQ sauce that you like.

You need to cook everything separately to get the gorgeous presentation – but everything comes together in under twenty minutes – as long as you start with cooked, warm rice.  If not – I guess it would come together while the rice cooked.  I used leftover Coconut & Ginger Rice Pilaf with Pomegranate Seeds – but plain steamed rice is actually probably better.  Whatever you decide – I hope you try this recipe because it is really healthy & satisfying!

10-8-15 (21)

10-8-15 (46)

10-8-15 (47)

Vegan Beef & Vegetable Bibimbap Bowls

Serves 2

INGREDIENTS

1-2 cups cooked rice (depending on how much rice you want to eat)

1/2 lb shitake (or other) mushrooms

2-3 carrots – grated or cut into matchsticks

5 oz fresh spinach

1 large zucchini – grated, cut into matchsticks or, as I did it, spiralized

A handful of bean sprouts

9 oz vegan ground beef

4 TBS soy sauce (or tamari) – divided

1 TBS brown sugar

1 TBS Mirin

1-2 tsp sesame oil

Salt

2 TBS BBQ sauce (Korean or Chinese or other mesquite BBQ sauce)

Sesame seeds – back and/or white (toasted or not)

I added Asian micro greens as garnish but they are $$ and silly – but they just LOOK so nice!

for the gochujang sauce

2 TBS gochujang

1 TBS brown sugar

1 tsp sesame oil

2 tsp rice vinegar

1 tsp soy sauce (or tamari)

10-8-15 (60)

10-8-15 (70)

10-8-15 (35)

10-8-15 (91)

10-8-15 (96)

10-8-15 (121)

DIRECTIONS

Make some steamed rice.

Mix the gochujang sauce with a whisk & set aside.

10-8-15 (8)

Heat about 1/2 tsp sesame oil in a saute pan.  Cook the carrots with a pinch of salt until just softening.  If your matchsticks are thick like mine are – add a TBS or so of water & steam them a bit.  Set aside.

10-8-15 (10)

In the same pan – add 1/4 tsp sesame oil & cook the zucchini until just tender.  The water trick works here, too, if you need it.  Set aside.

10-8-15 (11)

In the same pan – add 1/4 tsp sesame oil & cook the spinach until just wilted.  The water trick works here, too, if you need it.  Set aside.

10-8-15 (12)

10-8-15 (14)

In the same pan, heat about 1/2 tsp sesame oil  & cook the mushrooms.  When they start to wilt, add 2 TBS soys sauce, 1 TBS brown sugar & 1 TBS mirin.  Cook until the liquid is absorbed.  Set aside.

10-8-15 (4)

10-8-15 (6)

In the same pan, heat the beef with sesame oil, soy sauce & BBQ sauce until warmed through.

10-8-15 (9)

Now – you assemble your bibimbap bowls – pretty much any way you like – but keeping everything separate.  Remember a spot for the gochujang sauce.

Sprinkle with sesame seeds & serve!  When ready to dig in – REALLY mix all that shit up!  Completely incorporate everything & chow the fuck down!

10-8-15 (49)

10-8-15 (50)

10-8-15 (81)

10-8-15 (94)

10-8-15 (102)

10-8-15 (109)

Mixed Vegetable Risotto with Fennel and Roasted Brussels Sprouts (Vegan – Vegetarian)

Leave a comment


All Photos © Christine Elise McCarthy 2015

To see images of my past posts & get links to the recipes – look on my Pinterest board – HERE.

images (1)download (1)

~

All my posts now have a VERY customizable PRINT & PDF option.  Create a PDF & save the recipe to your computer or print it out.  It offers a “remove images” option & you can delete any part of the post you do not need before printing.  The button is below by the Twitter & Facebook links.

~

3-2-15 (46)

3-2-15 (86)

BathingandthesinglegirlCover

vromans back

Risotto gets a bad rap for being hard to make.  If standing at the stove, stirring, for 20-30 minutes is hard – then I guess risotto is hard but really, how hard is casual stirring?  The main mistake people make with risotto is over-cooking so – as soon as it seems al dente – add the final ingredients & serve immediately because it will keep cooking as long as it is warm.

You can use any vegetables you like or lose anything from this recipe that displeases you.  The roasted Brussels sprouts are not necessary but they add a nice depth.  I suppose you could just chop them raw & stir them in with the carrots – if roasting is a pain in your arse.

This can be made vegan (obviously) by subbing out the dairy with vegan alternatives.

3-2-15 (78)

3-2-15 (98)

3-2-15 (121)

Mixed Vegetable Risotto with Fennel and Roasted Brussels Sprouts (Vegan – Vegetarian)

serves 4

INGREDIENTS

1 1/2 cups Arborio rice

5-6 cups vegetable stock

1 cup grated Parmesan (or vegan alternative) – optional

3 TBS butter (or vegan alternative – even olive oil)

1/2 cup dry white wine (not strictly necessary – so – you could sub out with more stock & a squeeze of lemon juice)

4 garlic cloves – minced

1/2 onion – diced

1 cup peas

2 carrots – diced

1 bulb fennel – sliced very thin

12 large Brussels sprouts – trimmed & halved

1 TBS olive oil

1 tsp white balsamic vinegar (optional)

S&P

3-2-15 (31)

3-2-15 (34)

3-2-15 (33)

3-2-15 (94)

3-2-15 (110)

DIRECTIONS

If roasting the Brussels sprouts (rather than just tossing them into the mix raw when you throw the carrots in – a viable option) – heat the oven to 400 degrees.  Toss the halved sprouts with olive oil & balsamic & salt & pepper.  Lay on a cooking sheet face down (I always use parchment paper because it makes clean-up easy & nothing sticks to it).  Roast about 15-20 minutes & then turn them & roast another 10-15 – until they are browned a bit.

3-2-15 (30)

3-2-15 (35)

3-2-15 (36)

3-2-15 (41)

Chop them up a bit if you want – but you don’t have to.  I did.  Set aside.

While those guys are roasting – bring the stock to a boil & then reduce to a simmer.

In another heavy-bottomed pan, melt the butter over medium heat.  Add the carrots & onions (and raw Brussels sprouts – if you are not roasting them) – and saute for 1-2 minutes.  Add the fennel & saute another 2 minutes.

3-2-15 (38)

3-2-15 (39)

3-2-15 (42)

Add the garlic & rice & stir to coat.   Add the wine (or extra stock & lemon) & cook off the moisture.   Then add the stock, 1/2 cup at a time & not adding more until the last was absorbed.  Stir as much as possible as the motion breaks down the starches more & makes the risotto creamier – and keeps it from burning.  When you are about 1 cup away from going through all the stock – test the firmness of the risotto.  It should still have a bit of a bite but, if it is very hard still, add more water or stock to your stock pot & bring it to a boil & then a simmer again.  Add the stock until the risotto is just al dente.  Stir in the peas & cheese.  If it is too thick – add yet more stock.  If it is too wet – cook it down a bit.

Serve immediately, garnished with the roasted Brussels sprouts, extra cheese & lots of fresh cracked pepper.

3-2-15 (90)

3-2-15 (106)

3-2-15 (62)

Mixed Mushroom & Blue Cheese Galette in Sour Cream Pastry with Smoky Eggplant Faux Bacon (Vegetarian)

Leave a comment

All Photos © Christine Elise McCarthy 2013

To see images of my past posts & get links to the recipes – look on my Pinterest board – HERE.

~

All my posts now have a VERY customizable PRINT & PDF option.  Create a PDF & save the recipe to your computer or print it out.  It offers a “remove images” option & you can delete any part of the post you do not need before printing.  The button is below by the Twitter & Facebook links.

~

Image

Wow.  Last night I was just not myself.  I blame the overpowering stench of the decomposing rat in my walls somewhere – somewhere near my kitchen.  I am not sure how many of you have had this experience but it is wildly unpleasant & sometimes can linger for a week or more.  Once that smell is in your olfactory memory bank, you never forget it.  In fact, if you are in the early days of said decomposition – you feel like that smell is on your upper lip & you start smelling it everywhere.  I got in my car yesterday & swore I smelled it.  I took my car to to the car wash as a concession to my paranoia.  They found no dead rats.  I swore I smelled it as I strolled the aisles at my glorious Super King.  I wondered how super markets are NOT overrun with rats.  All that food & produce.  How are rats not all over it at night?  Why do I have to store my flour etc in my fridge & freezer to avoid those little bugs that get in them – but stores can have stuff on the shelves forever & nothing invades?  I’m not a dirty girl.  My house isn’t dirty.  Anyway – I digress.

I decided that, rather than concede defeat & eat out last night, I would cook a lot of aromatic foods & try to combat the vile stench that way.  And I am happy to say, I was largely successful.  Today, I baked some sweet potatoes & now I smell autumn & holidays more than – you know what.

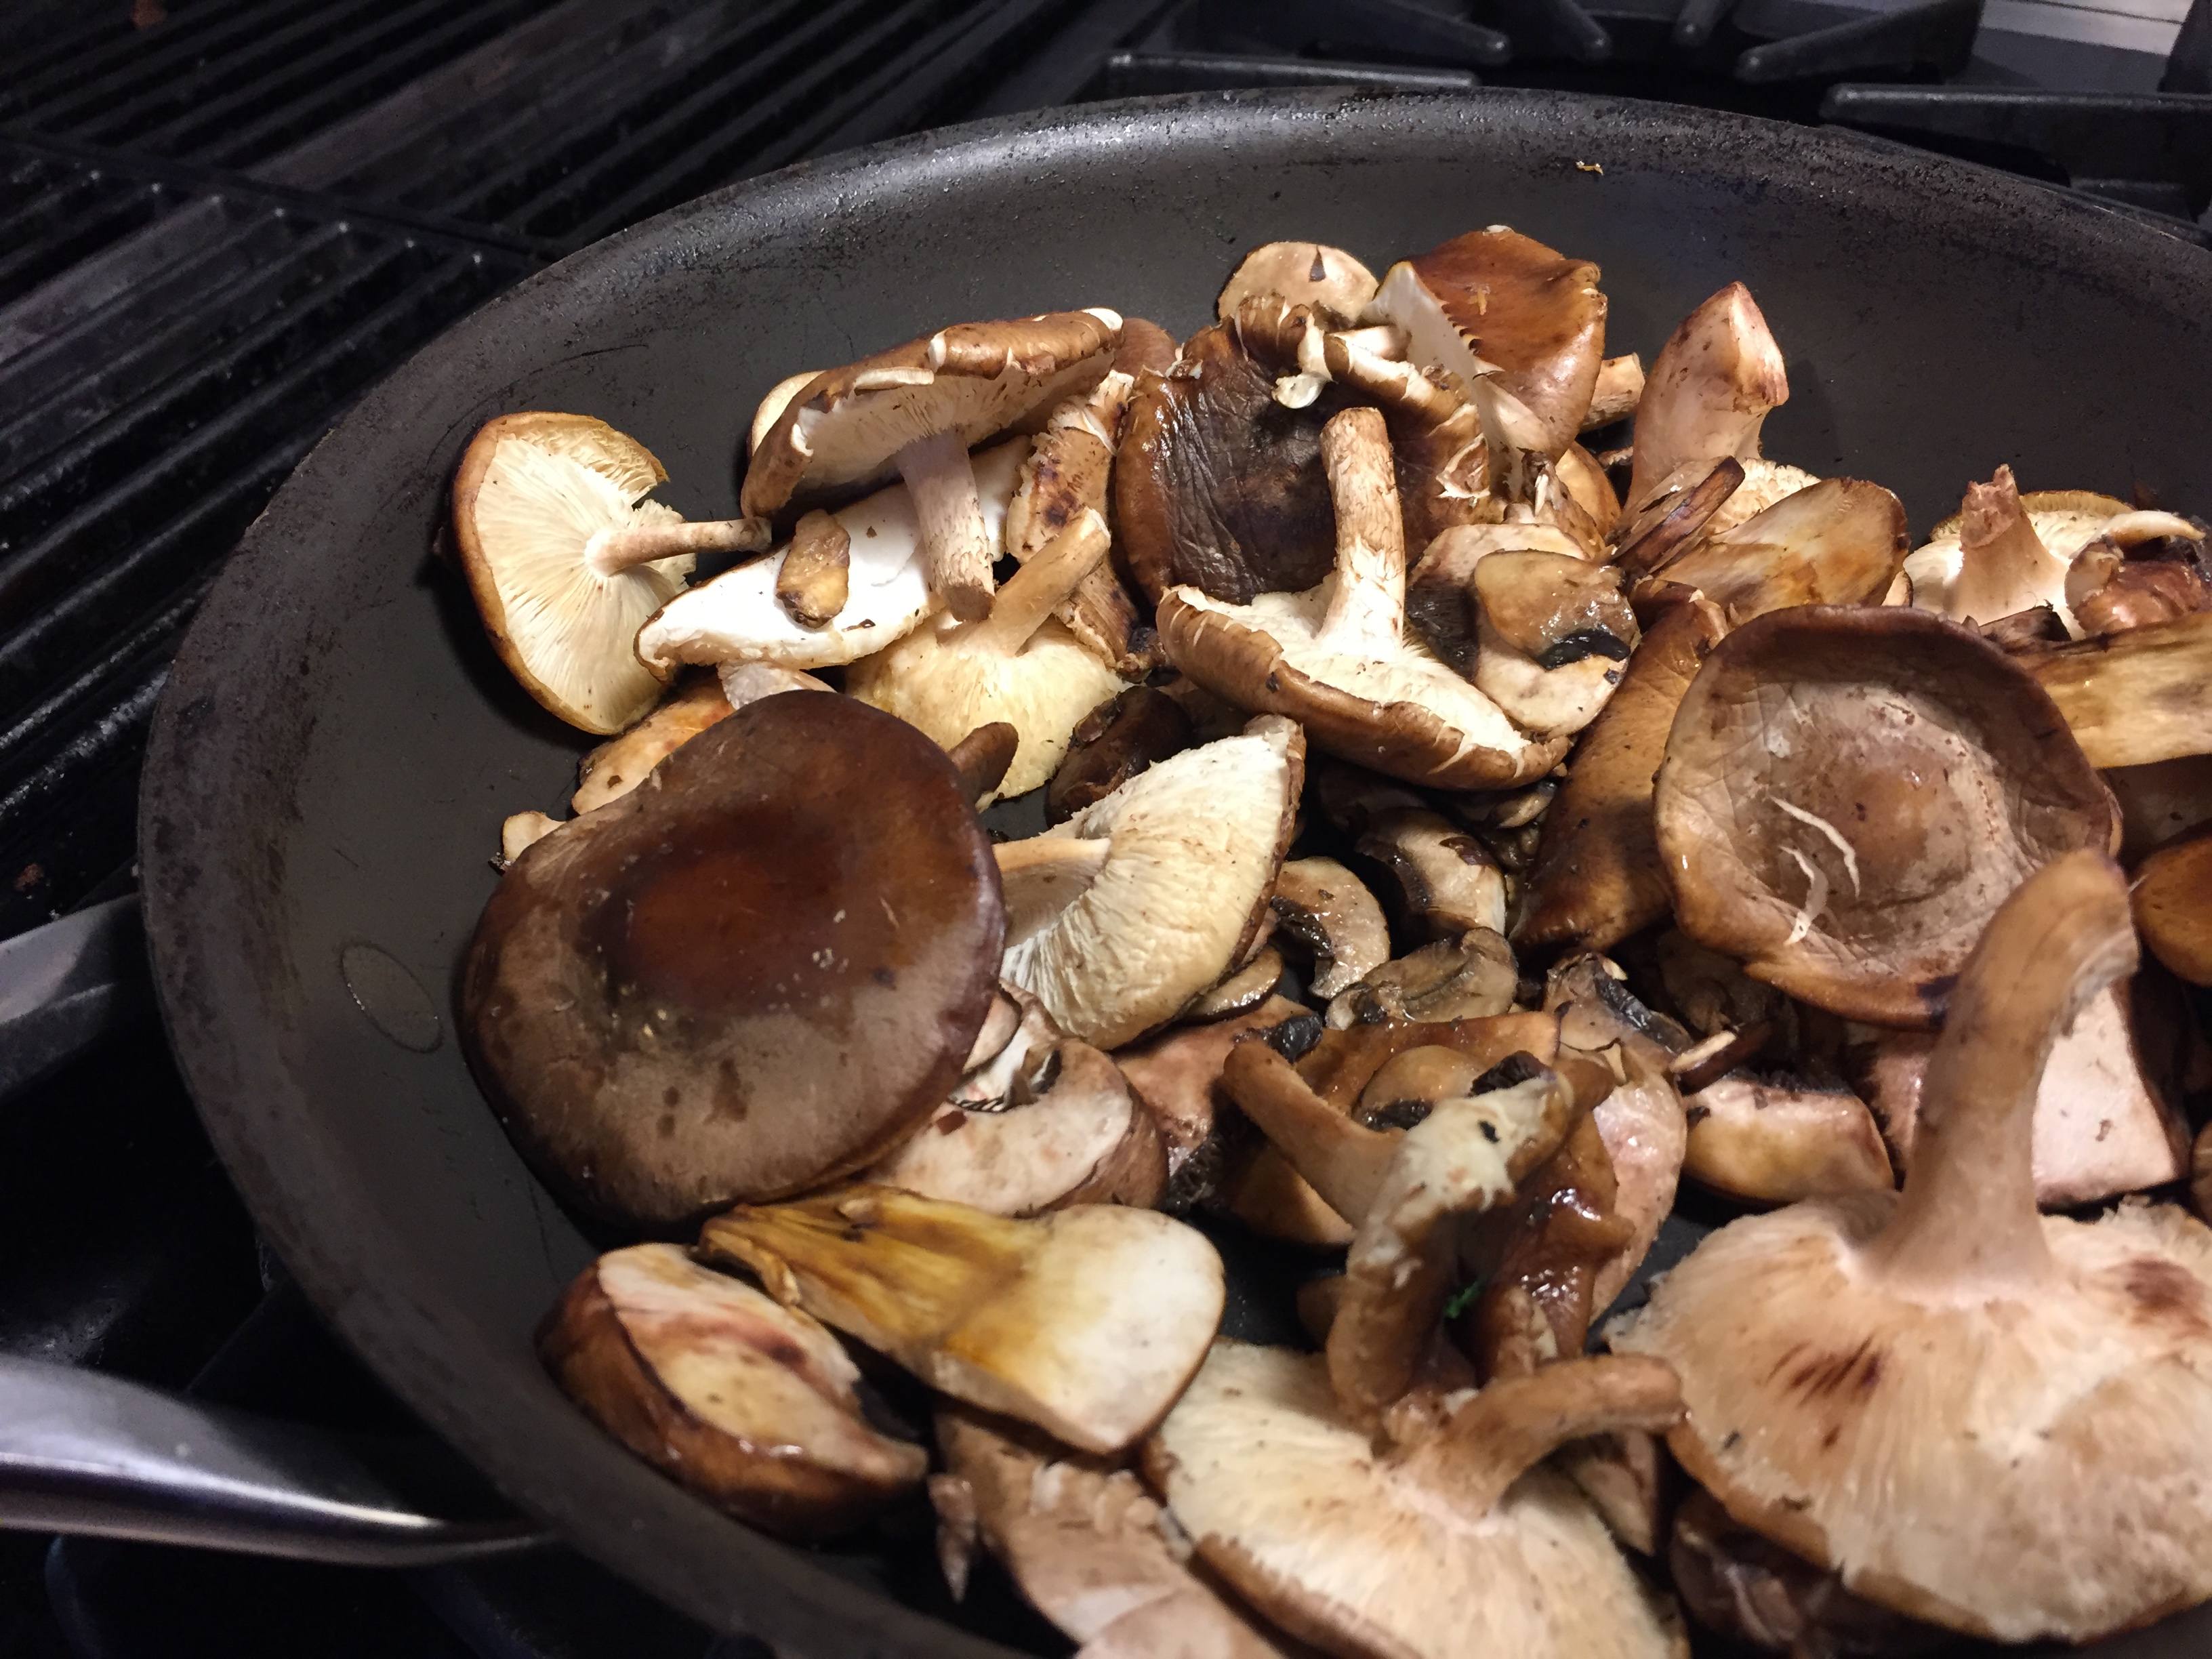
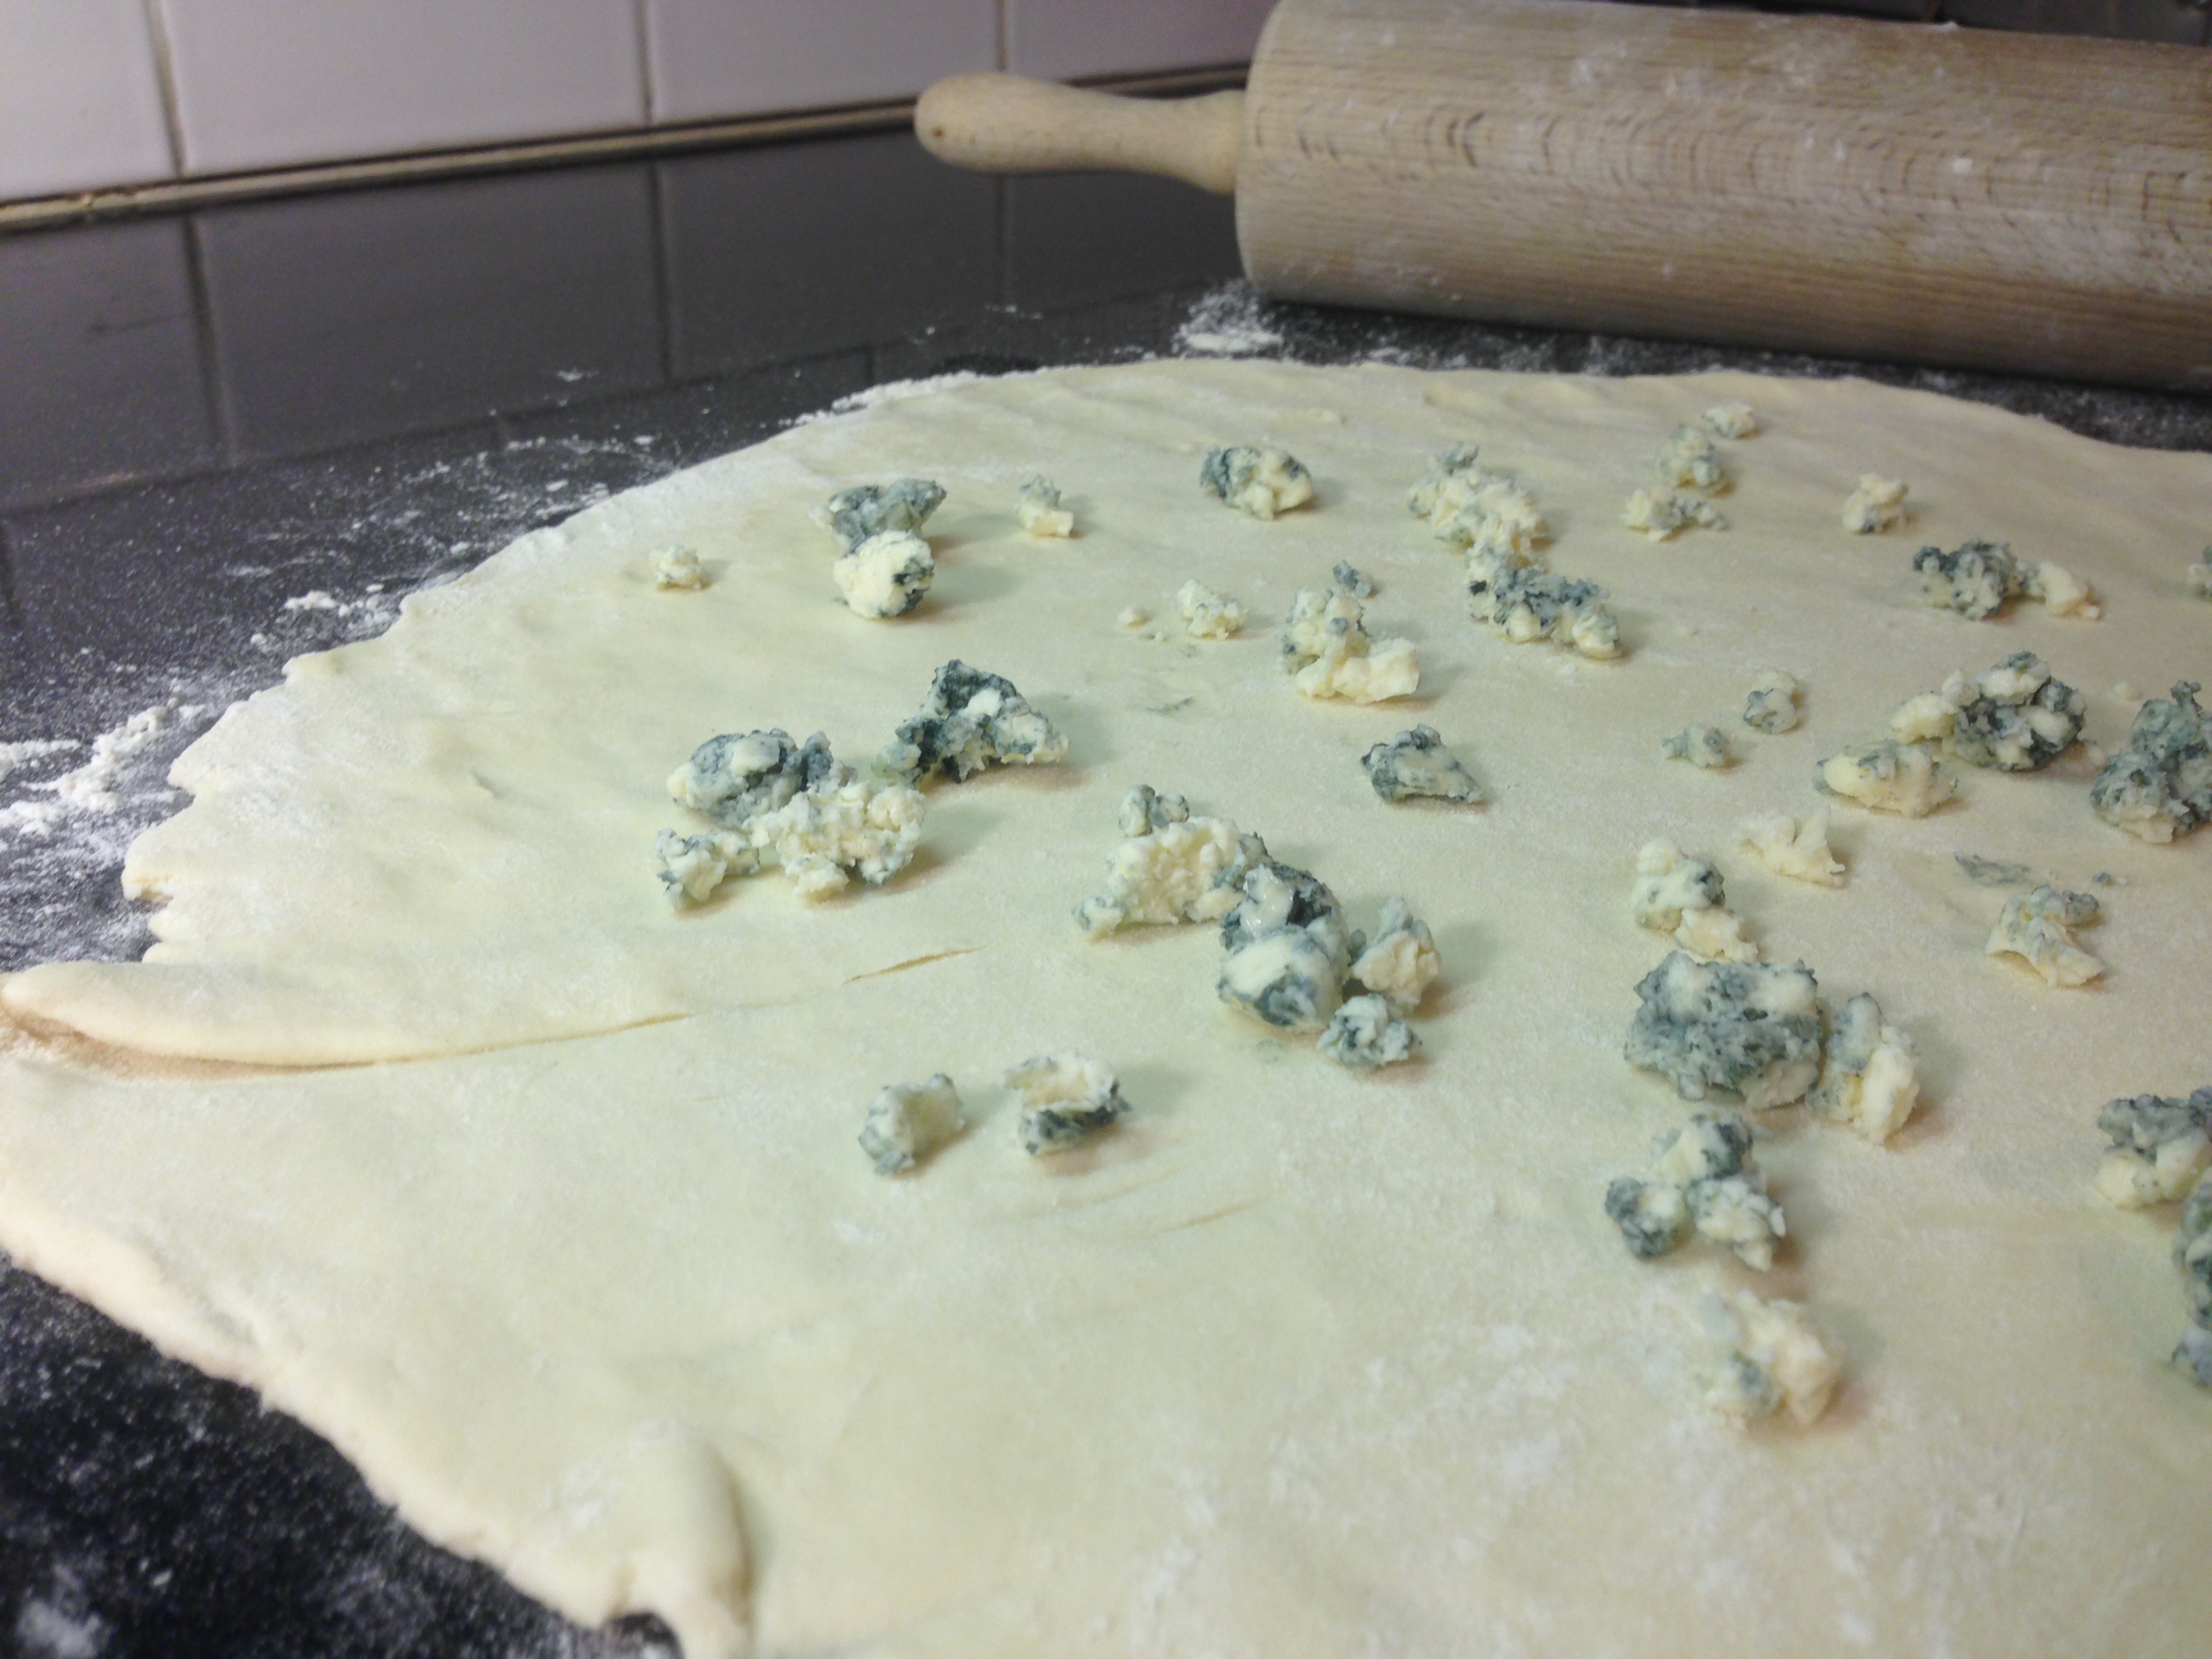
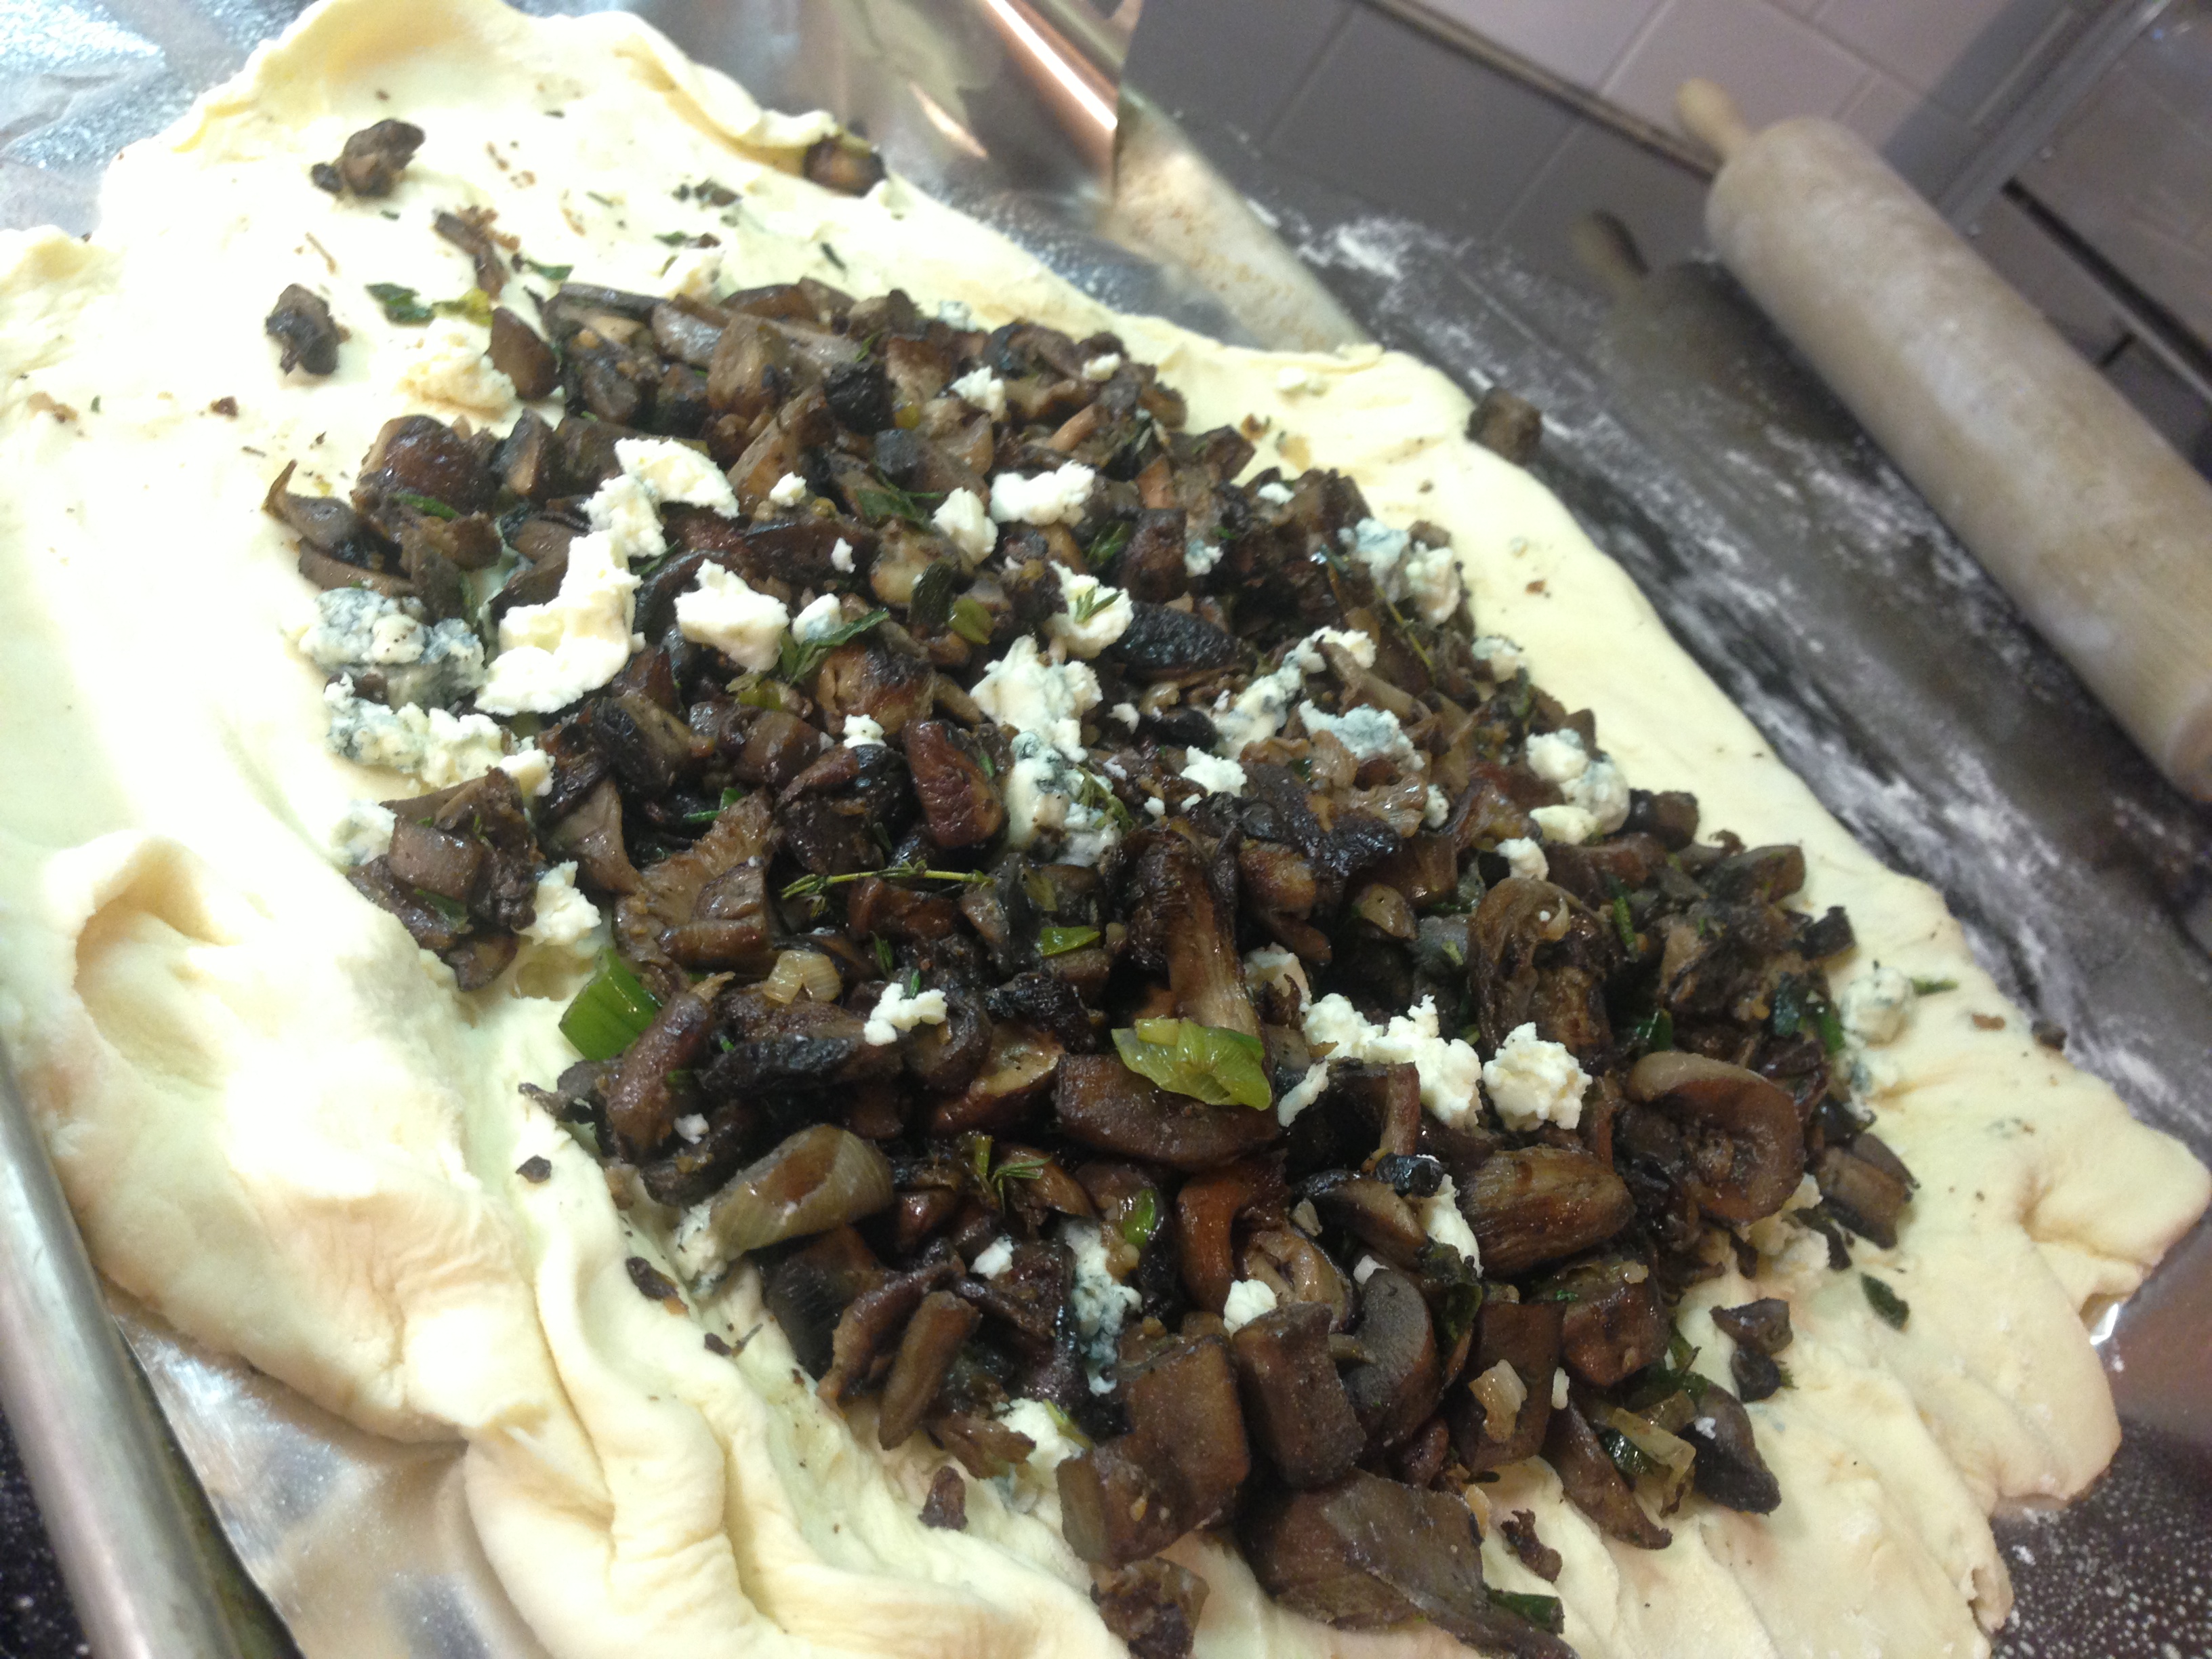
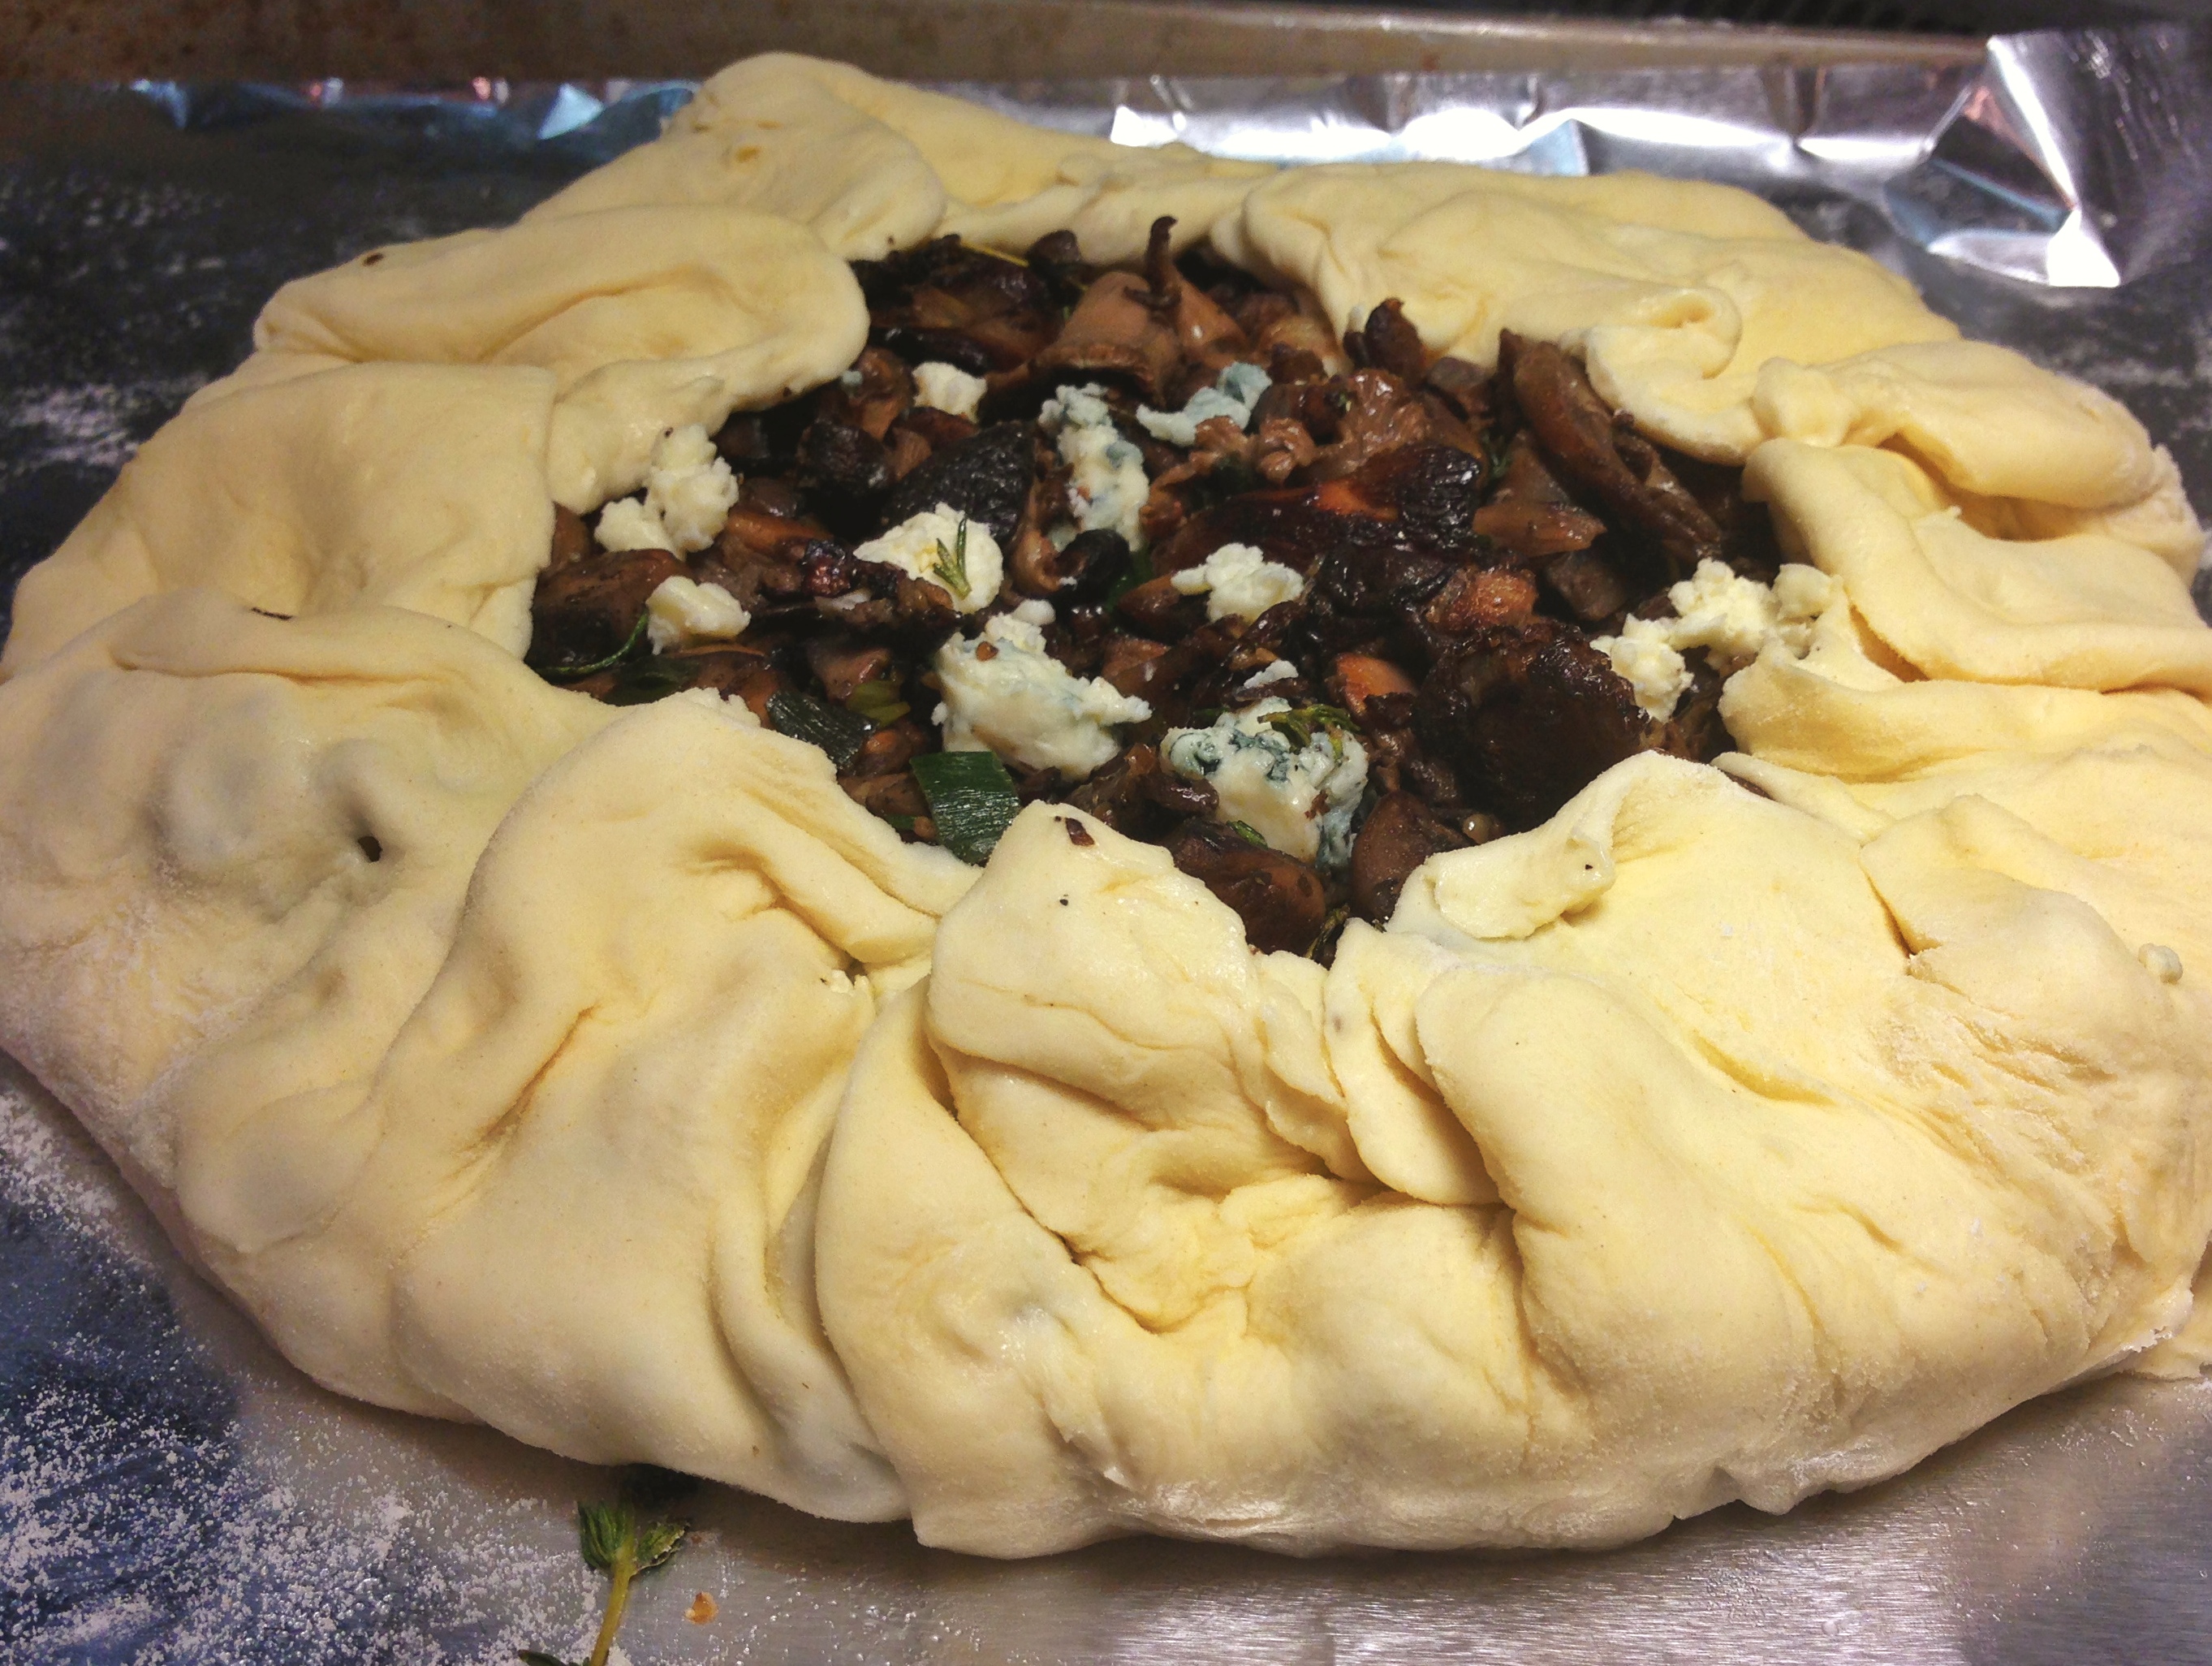
So – I made this galette last night.  It is basically an open-faced pie without the benefit of a pie plate to shape it.  They can be made sweet or savory.  This one is, obviously, savory.  I used a mix of crimini, portobello & oyster.  You can use any mix you like or use all white mushrooms.  It doesn’t matter.  I used blue cheese.  You can use goat cheese or feta or gorgonzola – your call.  I made the crust from scratch.  You can use a pre-made crust – or even a filo pastry.  Don’t get intimidated.  Just do whatever works for you.

I also made a faux bacon from eggplant slices.  It doesn’t taste like bacon AT ALL but it is smoky and oddly satisfying.  And the eggplant I used looked like a gorgeous leopard.  Not sure why.  I ate a bunch just standing there at the stove – trying to fill my head with other sensory experiences than dead rat.  Then – perhaps all doped up on the toxic fumes that had filled my house all day –  I FORGOT to use it in the galette recipe!  So – I just took bites of it as I ate my slice of galette & it was very yummy.  So – I will include the faux bacon as a potential ingredient but it certainly is not necessary.  If you are a whore for real bacon – feel free to fry some up & crumble it into the mushrooms when they are done.

Finally – I want to note that photographing cooked mushrooms is a tricky business.  They tend to get very dark & photograph as inky muck – so – be kind.

10-23-13 (90)

Mixed Mushroom & Blue Cheese Galette in Sour Cream Pastry with Smoky Eggplant Faux Bacon (Vegetarian)

INGREDIENTS

For the Sour Cream Pastry Crust

1 1/4 cups flour

1/2 tsp salt

1/2 cup (1/4 pound) of butter – cut into small cubes & then FROZEN

1/4 cup sour cream

2 tsp fresh lemon juice

1/4 ice water

For the Mixed Mushroom & Blue Cheese filling

Between 1-1.5 lbs mixed mushrooms (I used crimini, portobello & oyster) – sliced thin or coarsely chopped

4 TBS butter

4 garlic cloves – minced

3 scallions – sliced (white and green parts)

1/2 cup sherry (or dry white wine)

1 tsp chopped fresh rosemary

1 tsp chopped fresh thyme

4 ounces blue cheese (or goat cheese or feta or gorgonzola or other) – crumbled

S&P

For the Smoky Eggplant Faux Bacon

1/2 large eggplant – sliced 1/8 thick

2 TBS soy sauce

1/2 tsp liquid smoke

10-23-13 (134)

DIRECTIONS

For the Sour Cream Pastry Crust

Combine salt & flour in a bowl (I did all this in my food processor but it can be done in a bowl, too).  Add the butter & mix or pulse until just combined & it resembles a coarse meal.

Whisk the sour cream, ice water & lemon juice together.

With a wooden spoon (or pulsing in the food processor), slowly add the sour cream mixture until you get large lumps.  Collect into a large ball of dough & wrap in plastic wrap & refrigerate for at least an hour.

10-23-13 (49)

For the Mixed Mushroom & Blue Cheese filling

In a large saute pan, melt 2 TBS of the butter (half the butter) over high heat.  Add the mushrooms and a scant pinch of salt & fry them over high heat until they release their liquid & then most of it has evaporated off.  Add the garlic & scallions & saute until the mushrooms begin to brown & sear a bit.  Add the sherry & cook it off then lower the heat to medium.  Add the second 2 TBS butter & the herbs & saute until well combined.  Add salt and pepper to taste.  Remove from heat & allow to cool.

Crumble the cheese & set aside.

Parsley – chopped – as garnish

10-23-13 (30)

For the Smoky Eggplant Faux Bacon

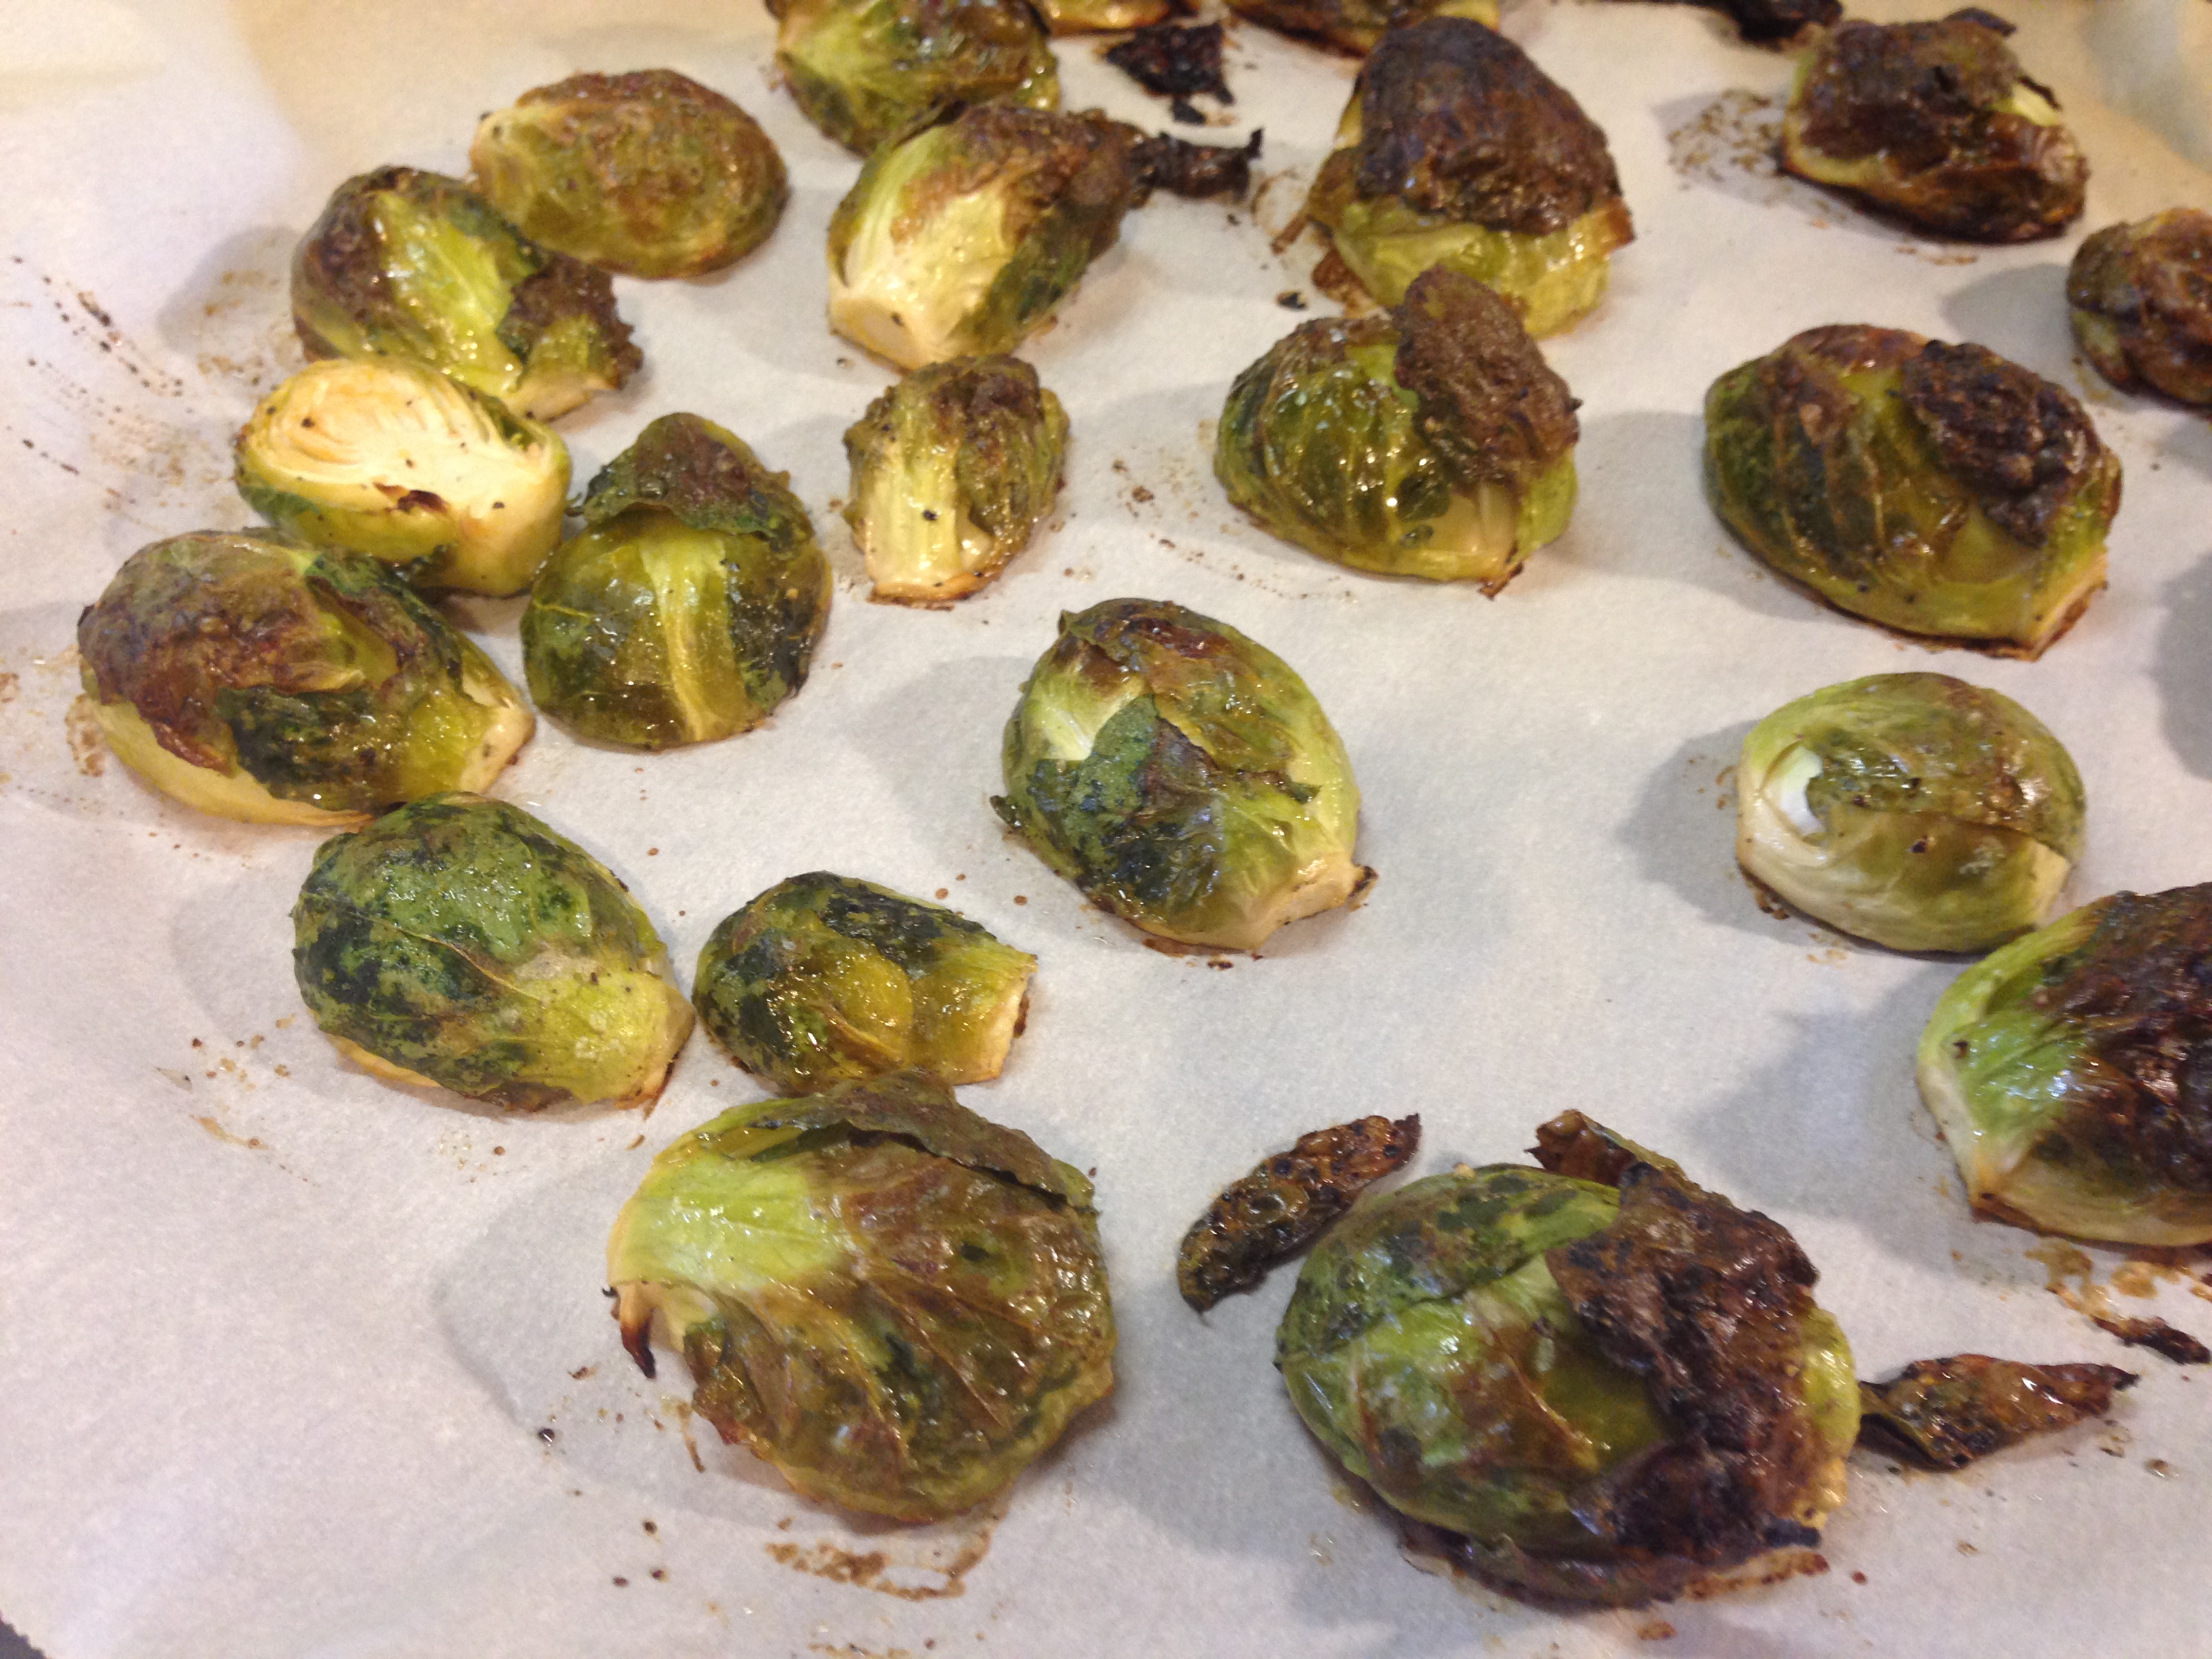
Heat the oven to 425 & prepare a cooking sheet with cooking spray.  Place the eggplant in a single layer & bake 8 minutes on one side & flip & cook another 3-5 – until it begins to brown.  You might need to do this in several shifts to cook all your eggplant.  Remove from the oven & allow to cool a bit.  Lower the oven temperature to 350.

Mix the soy sauce & liquid smoke in a bowl.  Dunk each slice of cooked eggplant in the liquid & put back on the cooking sheet.  Cook another 3-5 minutes.

Eat it like it is – or layer it into your galette.

10-23-13 (126) 10-23a-13 (1)

To assemble the galette

Heat the oven to 400 degrees.

On a floured surface – roll your sour cream pastry out to about a 12 inch circle.

Place the crust on a cooking sheet treated with cooking spray or topped with parchment paper or foil treated with cooking spray.

If you are using the faux bacon – layer it on the crust leaving 1.5 inch border (to be folded over later).

10-23-13 (52) 10-23-13 (53)

Drop 2/3 of the cheese onto the crust leaving that 1.5 inch border (to be folded over later). Top with the mushroom mixture (leaving that border) & then fold the edges over the top – pleating if you can – leaving the center uncovered.

10-23-13 (130)

Bake for 30 minutes or so & then top with the remaining cheese crumbles.  Bake another 5-10 minutes or until your crust is golden.

Remove from the oven & allow it to rest 5 minutes or so before cutting into it.

Garnish with chopped parsley & indulge!!!

10-23-13 (137)

Truffled Celery Root Mixed Grain Risotto Tower with Roasted Beets, Pan-fried Cauliflower & Basil Jus

1 Comment


All Photos © Christine Elise McCarthy 2013

To see images of my past posts & get links to the recipes – look on my Pinterest board – HERE.

~

This might look intimidating but it is not.  It just requires a few easy steps.  Most of it could be substituted with other ingredients, too.  For example – hate beets?  Use carrots or corn or sweet potato instead.  Trader Joe’s mixed grain thing not available to you?

Image

Use a regular risotto.  Celery root unavailable or yucky to you?  Make your risotto with whatever ingredients you prefer.  Don’t have fancy food mold ring to create the tower?   Use a bowl or just free form it on the plate for a more rustic presentation.

I loved this dish.  The celery root absolutely held its own despite competing with a lot of other flavors here from white truffle oil to roasted beets & garlic to the fried cauliflower to the basil oil.   This dish was served closer to warm-room temperature than what I would call hot – primarily because there are so many ingredients to time properly – but I liked it just warm.  It might also be served hotter if you don’t spend 15 minutes trying to get the perfect photo of it.

Speaking of which – I am often asked what I use to photograph the food.  The answer?  My iphone 5 and a construction lamp.  See?

ImageImage

That is all I have going on.  I have limited dishware & napkins etc with which to present my recipes and I am beginning to feel my images are starting to look a lot alike but that is just the reality of doing it all DIY on a shoestring budget.  But THIS dish – this will definitely wow folks on any plate.  I hope you try it.

2-10-13 (35)

PRINT THIS RECIPE

Truffled Celery Root Mixed Grain Risotto Tower with Roasted Beets, Pan-fried Cauliflower & Basil Jus

INGREDIENTS

For the risotto

1 lb Mixed grains (or risotto or other rice)

1 large celery root – peeled & diced

2 cups milk

1 cup Parmesan – grated

White truffle oil to drizzle – (VERY optional)

For the roasted beet & garlic puree

6 small beets

4 TBS heavy cream

4 cloves garlic

For the pan-fried cauliflower

1 head cauliflower

1-2 TBS olive oil

For the basil jus (basil oil)

1 cup fresh basil

3/4 cup high quality olive oil

DIRECTIONS

For the beet & garlic puree

Halve your beets (or quarter them if the are large) & drizzle them with olive oil.  Toss them with the garlic cloves & roast them & the garlic (add lots of extra garlic so you can have some extra around for future recipes) in a 400 degree oven for 30-45 minutes or until tender.  Check frequently & remove the garlic if it browns quickly & is done before the beets.  When roasted – cool a bit then puree the beets, 4 roasted garlic cloves & the heavy cream in a food processor.  Set aside.

For the basil jus

Plunge the basil in boiling water for 30 seconds.  Plunge it in cold water, drain & squeeze out the water.  Puree the basil with olive oil in a food processor.  Set aside.

For the pan-fried cauliflower

Slice the cauliflower into 3/4 inch steaks.  Heat the olive oil & fry the cauliflower until browned on both sides.

Alternatively – you could roast the cauliflower (tossed in olive oil) in a 400 degree oven for 30 minutes or until it is soft & beginning to brown.  My photo here is of florets roasted in the oven.  The assembled tower images show cauliflower pan-fried as steaks.

Image

For the risotto

I cooked the bag of mixed grains as per the directions.

Bring the milk to a boil, add the diced celery root to the milk, reduce heat & simmer for about 20 minutes or until the celery root is soft.

Blend the celery root, the milk it cooked in & the cheese in a food processor until smooth.  Add to the cooked grains & blend completely.  Drizzle with truffle oil (if using) – sparingly, as it can really overpower the other flavors.

ImageImageImageImage

TO ASSEMBLE

I used a food ring like this

Image

and simply put a layer of risotto then beet puree then cauliflower.  I drizzled it with the basil jus & topped it with watercress.  You could build yours backwards in a greased ramekin & flip it or in a bowl & flip it – or just present it in a more casual, rustic, unformed way.

PRINT THIS RECIPE

Image

Mixed Cabbage & Grilled Corn Slaw

1 Comment

All Photos © Christine Elise McCarthy 2013

To see images of my past posts & get links to the recipes – look on my Pinterest board – HERE.

~~~~

I made this slaw to go inside fish tacos but it is a great stand-alone slaw.  I grilled corn on the cob & used that in this – but not grilled is fine.

Easy, easy, easy.

Image

PRINT THIS RECIPE

Mixed Cabbage & Grilled Corn Slaw

INGREDIENTS

3 cups red cabbage – sliced thin

2 cups green cabbage – sliced thin

2 cups corn (2 ears grilled in their husks & cut from the cob or raw – or canned/frozen, in a pinch)

1/2 cup mayonnaise

1/4 cup Mexican Crema (or more mayonnaise)

1/2 red onion – sliced thin

1 tsp Old Bay seasoning

1 tsp ground cumin

1 tsp chili powder

2 limes – zest & juice

1 cup cilantro – chopped

Image

DIRECTIONS

Grill your corn still in their husks – rotating frequently.  After about 20 minutes – check to see if they are beginning to char (you want that).  When they are – give it 5 more minutes or so then let them cool.  Peel & cut the corn from the cobs.  Or – go raw or canned or frozen.

Mix the mayonnaise & crema (if using) with the spices & lime zest.  Blend all the ingredients (except cilantro) in a large bowl and chill for an hour or more.  Sprinkle with cilantro and lots of cracked pepper when serving.

PRINT THIS RECIPE

Image